Inject Mode
Inject WPEHook.dll into the target process and hook the WinSock send / receive functions from inside it. This is the capture method closest to the program's own logic; the chapter walks the whole path from picking a target to editing packets.
WPE injects a small capture module into the target process, which hooks the send / receive functions of wsock32.dll, ws2_32.dll and mswsock.dll and sends what it captures back to WPE's own window. Nothing is drawn inside the target program.
When the target is already running and you do not need its start-up traffic, these six steps are the whole procedure.
- Click Inject Mode on the home screen, then the first card, Process, on the "choose an injection method" screen, and search for the target in the process table (the search matches the path as well as the name).
- Double-click the row (or select it and press Inject in the footer). Once attached, the interface stays in WPE's own window — nothing is drawn inside the target program.
- Open Settings ▾ on the right of the status bar → Hook Settings and tick the functions to hook. Everything is on by default; do not trim it down yet.
- When there are too many packets to follow, use Settings ▾ → Leach Setting to narrow what is shown by port, length or content.
- Press Start Hook on the status bar, make the target do something on the network, and packets stream into the list.
- Double-click a row to open Packet Edit, change bytes and press Send to replay. Once the pattern is confirmed, turn it into a Filter.
01 · Picking a target
Clicking Inject Mode on the home screen opens the Process List dialog.
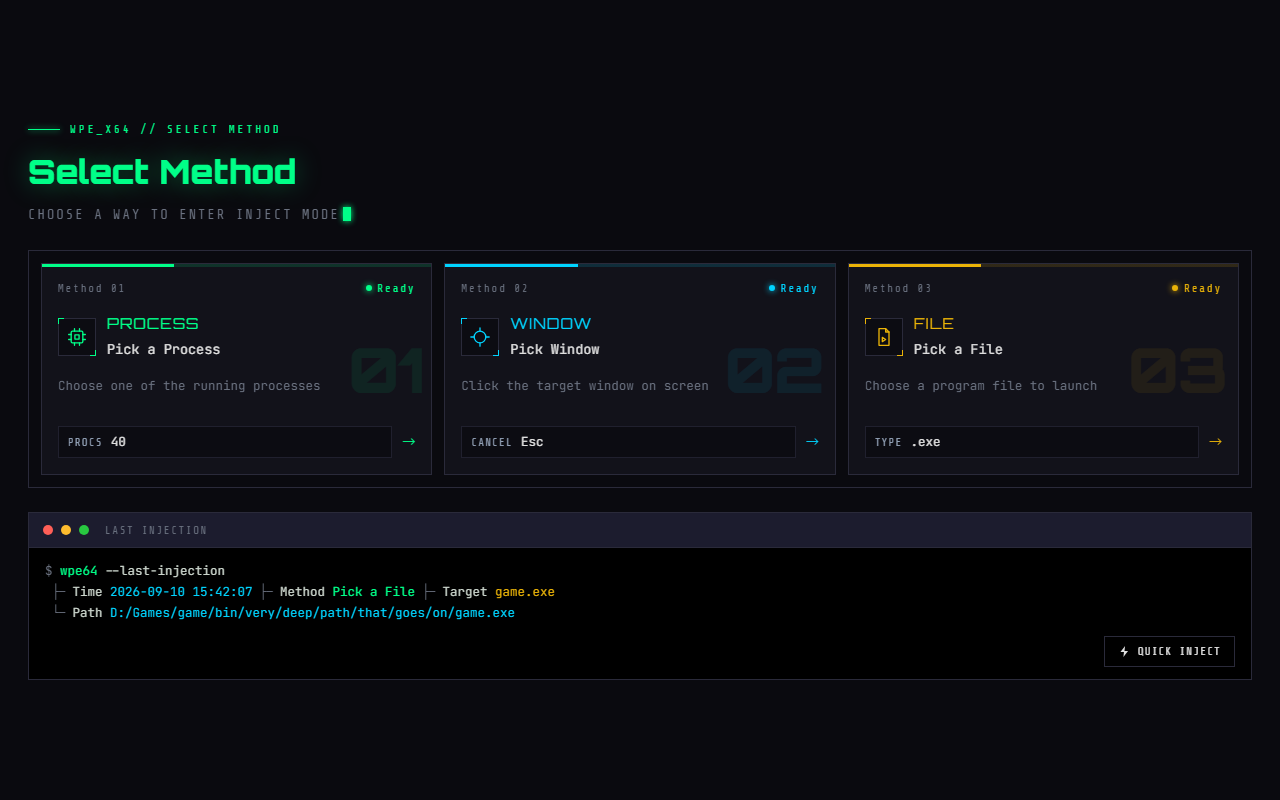
- Method 01 · Process: pick one of the running processes. It opens a searchable process table (name / PID / path — search matches the path as well as the name, which is the only way to tell several
svchostinstances apart). ThePROCSreadout is how many processes were enumerated - Method 02 · Window: WPE minimises itself and you click the target window on screen; Esc cancels. Use it when you do not know the process name but recognise the window (multi-instance games, emulator child windows)
- Method 03 · File: pick an executable that is not running yet. It is launched suspended and resumed once the hooks are in place — the only way to capture the start-up traffic. You also get to type command-line arguments
- Last injection (the terminal block): time, method, target and full path. Quick inject at the bottom right repeats that exact injection
- The process table never lists WPE itself
2.3 records more than the process name: time + method + target + full path + command-line arguments, five fields — which is what lets Quick inject repeat the last one exactly, arguments included when it went through "File".
⚠️ It does not record the PID: PIDs get recycled, and after a reboot the same number is usually a different process. It looks the target up by name every time.
Which way to pick
| Method | When to use it | Captures start-up? |
|---|---|---|
| Click in the list | the target is running and you know its name | No |
| Pick Window | you only know which window it is — multiple instances, emulator child windows | No |
| Pick Program | you need login or handshake packets from start-up | Yes |
After injecting via File the target sits suspended and looks frozen. It only wakes up once the hooks are in place, which is what pressing Start Hook on the status bar does.
02 · The main window
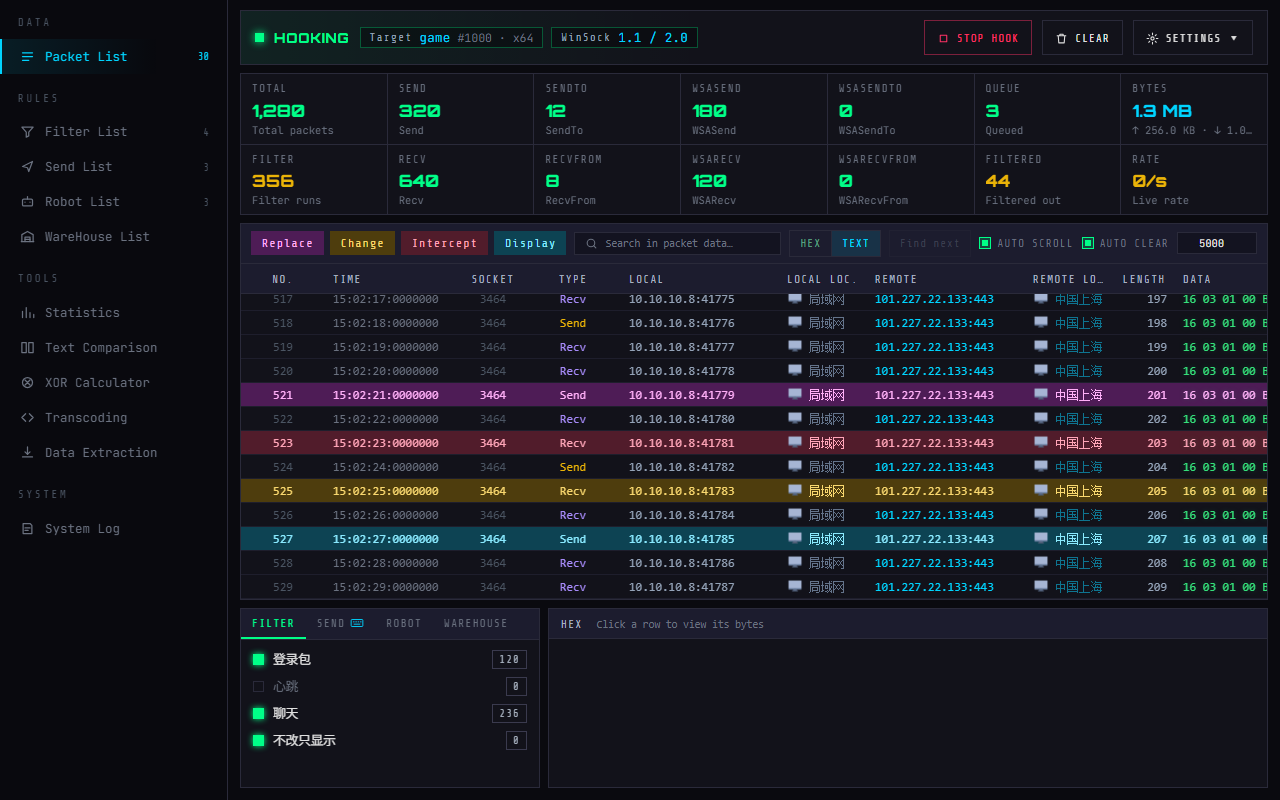
- Sidebar: four groups — Data / Rules / Tools / System — with 12 pages in total. The number on the right of each entry is a live count. the same layout as Proxy Mode
- Collapsing the sidebar: the button at the top right of the sidebar folds it into an icon rail (icons and counters only); press it again to expand. Useful on a narrow window or when you only want the data
- Status bar: the lamp and the state word (Disconnected / Attached / Hooking), the target process and its bitness, the WinSock version; then Focus List, Start / Stop Hook, Clear and Settings ▾
- Focus List: the toggle on the right of the status bar. It hides the statistics grid, the lower pane and the dropped-packet notice so the packet table gets more height; the status bar and common actions stay available — click again to restore
- ⚠️ There is no Disconnect button: the hooks are removed from the target automatically when WPE exits, so switching to another target means restarting WPE. If the target exits on its own, this screen keeps its data and shows a notice at the top; the captured packets can still be viewed and exported
- Statistics grid (7 × 2): column 1 is the total and the filter execution count; columns 2–5 are vertical pairs (send ↔ receive: Send↔Recv, SendTo↔RecvFrom, WSASend↔WSARecv, WSASendTo↔WSARecvFrom); column 6 is the queue and the filtered count; column 7 is bytes and live rate
- Toolbar: four colour chips on the left are the filter-action legend (Replace / Swap / Intercept / Display only), the search box in the middle, and Hex/Text, auto-scroll and auto-clear on the right
- Packet list: columns can be dragged and double-clicking a divider restores the default width. Rows a filter matched are coloured whole, matching the legend chips
- Lower half: the quick panel on the left (six tabs: Filter / Send / Robot / WareHouse / Decoder / Extractor, each row can be toggled straight from here) and the hex panel on the right — click a packet row to see all of its bytes
- Settings ▾ holds the 7 dialogs inject mode has: Leach, Hook, List, Hotkey, Backup, Remote management and System
- Title bar: the leftmost button is Back to start page (Inject Mode only) — you can go back to pick another mode or change settings without closing the program; then come the gear (Preferences), the pin (keep on top) and the window buttons
If the third segment of the info bar shows only WinSock, without 1.1 / 2.0 / Microsoft after it, the target has not loaded any WinSock module yet — the hooks cannot attach and nothing will be captured. Make the program do something on the network, then inject again.
The lower half: quick panel and hex panel
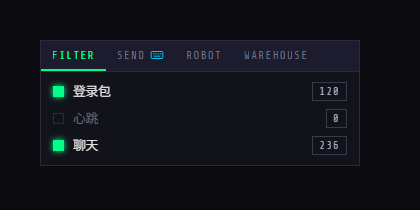
- Six tabs — Filter / Send / Robot / WareHouse / Decoder / Extractor — each row with a green checkbox on the left that toggles that entry and saves it immediately, without switching to the matching sidebar page; double-clicking a row opens its editor
- The number on the right is its execution count; disabled rows are dimmed as a whole
- The cyan keyboard icon beside the "Send" tab shows which list the global hotkeys currently act on. Hotkeys 1–10 fire the matching entry and 11 / 12 run the whole list, but that either/or setting lives inside HotKey Settings — until now there was no way to tell before pressing a key
- The context menu carries the rest: add / enable all / disable all for the whole list (Filter, Send and Robot also get reset counts, and Send and Robot get execute / stop), plus move to top, up, down, bottom, duplicate and delete for that row. The panel offers no export — export lives on each list page
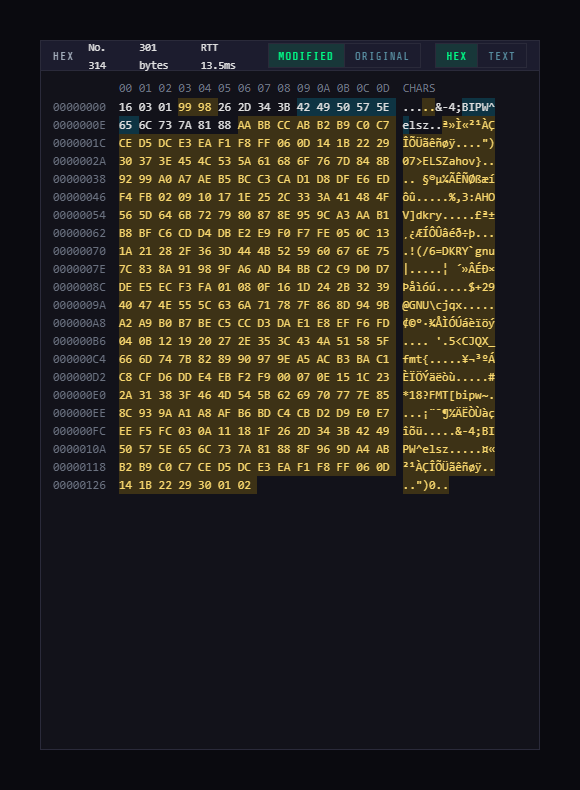
- Title bar: index · byte count · RTT (time from requesting the bytes to receiving them, excluding local rendering) · the after / before segment · the Hex / Text segment
- After / Before: for a packet a filter modified, these two compare directly — the differing bytes are marked amber
- How many bytes fit on a line is computed from the panel width, not fixed at 16 — widen the panel and you get more columns (rounded to whole 2-byte groups). The column header above scrolls horizontally with the body, so they never drift apart
- The right-hand column is "characters", not "text": a per-byte Latin-1 rendering, one cell per byte, aligned with the hex on the left.
0x00–0x1Fand0x7F–0x9Fshow as dots; everything else is drawn from its byte value - Select a range and right-click: copy text / copy hex / select all, plus "add to filters" and "add to send ▸" — with nothing selected it takes the whole packet
- When a search matches, the matching bytes are outlined here

- This and the "characters" column are two different things: this decodes the whole payload as UTF-8, that one is per-byte Latin-1
- The four HTTP / HTTPS packet types land on this tab by default (they are text protocols to begin with); everything else defaults to hex. After you switch by hand, selecting another packet re-decides by type
- It wraps and never scrolls sideways: this panel is only half a screen tall and is there to be read — dragging sideways pushes away the half-sentence you were reading. Long runs without spaces break too
- ⚠️ Search hits are only highlighted on the Hex tab: the Text tab is one block of text with no byte-level selection
- ⚠️ Packets from Chinese games are usually GBK, and this tab only decodes UTF-8, so those come out as mojibake. Read them from the "characters" column against the hex, or copy them into the encode/decode workbench
03 · Starting a capture
- First open Settings ▾ on the right of the status bar → Hook Settings and tick the functions you need (next section). This must be done before pressing Start Hook.
- If needed, narrow the display with Leach Setting.
- Press Start Hook on the status bar: the hooks go live, and a target created suspended (the "File" route) is woken at the same moment.
- Make the target do something on the network; packets stream into the list.
- Stop Hook removes every hook and restores the target; Clear empties the queue, the list, the data panel and the matching group of counters.
04 · Hook Settings
This decides which hooks get installed, and therefore what can be captured at all.
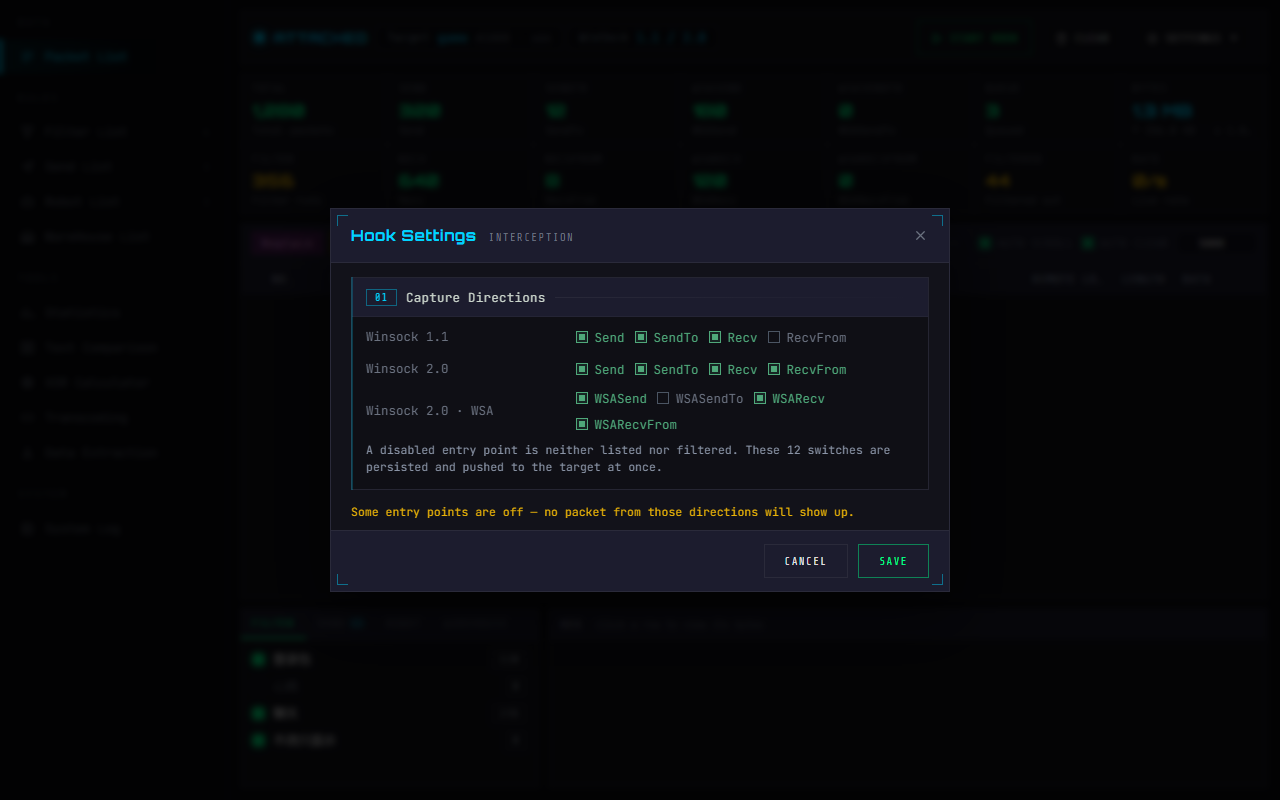
- Winsock 1.1 (
wsock32.dll): send / sendto / recv / recvfrom - Winsock 2.0 (
ws2_32.dll): the same four entry points — most modern programs use this group - Winsock 2.0 · WSA:
WSASend/WSASendTo/WSARecv/WSARecvFrom— the asynchronous family, very common in games. The WSARecv switch also coversWSARecvExinmswsock.dll - ⚠️
WSARecvExis not hooked on 64-bit targets: to keep the target from crashing, that one entry point is skipped on 64-bit targets and a line is written to the system log; the other 12 entry points work as usual - Turn an entry point off and its packets neither reach the list nor the filters. All 12 switches are persisted and pushed to the target process immediately
- The amber line at the bottom only appears when something really is switched off — nine times out of ten "I capture nothing" is this
Hooks are created one by one at the moment you press Start. Changing Hook Settings afterwards has no effect — you must Stop, change, then Start again.
05 · Leach Setting (display only)
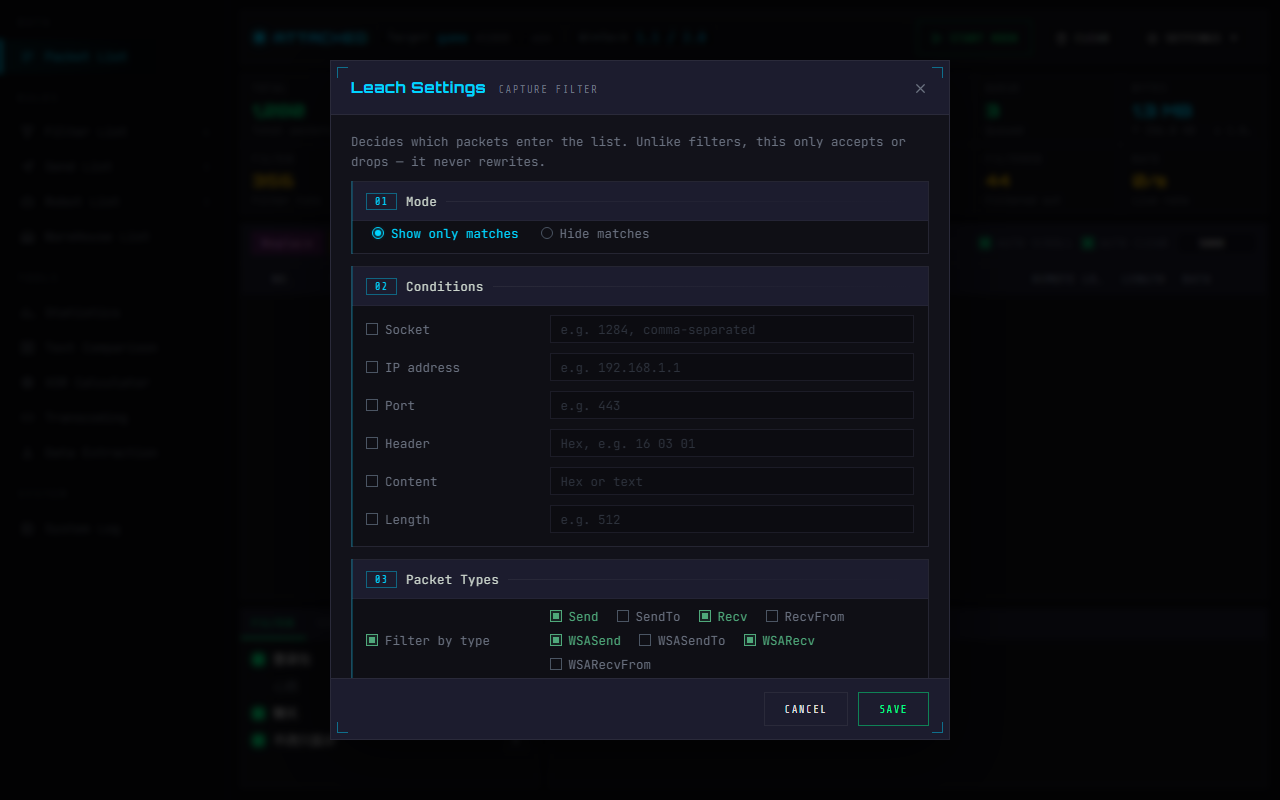
- Direction: "show only matches" or "hide matches" — one set of conditions, usable both ways
- Six conditions: socket, IP address, port, packet head, content, length. Only ticked ones count, and several ticked conditions are ANDed
- Categories: inject mode offers the eight WinSock categories that line up with the 12 hook entry points; proxy mode offers TCP/UDP request and response instead. Before 2.2 this dialog wrongly offered proxy mode's four in inject mode, so ticking them matched nothing
- ⚠️ Ticking a condition and leaving its value empty is now rejected: letting it through would filter out every packet, which is far harder to diagnose than an error
- It only decides what reaches the list; it never alters packet content — that is what filters are for
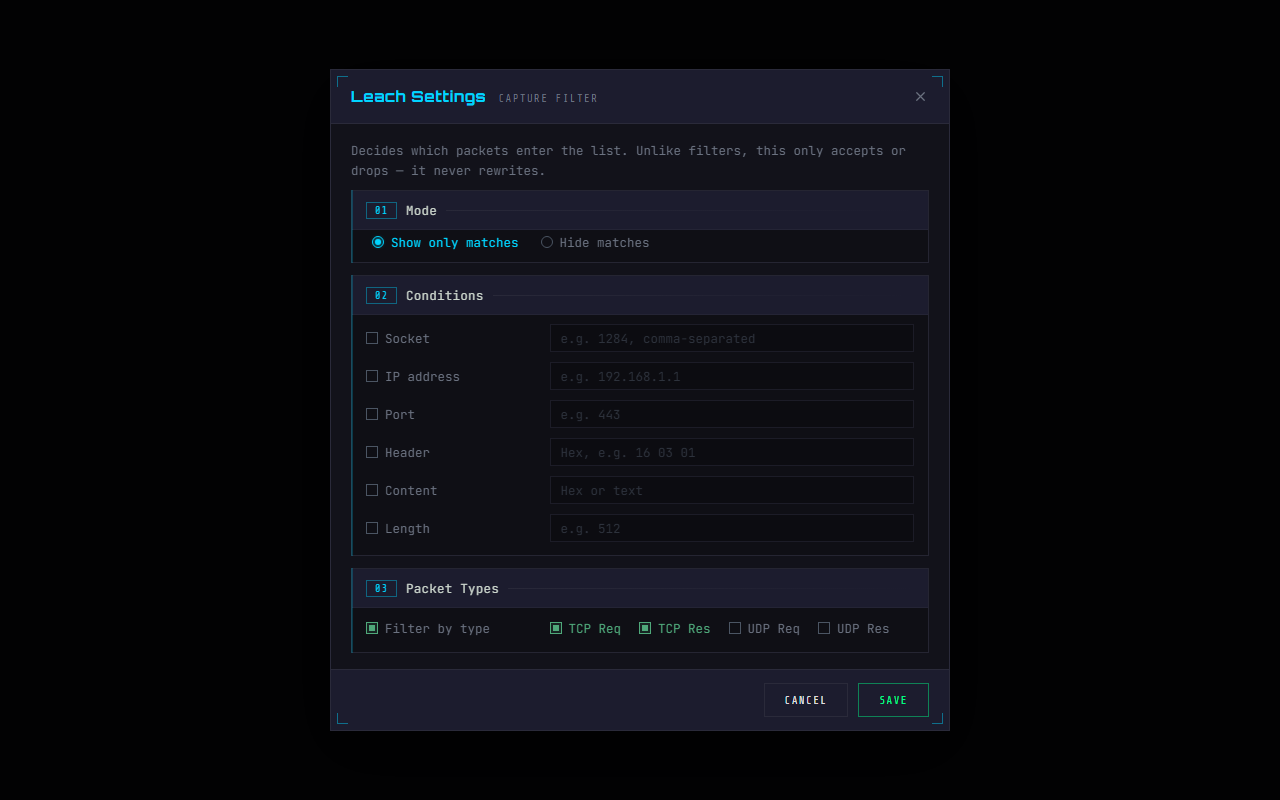
- The direction and the six conditions are identical; the only difference is the categories group at the bottom — Proxy Mode offers
TCP request / TCP response / UDP request / UDP response, Inject Mode the eight WinSock categories - ⚠️ Before 2.2 these two were crossed: Inject Mode showed the four proxy categories, which could never match no matter what you ticked. The two sets are stored separately, so changing one mode never touches the other
- With the "filter by category" master switch off, all four are dimmed — categories take no part in the decision then
06 · List Settings
It does exactly one thing: which columns the list shows, stored per mode (inject and proxy keep separate sets that do not affect each other).
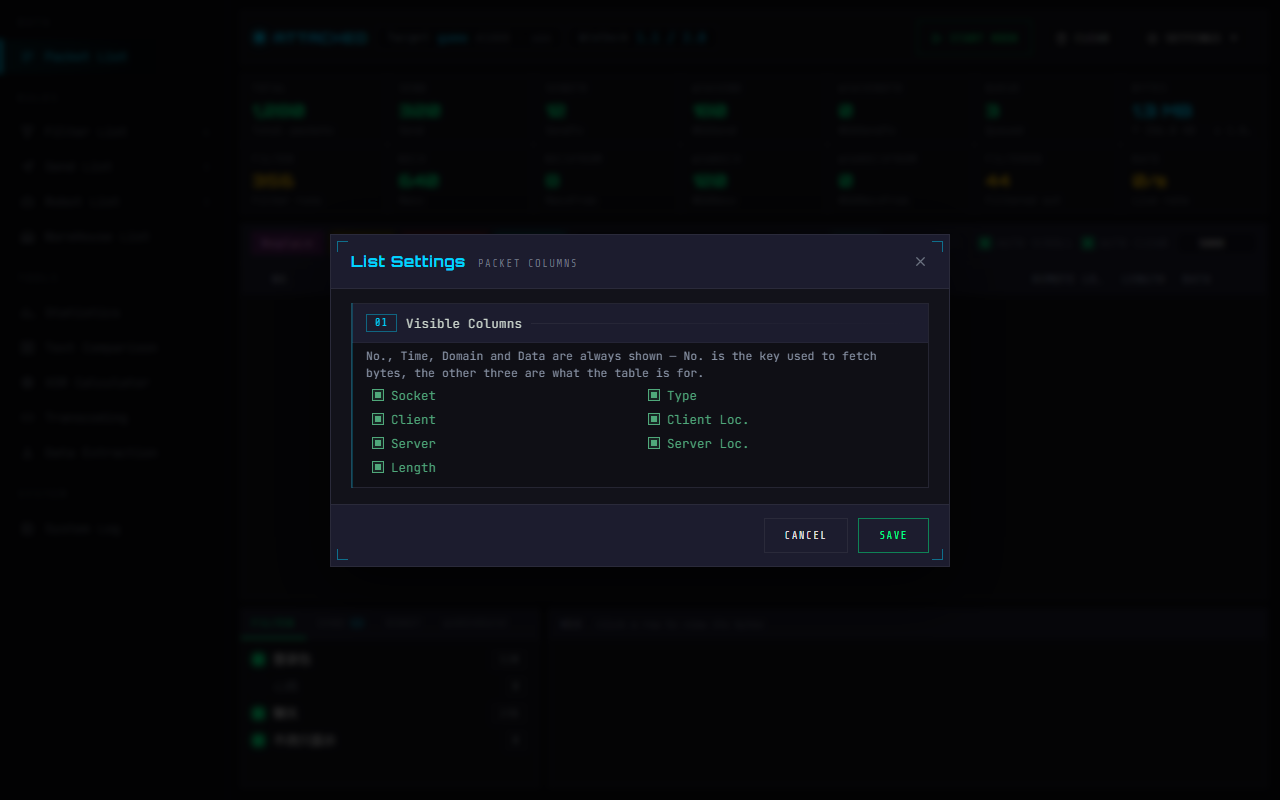
- The seven you can hide: Socket · Type · Client · Client location · Server · Server location · Length
- No., Time, Domain and Data are always shown, and the grey line in the dialog says why — No. is the key used to fetch the bytes, and the other three are the point of the table
Turning off the two Location columns cuts a lot of overhead during heavy capture — behind them sit a QQWry offline lookup and flag-icon rendering.
It sits on the packet list toolbar (a checkbox plus a row count), next to the table it governs. Past the limit only the oldest rows go and the most recent N are kept. The log page has its own auto clear on its own toolbar, and the two are independent.
No. is the key used to fetch the bytes (clicking a row to see its full content goes through it), and Time and Data are the point of the table. Older builds let you hide them; 2.3 does not.
07 · Search Packet
① Hex search ignores case and spaces: 0A1B2C and 0a 1b 2c find the same thing.
② "Find next" walks hit by hit: a packet with three matches stops three times before moving on to the next packet.
- Search box: what you type is a regular expression, not plain text
- The Hex / Text segmented button to its right decides what is matched:
Textis the packet decoded as UTF-8;Hexis one continuous uppercase hex run - Find next: the list scrolls to the hit and selects it, and the hex panel below outlines the matching bytes. At the end of the list it wraps around; only after a full lap does it report "no matching packet"
- To start over, change the query or clear it with Esc / the × — the cursor goes back to the beginning. (2.2 removed the separate "search from start" button; it could do nothing that Find next cannot)
- The rest of the toolbar: the four colour chips on the left are the filter-action legend; auto-scroll and auto-clear are on the right
Example: to find TLS records starting with 0x16 0x03, choose Hex and enter ^1603.
08 · Editing and replaying packets
Double-click a row, or right-click → Edit. This is where hand-editing and replaying actually happens.
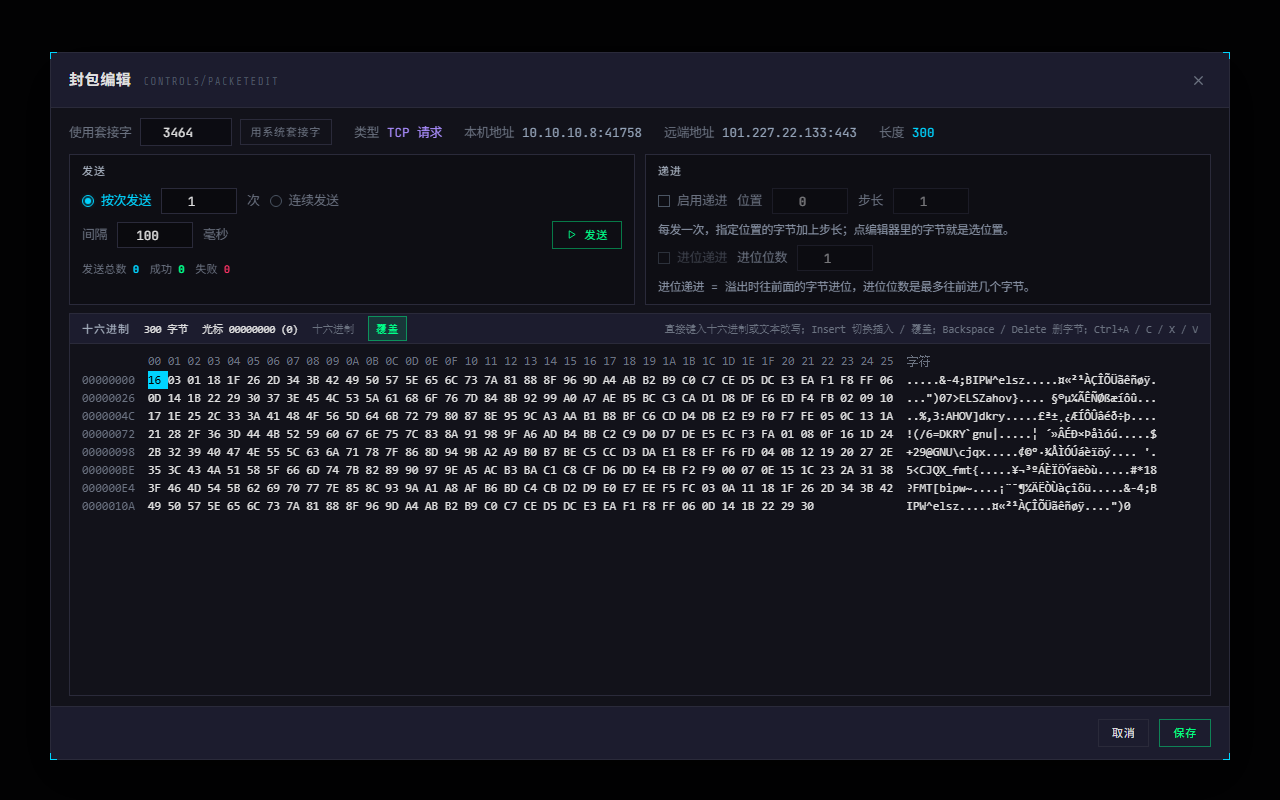
- Info bar: socket in use, type, local address, remote address and length. Without an available socket, the packet cannot be sent back on its original connection.
- Send (left): "send N times" or "send continuously" until you press Stop; an interval of 0 means no sleep. Totals, successes and failures update live
- Progression (right): every send adds step to the byte at position. With "carry" ticked an overflow carries into the preceding bytes, up to the number of digits given — this is how you deal with a sequence field
- Hex editor: type over the bytes directly. Insert switches between overwrite and insert, and the outlined pill on the title bar shows which you are in (green = overwrite, amber = insert) — inserting grows the packet, so it gets the more cautious colour
- The right-hand column is "characters", not "text": it is a per-byte Latin-1 rendering, one cell per byte, aligned with the hex on the left. For decoded text use the Text tab of the hex panel, which decodes UTF-8
- Context menu: add to filter list, add to send ▸, copy text, copy hex, select all
- Save writes the edit back into that row of the list; Cancel changes nothing
Which channel a send goes through
| Condition | How it is sent |
|---|---|
socket > 0 | calls the native send / sendto / WSASend API matching the packet type |
= 0 | no socket is available for sending on the original connection |
= 0 with type UDP_* / WebSocket_* | same as above |
= 0 with type HTTP_* / HTTPS_* | cannot be sent — always reports failure |
09 · The packet list right-click menu
| Item | Shortcut | What it does |
|---|---|---|
| Edit | — | opens the Packet Edit window |
| Copy | Ctrl+C | copies the selected rows to the clipboard as hex text, one per line |
| Add to Send ▸ | — | the submenu lists every send item; the selected packets are appended to it |
| Add to Filter List | — | creates a filter from the selected packet, prefilled with its content |
| Add to WareHouse ▸ | — | stores it in the chosen warehouse |
| Set System Socket | — | makes that row's socket the global System Socket |
| View Packet Modification | — | shows the original and the filtered packet side by side |
| Export to Excel | — | exports the selected rows — or all of them — to .xls |
| Add to Text A / Text B | — | sends it to Text Comparison for diffing |
| Select all / deselect | Ctrl+A | — |
Catch the packet → right-click Add to Filter List, which fills the search row for you → double-click the filter to set its action and modify row → switch it on. That is the shortest path from seeing something to changing it.
10 · Comparing original and modified
Right-click → View Packet Modification puts before and after side by side, so you can confirm exactly which bytes a filter touched.
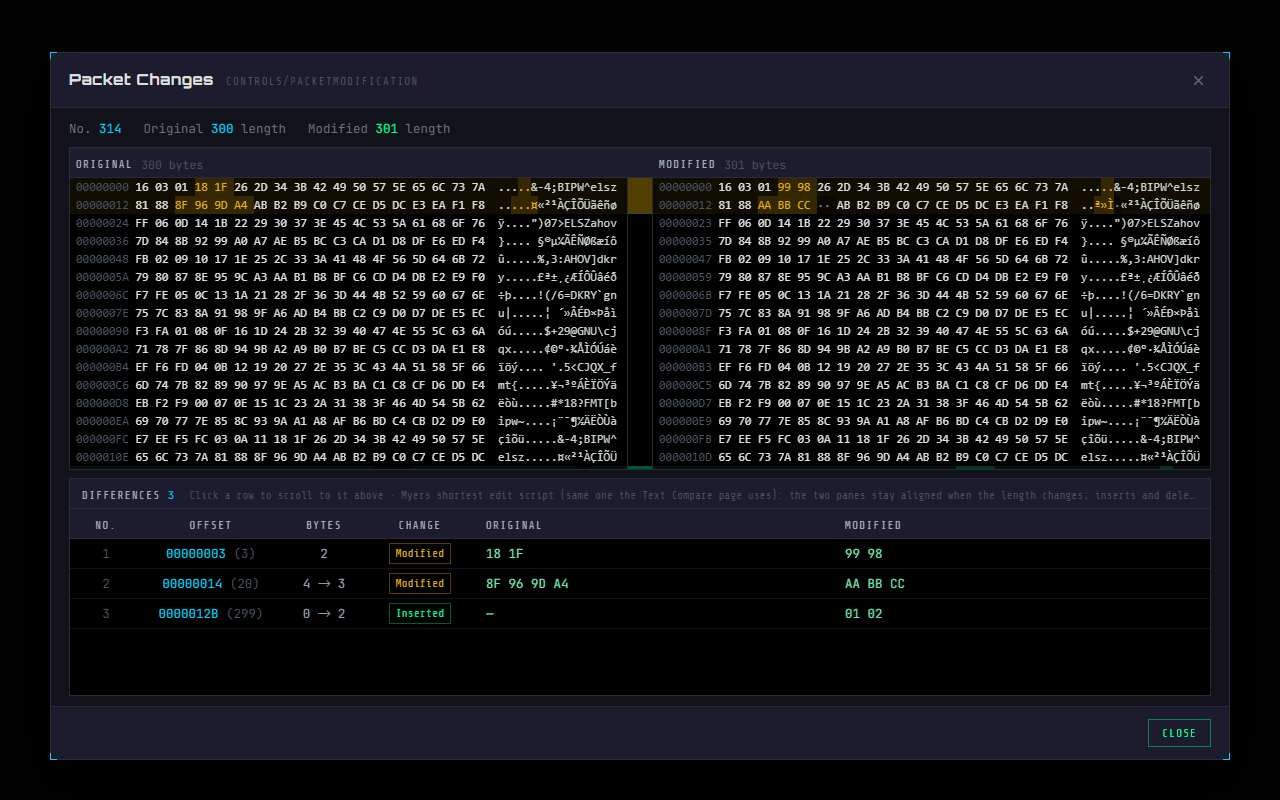
- The line at the top gives the index, the original length and the modified length — different lengths mean the filter changed the packet size
- Side-by-side view: before on the left, after on the right, differing bytes in amber. It compares the same way as the Text Comparison page: when a filter's Replace changes the length, the two columns still line up and only the part that really changed is marked
- A length change still lines up: the side with the insertion or deletion is held open with filler cells, so the offsets on the right run a few bytes behind the left while the two columns stay aligned
- Difference table:
no. / position / bytes / change type / old value / new value. Click a row to scroll to it above; the change type is modified, added or deleted - ⚠️ The "bytes" column may read
4 → 3: meaning that spot has a different length before and after - Old and new values are capped at 24 bytes, with "… +N" beyond that — a whole-packet replacement is thousands of bytes and unreadable spelled out
11 · Troubleshooting
In order: ① is WPE elevated; ② does the target have anti-cheat or anti-injection protection (if so use Proxy Mode); ③ are WPEHook.dll, EasyHook32/64.dll and EasyLoad32/64.dll all present; ④ was the launcher unblocked; ⑤ read the full exception in the System Log.
① Is the WinSock version on the status bar empty (it is filled in the moment you attach, without waiting for you to start capturing); ② are the right functions ticked in Hook Settings; ③ a rising Leach counter at the bottom means the display filter is hiding them; ④ is Speed Mode on in System Settings; ⑤ does any filter use the NoModify NoDisplay action.
Expected. That path creates the process suspended; it is woken only once the hooks are in place, which is what pressing Start Hook on the status bar does.