Getting Started
This chapter covers installing and launching, the three entry points on the home screen, multi-instance databases, and the core concepts used throughout the tutorial. By the end you will know whether Inject Mode or Proxy Mode is the right route for you.
Written against 2.5. The interface is the Vue 3 + WebView2 one (sidebar navigation, seven languages, light and dark themes); the WinForms / AntdUI screens are gone.
Every UI figure here is a real screenshot in dark mode (1280 × 800), not a hand-drawn diagram. The numbered list under each figure walks the screen top to bottom, left to right; the bold phrase that starts each item is the on-screen label of the control it describes.
Still on 1.0.0.36? Download the legacy tutorial PDF (Chinese).
Walk through it once and get to the point where packets appear on screen. The reasoning behind each step is unpacked in this chapter and the ones after it.
- Run the unzipped
WPE64 v2.5.exeas administrator (the first run unpacks the program first) to reach the three cards on the home screen. - Pick a route: ordinary desktop programs and emulators go through Inject Mode; HTTPS in the clear, phones and other machines go through Proxy Mode (the devices connect with WPC).
- Inject Mode: choose an injection method first (Process / Window / File), then pick the target and you are attached. The interface stays in WPE's own window — nothing is drawn inside the target program.
Proxy Mode: open Settings ▾ on the right of the status bar → Proxy Settings, tickEnable SOCKS5 proxy(port 1080 by default) and save. - Set the capture scope: same Settings ▾ menu — Hook Settings in Inject Mode for the send / receive functions, Leach Settings in Proxy Mode for the TCP / UDP request and response categories. Do this before you press Start.
- Press Start Hook (Inject Mode) / Start (Proxy Mode) on the status bar, make the target program do something on the network, and packets stream into the list.
- Double-click any row to open the packet editor, change a few bytes and press Send — that is the full capture → edit → replay loop in miniature.
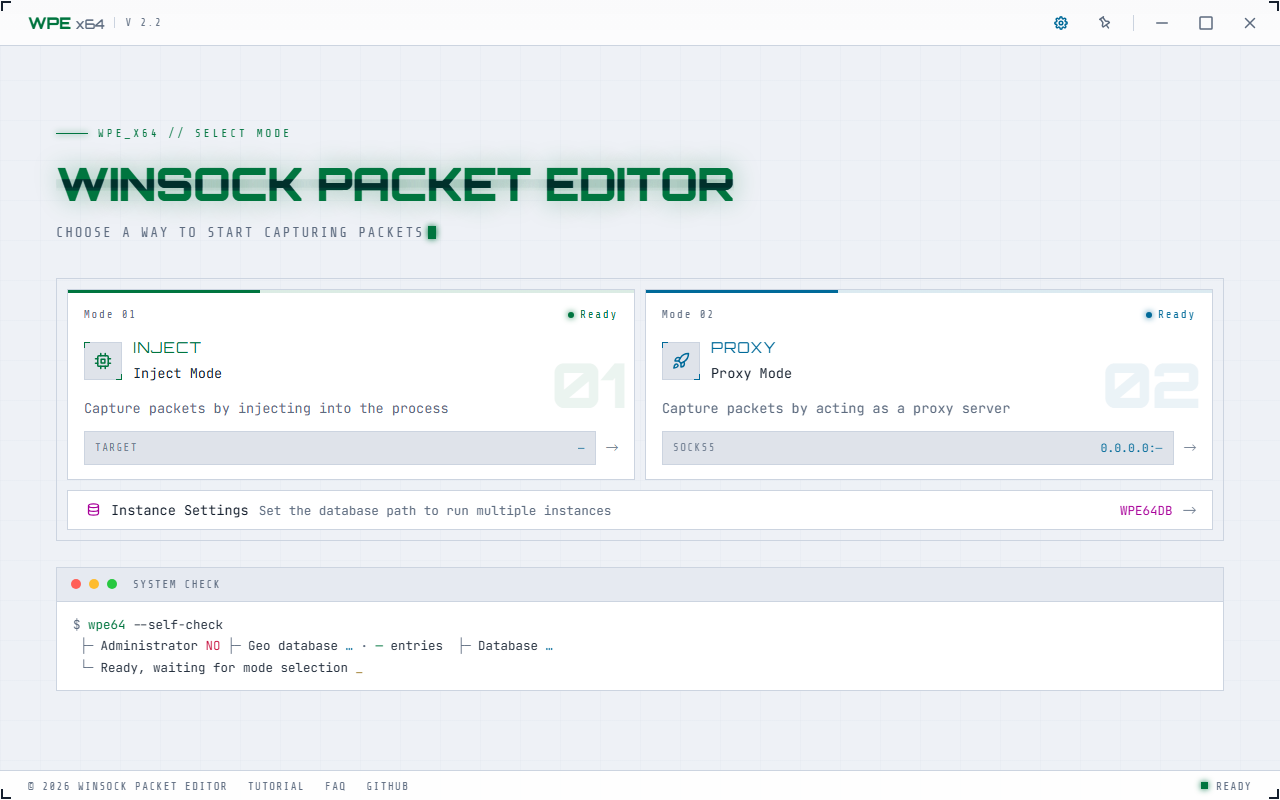
- The theme is switched from the gear in the title bar (dark / light / follow system), see section 11 of the Tools chapter
- Not a simple inversion: the layout is exactly the same, only the colours change to a light palette
- Each neon colour is dimmed just enough to be readable on light, with its hue unchanged — at a glance it is still the same palette
Requirements
| Item | Requirement |
|---|---|
| OS | Windows 10 / 11 · Server 2019 / 2022 (x64 recommended) |
| Runtime | .NET Framework 4.8 |
| UI runtime | WebView2 Runtime (built into Windows 11; usually present on Windows 10 via Edge). If it is missing WPE walks you through installing it — see First launch |
| Privileges | Administrator required. The launcher asks for elevation through UAC as soon as you double-click it |
| Target program | 32-bit and 64-bit both supported; the hook module matching the process is selected automatically |
| Data storage | SQLite, C:\WPE64DB\<version>.db by default (2.5.db for this release) |
| Distribution | Single-file launcher WPE64 v2.5.exe, shipped in WPE64 v2.5.zip: the first run unpacks into %LOCALAPPDATA%\WPE64\app\<version>-<hash>\, and every launch verifies and repairs the files. No installer, nothing in Add or Remove Programs, no auto-update |
Download and install
WPE x64 has nothing to install: the zip you download holds a single launcher exe and its checksum file — no entry in Add or Remove Programs. To remove it, delete the launcher, %LOCALAPPDATA%\WPE64\ and the database folder.
The WPE64 v2.5.exe inside the zip carries the complete program. On first run, or after a version change, it shows a progress window while unpacking into %LOCALAPPDATA%\WPE64\app\<version>-<hash>\; after that every launch quickly checks the files, repairs anything missing or damaged, starts WinsockPacketEditor.exe and removes old version folders that are not in use. Injection and the interface both need real files on disk, which is why the program is unpacked first.
- Download and unzip: pick the latest build on Downloads, from either Lanzou or Baidu Pan (the pan link already carries the extraction code) to get
WPE64 v2.5.zip, then unzip it to getWPE64 v2.5.exeand its checksum file. - Unblock it first: right-click the downloaded zip (before unzipping; if you forgot, do it on the unzipped exe) → Properties → tick Unblock at the bottom → Apply. Do this before the first run — see the warning below.
- Double-click to run: accept the UAC prompt (see First launch). The first run shows the unpacking progress and then opens the program; the launcher itself can sit on the desktop, another drive or a USB stick. If SmartScreen shows "Windows protected your PC", click More info → Run anyway.
Windows tags files downloaded from the internet with Zone.Identifier, and unzipping passes the tag on to the exe. Run it while it is still blocked and the tag carries over to the unpacked files, which usually means STATUS_INTERNAL_ERROR (Code: 15) when you inject. If you forgot, it is recoverable: unblock the launcher (right-click → Properties → Unblock), delete its version folder under %LOCALAPPDATA%\WPE64\app\, and run the launcher again.
.NET Framework 4.8 is required. Windows 10 1903 and later ship with it, so normally there is nothing to do. If launching complains about a missing runtime, install the .NET Framework 4.8 runtime from Microsoft and try again.
Upgrading to a new version
There is no auto-update — WPE never checks for versions and never prompts. Upgrading means repeating the steps above:
- Read the changelog on Downloads and check the new build has what you want.
- Download the new zip → unblock it → unzip it.
- Close the running old build — in Inject Mode press Stop and exit the injected program first — then run the new exe.
- No need to delete the old version folder yourself — the new launcher removes old version folders that are not in use. The settings databases under
C:\WPE64DB\are not touched, but they are not carried over either (see below).
Settings live in C:\WPE64DB\<version>.db and the filename follows the version. So the first time a new build opens, filters, send lists, robots and proxy accounts all look empty — nothing is lost, it is simply still in the old version's .db.
To carry it across: export a .sb file from the old build via BackUp Settings, then import it into the new one. Worth doing before every upgrade.
First launch
- Double-click the launcher and choose Yes on the UAC prompt; on the first run (or after a version change) it shows the unpacking progress first.
- If the machine has no WebView2 Runtime, a dialog lists three steps (download → install → reopen); choosing Yes opens Microsoft's official installer. Install it, start WPE again, and you are through. Windows 11 and most Windows 10 machines never see this step.
- You land on the home screen, where you choose the working mode.
Home screen · two modes plus two settings entries
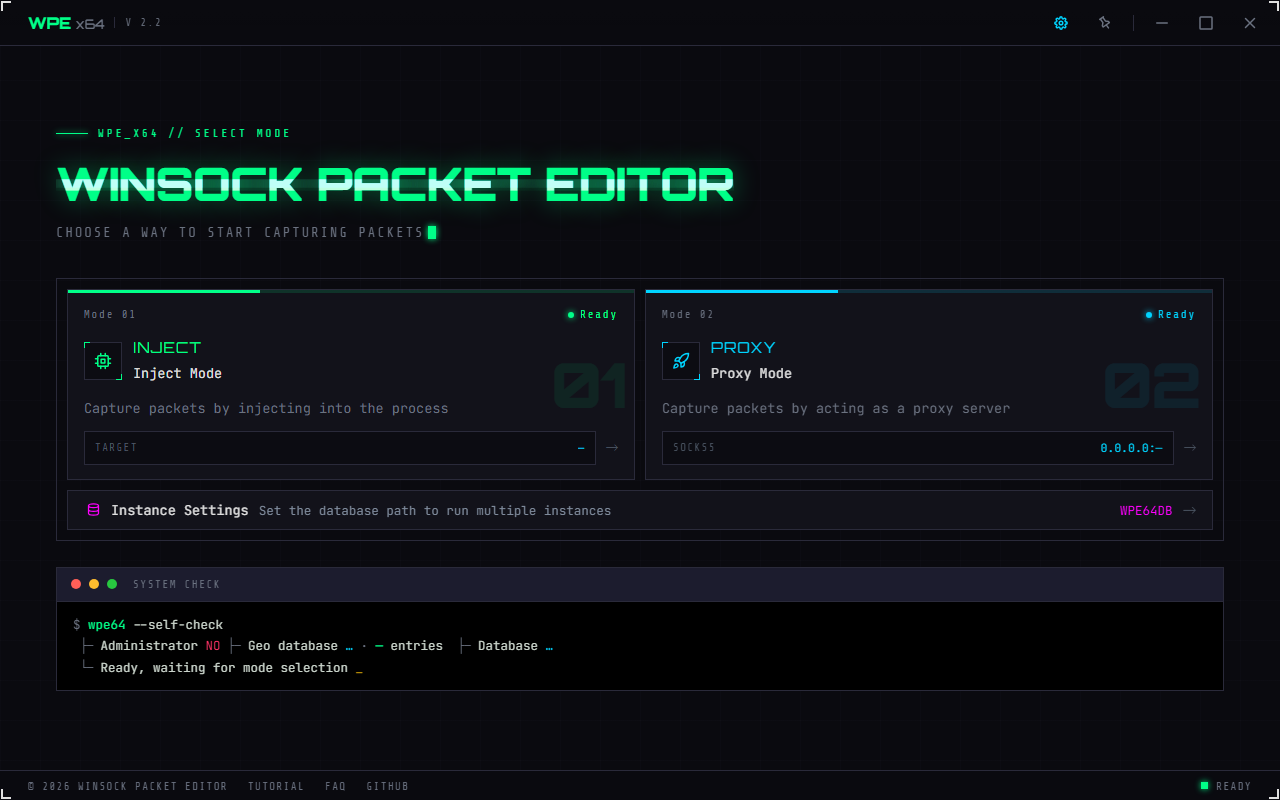
- Mode 01 · Inject: the whole card is clickable. It takes you to target selection → Chapter 2. The readout at the bottom of the card shows
TARGET, i.e. the target of your last injection - Mode 02 · Proxy: goes straight into the proxy main window → Chapter 3. Its readout shows the
SOCKS5listening address - Database Setting (the first narrow row under the two cards): switches the SQLite database folder for this session so you can keep several independent configurations (next section). The right-hand end shows the current database folder name
- MCP Settings (the second narrow row): connects an AI client on this machine to WPE; the right-hand end shows how many tools are available. See Chapter 8
- System check (the terminal block): administrator rights, the geolocation database version and row count, and the database location — all three are checked live at start-up. Start here when something goes wrong at launch
- Top right: the gear opens Preferences (language / theme / display / file icons), the pin keeps the window on top, then minimise, maximise and exit
- The status bar carries four outbound links on the left (website, tutorial, FAQ, GitHub) and the current state on the right
If the official domain is unreachable, WPE falls back to the backup IP http://101.132.222.195. On a machine with no internet, the external links simply doing nothing is expected.
Database Setting (multiple instances)
Every setting in WPE — system settings, filters, send lists, robots, the warehouse, proxy accounts, mappings, allow and block lists, WPC servers and notices — lives in one SQLite file. Which means:
A different database path is a different config set, and that is how you run multiple instances.
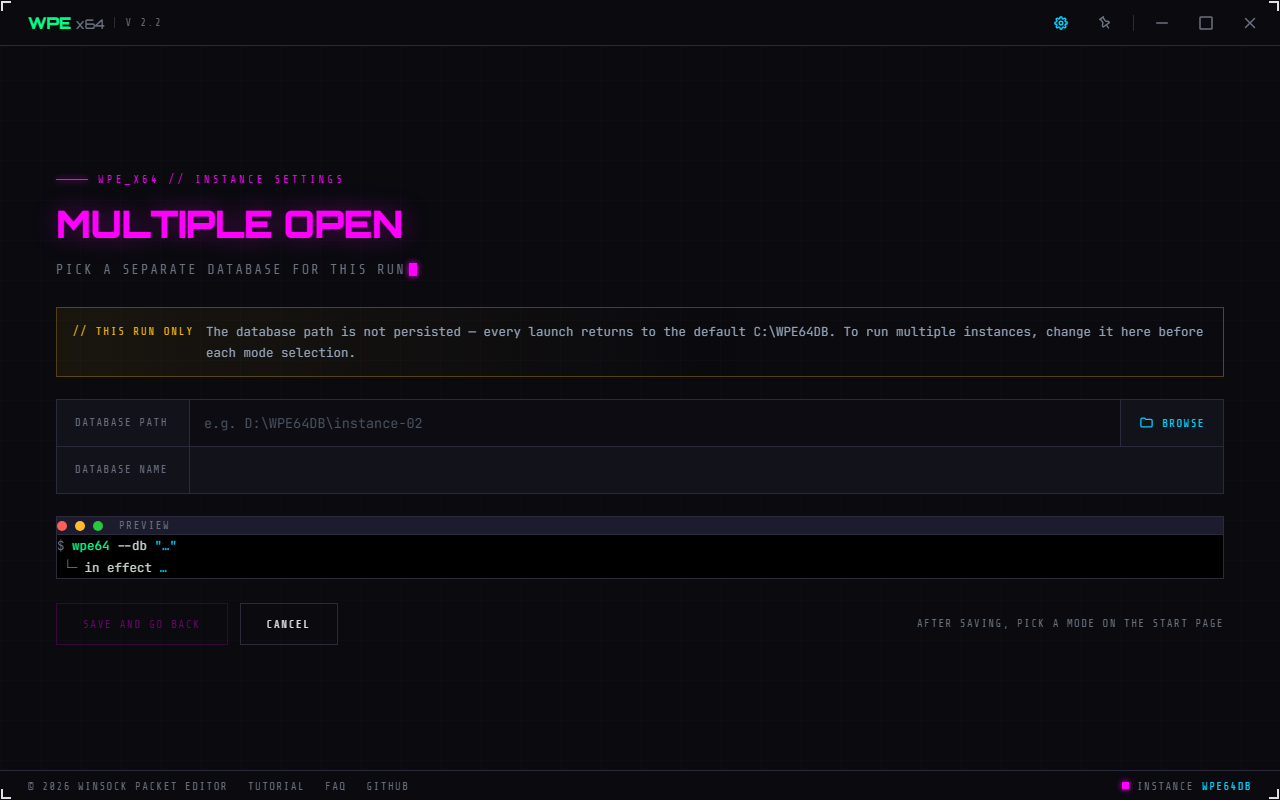
- Applies to this session only: the database folder is not saved; the next launch goes back to the default folder. Settings themselves live in the database, so "which database to use this time" cannot live there — you set it again on every launch
- 01 · Database folder: Folder path is
C:\WPE64DBby default. Type in the box, press Browse to pick a folder with the system dialog, or press Default folder to go back. A folder that does not exist is created; an existing one keeps the database file already in it - 02 · Database state: four lines update the moment the path changes — database file (
<version>.db), folder state (exists / will be created), database state (keeps the existing database / will be created) and current database. You know what Save will do before you press it - Database name follows the version number and cannot be changed: 2.5 uses
2.5.db. A new version therefore means a new database — which is why a fresh build starts out empty - Saving creates the database and its tables at that path immediately, then reloads the system configuration
Running a second instance
- Home screen → Database Setting, change the path to
D:\WPE_A, save. - Go back and choose a mode; from then on every setting is read from and written to the new database.
- For a second one: start another copy of WPE, set the path to
D:\WPE_B, save, then choose a mode.
In Inject Mode the injected program itself never reads or writes the database — filters, sends and robots are managed in WPE's window and handed over from there. So which database is in use is decided on WPE's side alone, and multiple instances never cross over.
Concept · choosing a mode
| Capability | Inject Mode | Proxy Mode |
|---|---|---|
| Mechanism | EasyHook injection + WinSock API hooks | Built-in SOCKS5 server + mihomo process interception |
| Where the UI lives | Inside the target process | WPE's own process |
| Packet types | Send / Recv / SendTo / RecvFrom / WSA* | TCP, UDP, HTTP(S) and WebSocket requests and responses |
| HTTPS in the clear | ✗ you get the encrypted bytes | ✓ decrypted by the built-in CA |
| Cooperation from the target | None needed, but anti-cheat may block it | Must use the proxy — other devices through WPC, local programs via the built-in core in Process Settings |
| Port / host mapping | ✗ | ✓ Map Local / Map Remote |
| Accounts / firewall | ✗ | ✓ Proxy accounts + allow and block lists |
| Edit / replay | ✓ / ✓ | ✓ / ✓ (HTTP(S) types cannot be replayed) |
An ordinary desktop program or emulator → prefer Inject Mode; the data is closest to the program's own logic.
A target with anti-injection protection, a need for HTTPS in the clear, or traffic from a phone or another machine → Proxy Mode, with WPC installed on the device (see Bringing in devices with WPC).
Concept · how a packet reaches the screen
Captured packets are not pushed straight to the UI — a message queue sits in between, and that is what lets WPE take millions of packets without freezing.
- The Buffer figure on screen is how many packets are queued up. A number that keeps climbing means rendering cannot keep up with capture — see performance tuning
- The list takes packets off the queue in batches; whatever cannot be moved at once stays queued. With Auto clear on, the queue is capped at the same row limit, and the oldest packets are dropped
- Speed Mode (System Settings) skips the queue entirely: nothing is displayed, but filters keep working — for high-volume work where you only need the edits, not the view
Concept · Leach Setting is not a Filter
The single most common beginner mix-up. The names look alike; the jobs are nothing alike:
| Leach Setting | Filter | |
|---|---|---|
| Acts on | the display only | the real network data |
| Modifies packets | No | Yes — Replace / Change / Intercept |
| Applied | on dequeue, as rows enter the list | at hook / forwarding time |
| Typical use | show only one port or one packet length | change values, drop heartbeats, auto-reply |
| Where | Status bar "Settings ▾" → Leach Setting | Sidebar → Filter List |
Concept · the four gates a packet passes
Four things in WPE sound like filtering, but they sit at different points along the path. When nothing is captured or edits do not take, walking this table top to bottom beats guessing:
| # | Gate | Where | What it controls | If it is off |
|---|---|---|---|---|
| 1 | Hook Settings | the source of hooking / forwarding | which hooks are installed and which packet types exist at all — 12 function switches for injection, TCP · UDP request / response for the proxy | those packets are never produced, and nothing downstream can help |
| 2 | Filter | before the packet is queued | the only layer that changes real data: Replace / Change / Intercept / Only Display / Not Display | data passes through untouched |
| 3 | Leach Setting | on dequeue, as rows enter the list | only what you can see; the network data is never touched | everything is displayed and the list floods |
| 4 | Map Settings | the HTTP traffic forwarded by the built-in SOCKS5 server | rewrites HTTP response bodies and targets — filters cannot reach these. ⚠️ HTTP only: HTTPS is encrypted, so its host and path cannot be matched | HTTP content is returned unchanged |
"Nothing captured at all" → check gate 1. "Counters rising but nothing in the list" → check gate 3, watching the Leach counter on the status bar. "The filter reports a match but nothing changed" → check whether it is an HTTP(S) type, which belongs to gate 4.
Concept · sockets and the System Socket
- Socket: the number column in the list — the socket handle of that connection inside the target process. Sending requires a valid socket; without one nothing goes out
- System Socket: a global variable, for cases like the Send List and Robots where the socket is not known in advance
- To set it: right-click in the packet list or proxy list → Set System Socket
- To use it: tick "use system socket" in the send editor, or use the robot instruction that sets it
- If it is ≤ 0, the log records that the system socket is not set and the send is abandoned
Concept · filter actions and row colours
The background colour of each row in the packet list tells you what a filter did to it:
| Action | Meaning | Default colour |
|---|---|---|
| Replace | rewrites some bytes of the packet per the rule | dark gold / black text |
| Intercept | drops the packet — never sent, never received | dark red / white text |
| Change | builds a brand-new packet from the filter's modify row | bright blue / black text |
| NoModify Display | leaves the content alone but guarantees the row is shown | light green / black text |
| NoModify NoDisplay | leaves the content alone and keeps it out of the list entirely | — (nothing to see) |
To change the colours, click the four colour swatches on the left of the packet list toolbar (on both the proxy and inject data pages). That edits Action Colors in place, each with its own Reset — you judge a colour by how it looks in the table, so the entry point is the legend itself, not System Settings.
Concept · packet types
WPE defines 23 packet types internally — the first 13 come from Inject Mode, the last 10 from Proxy Mode. The filter's packet-type switches group them into 12:
| Mode | Internal type | Filter packet type |
|---|---|---|
| Inject | WS1_Send / WS2_Send | Send |
WS1_SendTo / WS2_SendTo | SendTo | |
WS1_Recv / WS2_Recv | Recv | |
WS1_RecvFrom / WS2_RecvFrom | RecvFrom | |
WSASend / WSASendTo / WSARecv / WSARecvFrom, plus WSARecvEx (counted as WSARecv) | WSASend / WSASendTo / WSARecv / WSARecvFrom | |
| Proxy | TCP_Req / TCP_Resp | TCP request / TCP response |
UDP_Req / UDP_Resp | UDP request / UDP response | |
HTTP(S)_* / WebSocket_* | never matched by filters |
HTTP, HTTPS and WebSocket packets are never matched by a filter — there are only 12 packet-type switches and none of them covers these. Use Map Settings to change that content instead.