Proxy Mode
WPE turns itself into a SOCKS5 proxy server. No injection: plain HTTP lands in the list as-is, and HTTPS becomes readable once you add an HTTPS mapping rule and the WPE root certificate. Accounts, a firewall, mappings and process takeover through the built-in mihomo core come with it; phones and other PCs connect through the proxy client WPC.
Proxy Mode picks no process and injects nothing. Get the service running first, then decide how to route traffic into it.
- Click Proxy Mode on the home screen to go straight to the main window.
- Settings ▾ on the right of the status bar → Proxy Settings: make sure
Enable SOCKS5(port 1080 by default) is ticked — it is on out of the box, and it is the only listener Proxy Mode has.Require authenticationis on by default too, so clients need a proxy account to connect — create one first (or turn authentication off), then save. - Settings ▾ → Hook Settings: tick the TCP and UDP request and response boxes.
- Press Start proxy on the status bar to bring the service up, then check the System Log for the
SOCKS5 proxy : TCP [ … ]line. The status-bar readouts show the SOCKS5 listening address and whether TUN is ready. - Route traffic in: phones, emulators and other PCs connect through WPC — see section 10. A local program can point at the proxy itself, or be selected by name in Process Settings.
- Once data appears in the Proxy List: plain HTTP types are shown as plain text and are edited with Map Settings; TCP / UDP types are edited byte-wise with Filters. HTTPS stays encrypted until an HTTPS mapping rule and the root certificate are in place.
01 · The main window
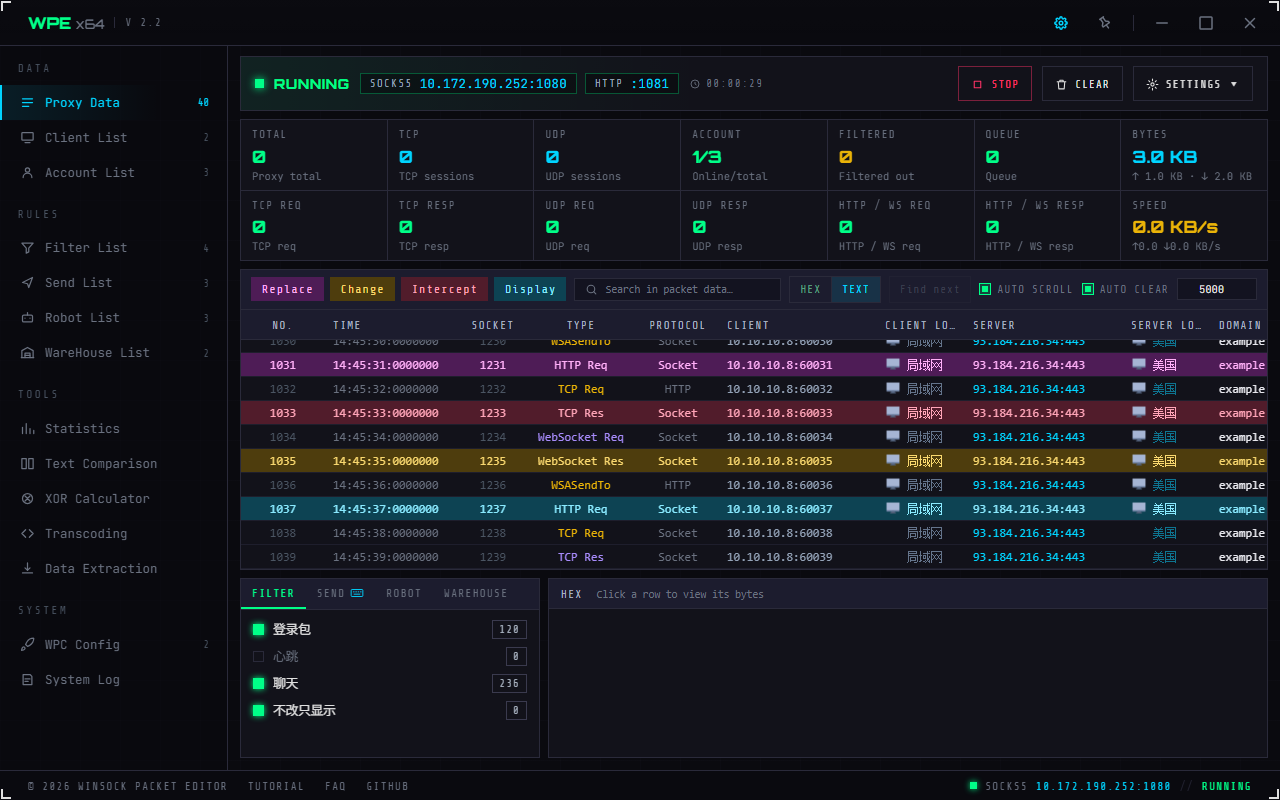
- Sidebar: Data (proxy data / client list / accounts) · Rules (filters / send / robots / warehouses / decoders / extractors) · Tools (statistics / text compare / encode-decode / extraction) · System (WPC config / system log) — 15 pages, each with a live counter
- Status bar: lamp plus Running or Stopped, the SOCKS5 listening address, TUN (whether the built-in core has taken over the selected processes; dimmed until ready, with a tooltip), uptime; then Focus List, Start/Stop proxy, Clear and Settings ▾
- Focus List: the toggle on the right of the status bar. It hides the statistics grid, the lower pane and the dropped-packet notice so the packet table gets more height; the status bar and common actions stay available — click again to restore
- Statistics grid (7 × 2): proxy total, TCP and UDP connections, online/accounts, filtered, buffer, bytes; the second row holds TCP and UDP request/response, HTTP request · response, and the live rate
- The two "HTTP request · response" cells count plain HTTP only; HTTPS is encrypted — to read it in the clear, decrypt it first with HTTPS mapping plus the root certificate
- Packet list: two more columns than inject mode — protocol and domain (this side of the wire knows whether a connection is TCP, HTTP, HTTPS or WebSocket). Rows a filter matched are coloured whole
- Lower half: quick panel on the left (six tabs: filters / send / robots / warehouses / decoders / extractors), hex panel on the right
- The status bar at the very bottom always shows the
SOCKS5address and state — the one thing you want visible at all times that is not on the dashboard
The twelve menu entries
| # | Menu entry | Where in this chapter |
|---|---|---|
| 1 | Proxy Settings | section 02 |
| 2 | Process Settings | section 03 |
| 3 | Leach Setting | same as Inject Mode (see there) |
| 4 | Hook Settings | section 04 |
| 5 | List Settings | same as Inject Mode |
| 6 | Map Settings | section 06 |
| 7 | EXTProxy Settings | section 05 |
| 8 | HotKey Settings | Tools chapter |
| 9 | BackUp Settings | Tools chapter |
| 10 | Remote MGT | Tools chapter |
| 11 | FireWall Settings | section 07 |
| 12 | System Settings | Tools chapter |
02 · Proxy Settings
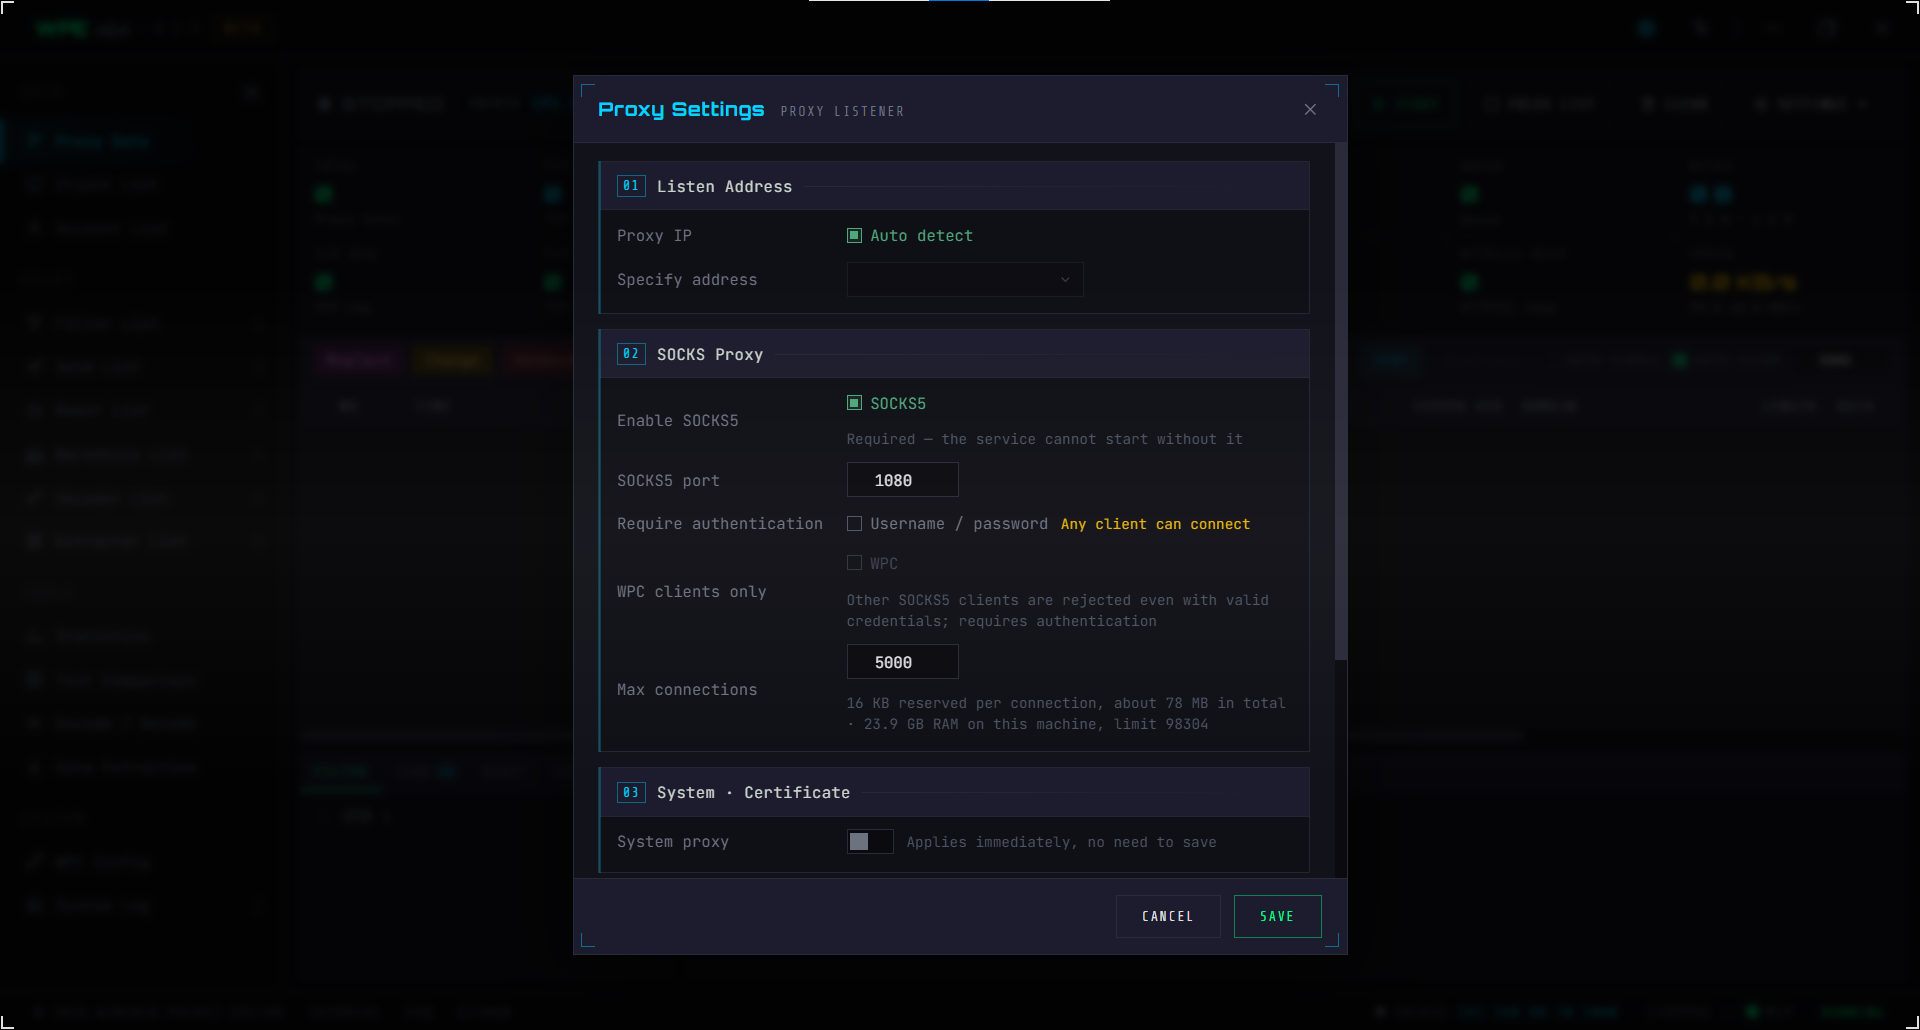
- Listening address: tick "auto" to listen on
0.0.0.0; untick it and you must supply a local address. ⚠️ Leaving it empty is rejected with a message - SOCKS5 proxy: port 1080 by default. This is the main path — filters, send lists and robots all live on it
- Maximum connections is not an arbitrary number: the service reserves memory for "connections × per-connection buffer" up front, so the box has the per-connection memory estimate and this machine's ceiling (worked out from physical memory) written next to it. A value above the ceiling is refused on Save, with the reason spelled out
- Allow WPC clients only: once on, a plain SOCKS5 client is refused even with the right credentials, and the refusal is written to the System Log — turn it on to keep this port for your own devices. ⚠️ It requires authentication to be on first
- Authentication: once on, clients must supply credentials. ⚠️ If you enable it, also tick the matching option in Process Settings, or the selected process simply loses network access
- System proxy: a sliding switch that takes effect immediately, without Save — it writes the Windows Internet settings, and its shape deliberately sets it apart from the fields that need saving
- HTTPS mapping root certificate: to read HTTPS in the clear, create the root certificate here and press Trust to install it on this machine; then export it in the format you need and install it on the device you are capturing. Whether anything is decrypted is decided by the enabled HTTPS mapping rules in Map Settings — with no rule, HTTPS passes straight through
- ⚠️ While the service is running the listening fields are locked: they only take effect when the service starts, so stop the proxy before changing them
- The port must be within 1–65535
Certificate export formats
| Dropdown option | File | Typical use |
|---|---|---|
| Cer certificate (binary) | WPE64.cer | double-click to install on Windows |
| Cer certificate (text) | WPE64.cer | where Base64 is required |
| Crt certificate (binary / text) | WPE64.crt | Linux / Nginx |
| Pem certificate (text) | WPE64.pem | SDKs, curl |
| Android system certificate | 9a7ae4b0.0 | push into the Android system certificate store |
Certificate install steps (PC · emulator · Android · iOS · Firefox)
The exported certificate has to be installed as a trusted root before anything will trust it. When you are done, the status should show as trusted back under Proxy Settings → root certificate. In the commands below, WPE64.cer, WPE64.crt, WPE64.pem and 9a7ae4b0.0 are the files exported from the table above.
1 · This Windows PC
- Create and trust it in WPE: press Create under Proxy Settings → root certificate, then Trust. That installs it as a trusted root for the current user.
- Or install by hand: export
Cer certificate (binary), double-clickWPE64.cer→ Install Certificate → store location Local Machine (administrator) → Place all certificates in the following store → Trusted Root Certification Authorities → Finish, then click Yes on the security warning. - Check where it landed: a certificate under Personal or Current User is ignored by some programs. Press Win + R and run
certlm.msc;WPE64must be listed under Trusted Root Certification Authorities → Certificates.
2 · Android emulator (MuMu / LDPlayer / Nox / BlueStacks / AVD)
- Turn on root first: MuMu, LDPlayer, Nox and friends have a root switch in their settings; for a plain AVD run
adb root. - Android 7 and above: export
Android system certificate (9a7ae4b0.0), then runadb push 9a7ae4b0.0 /sdcard/→adb shell→su→mount -o rw,remount /system→cp /sdcard/9a7ae4b0.0 /system/etc/security/cacerts/→chmod 644 /system/etc/security/cacerts/9a7ae4b0.0→reboot. - When the store is on a read-only partition: newer builds keep it at
/apex/com.android.conscrypt/cacerts/; runmount -o rw,remount /apexfirst, or mount the certificate with a Magisk module. Reboot either way. - Android 6 and below, or browser only: export
Crt certificateorCer certificate,adb pushit to/sdcard/, then Settings → Security → Encryption & credentials → Install from storage → CA certificate to install it as a user certificate. - Check: Settings → Security → Encryption & credentials → Trusted credentials;
WPE64should appear under the System tab. Reboot the emulator before capturing HTTPS.
3 · Android phone
- Get the file onto the phone: a USB cable, WeChat file transfer, a cloud drive or email all work; save it to local storage.
- Android 6 and below: Settings → Security → Encryption & credentials → Install from storage → CA certificate, pick the file and install it as a user certificate. Browsers and apps that opt in trust it immediately; no root needed.
- Android 7 and above: apps no longer trust user certificates, so reading an app's HTTPS needs root and a system certificate: push
Android system certificate (9a7ae4b0.0)into/system/etc/security/cacerts/(same commands as the emulator section above), permissions644, then reboot. - Without root: you can only install a user certificate, and only the few apps that opt in will trust it; other apps and browsers still reject it. For those targets use Inject Mode instead.
4 · iPhone / iPad (iOS)
- Send the certificate: export
Cer certificate (binary)and AirDrop it or attach it to an email; you can also hostWPE64.ceron a reachable page and open it in Safari. - Install the profile: tap
WPE64.cer→ "Profile Downloaded" → Settings → General → VPN & Device Management → Downloaded Profile → tapWPE64→ Install, enter your passcode, and tap Install again on the unsigned warning. - Enable full trust (the step people miss): Settings → General → About → Certificate Trust Settings → turn on the switch for
WPE64→ Continue. Since iOS 10.3 installing the profile alone does nothing; this step is required. - Check: HTTPS pages in Safari stop warning about an untrusted certificate. You can remove the profile any time under VPN & Device Management.
5 · Firefox
- Firefox has its own store: it does not read the Windows certificate store by default, so even on a machine where the certificate is already installed you must import it again here.
- Export a text format: choose
Crt certificateorPem certificate; Firefox accepts either. - Import: Firefox menu → Settings → Privacy & Security → scroll to Certificates → View Certificates → Authorities → Import → pick
WPE64.crtorWPE64.pem. - Trust it: in the import dialog tick "Trust this CA to identify websites" and confirm.
- Check:
WPE64appears in the Authorities list. If it still fails, make sure you imported the file exported from WPE and not another CA. - Optional: to make Firefox follow the system store, set
security.enterprise_roots.enabledtotrueinabout:config. Outside managed environments importing directly is cleaner.
An app doing SSL Pinning trusts only the certificate baked into it, so no root certificate will help. See the note at the end of Installing the certificate on each platform, or switch to Inject Mode.
What happens when the service starts
- Decide the listen address: the auto-detect setting determines which IP TCP and UDP bind to.
- Start the SOCKS5 service: it starts listening, clears idle sessions automatically and turns on IP connection filtering — this is where the firewall acts.
After starting, look in the System Log for these lines: SOCKS5 proxy : TCP [ … ] UDP [ … ], SOCKS5 proxy authentication enabled and upstream proxy enabled [ ip:port ].
03 · Process Settings · mihomo core
When you save, the program checks that the port list, proxy address and authentication fit together and actually tests the proxy connection once; if it cannot connect, nothing is saved — so the selected program is never cut off. A port list written as 80, 443 (with spaces) is fine, and UDP traffic can be forced through the proxy too.
Steers a given process's traffic into the proxy at the system level, so the target does not need proxy support of its own.
The proxy service must be running and the target processes must be routed in (mihomo core or a client you point at WPE) before their data can be captured — a ticked process with the core off produces nothing.
Saving drops the TCP connections the target has already established.
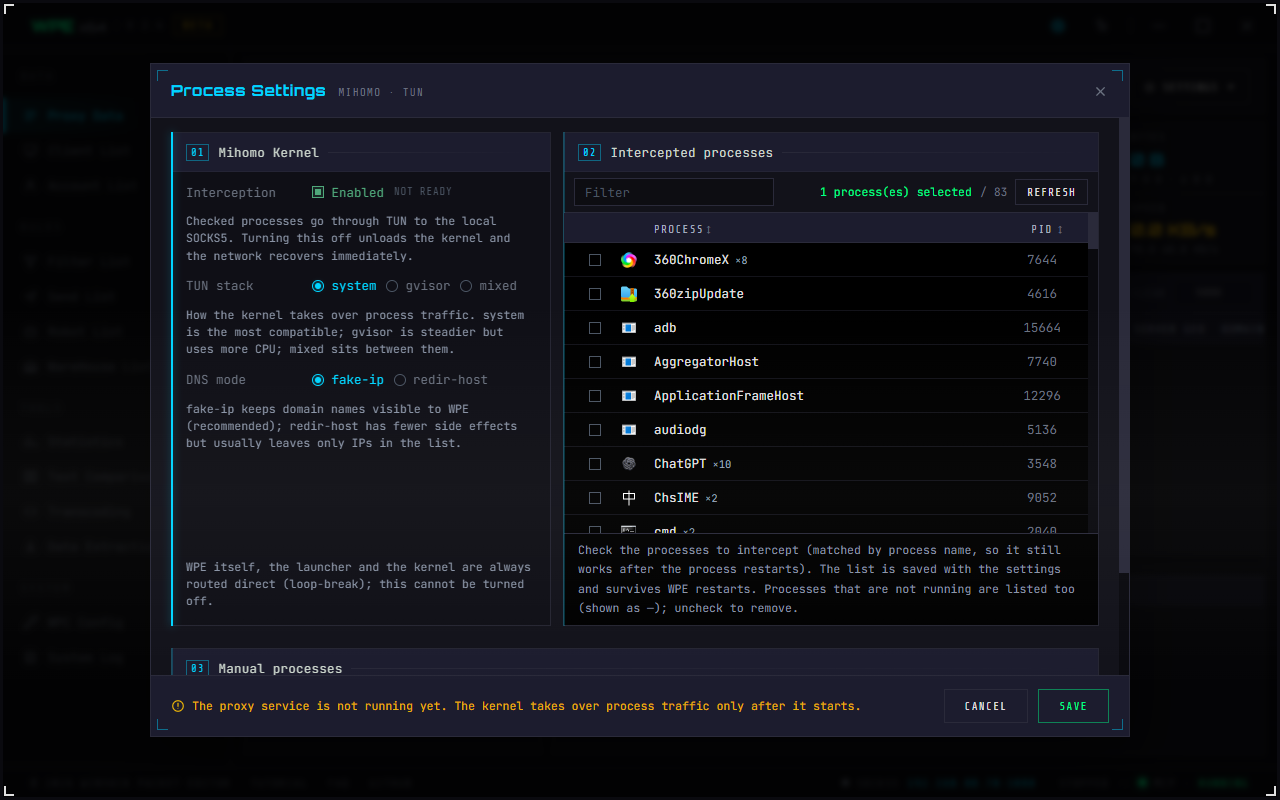
- Data path: target process → mihomo TUN → WPE SOCKS5 → capture and filters. The status bar shows core and TUN readiness.
- 01 Mihomo core: enable it, then choose the
system,gvisorormixedTUN stack and DNS mode. - 02 Intercepted processes: select running applications by name; names are saved with the settings. Use semicolon-separated manual process names when an app is not listed.
- ⚠️ With the core disabled or no process selected, that traffic never enters WPE SOCKS5, so filters are not on its path.
Choosing a TUN stack
| Option | What it means |
|---|---|
system | uses the system network stack |
gvisor | uses the gVisor network stack |
mixed | mixed mode; choose for the actual network environment and verify after saving |
What each Test proxy error means
| Message | Meaning |
|---|---|
| Proxy server settings are invalid | bad parameters |
| Proxy server connection timed out | unreachable |
| Proxy server refused the connection | nothing listening, or actively refused |
| Proxy server requires authentication | the upstream wants credentials but Requires auth is unticked |
| Proxy server authentication failed | wrong username or password |
| Unsupported authentication method | the upstream only offers GSSAPI or similar |
| Unsupported SOCKS protocol | version mismatch |
| Failed to reach the target server | the handshake succeeded but the destination did not |
04 · Hook Settings and UnPack
Two groups: which directions to capture, and whether to cut the TCP byte stream apart by packet header.
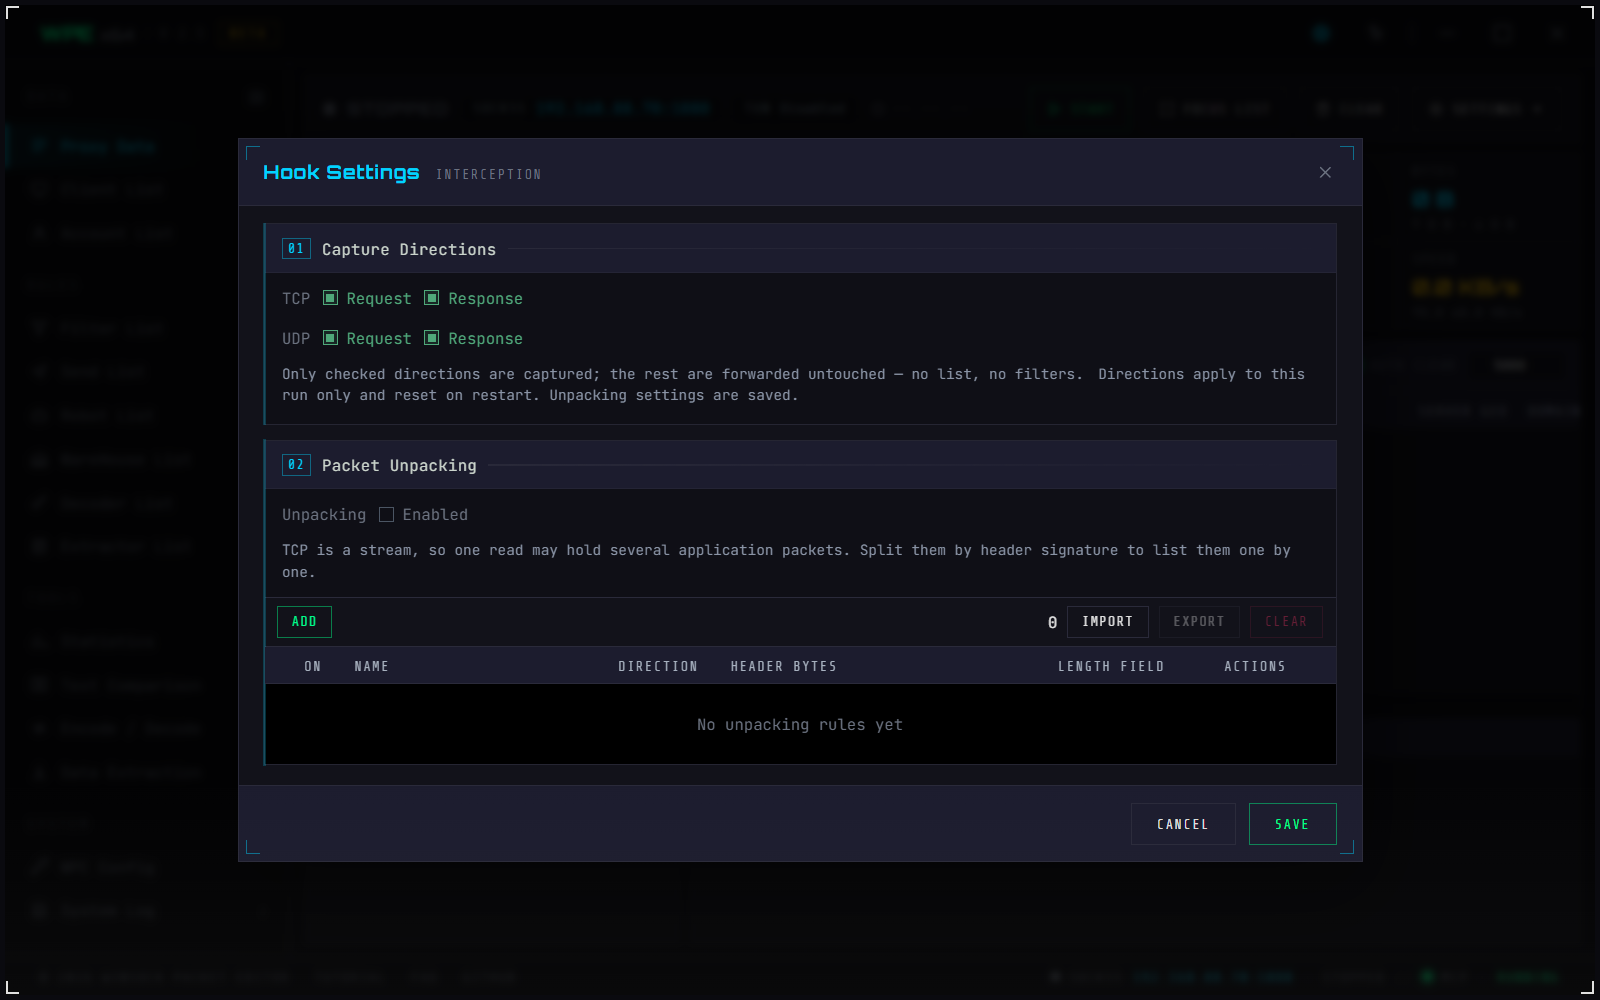
- 01 Capture direction: TCP request / response and UDP request / response. Only the ticked directions are captured; the rest are forwarded straight through — they reach neither the list nor the filters
- ⚠️ Read the grey line carefully: the capture direction applies to this run only and goes back to all-on after a restart; the UnPack settings below are persisted
- 02 UnPack: TCP is a byte stream, so one
recvmay hold several application-level packets (or half of one). Turn on the master switch and maintain an ordered rule list; only complete frames independently reach filters, capture and forwarding - Each rule has a name, enabled state, direction (both / request / response), header and length field. Rule order is first-match priority. The header is hex, for example
01 00 00; length positions are counted from 1 - It is for Proxy-Mode TCP only: not UDP and not Inject Mode. Requests and responses retain their own partial frames; after the first successful frame, that direction stays with its selected rule until the connection ends
| Field | Default | Meaning |
|---|---|---|
| Packet head | 01 00 00 | every packet must begin with this hex string; spaces, commas or semicolons all work as separators |
| Length | 4-5 | the byte range (1-based) holding the length field — bytes 4 to 5 here — read big-endian as the total packet length |
When UnPack is enabled, at least one valid rule is required: a 1–64-byte header made of two-digit hex bytes (spaces, commas and semicolons separate bytes), plus a start-end length field of 1–4 bytes, read big-endian as the whole-frame length. Rules can be ordered, copied, imported and exported as .upr, and are included in BackUp Settings.
05 · EXTProxy (upstream chaining)
Has WPE's SOCKS5 service hand traffic on to an upstream SOCKS proxy — to change the exit IP, or to chain other tools behind it.
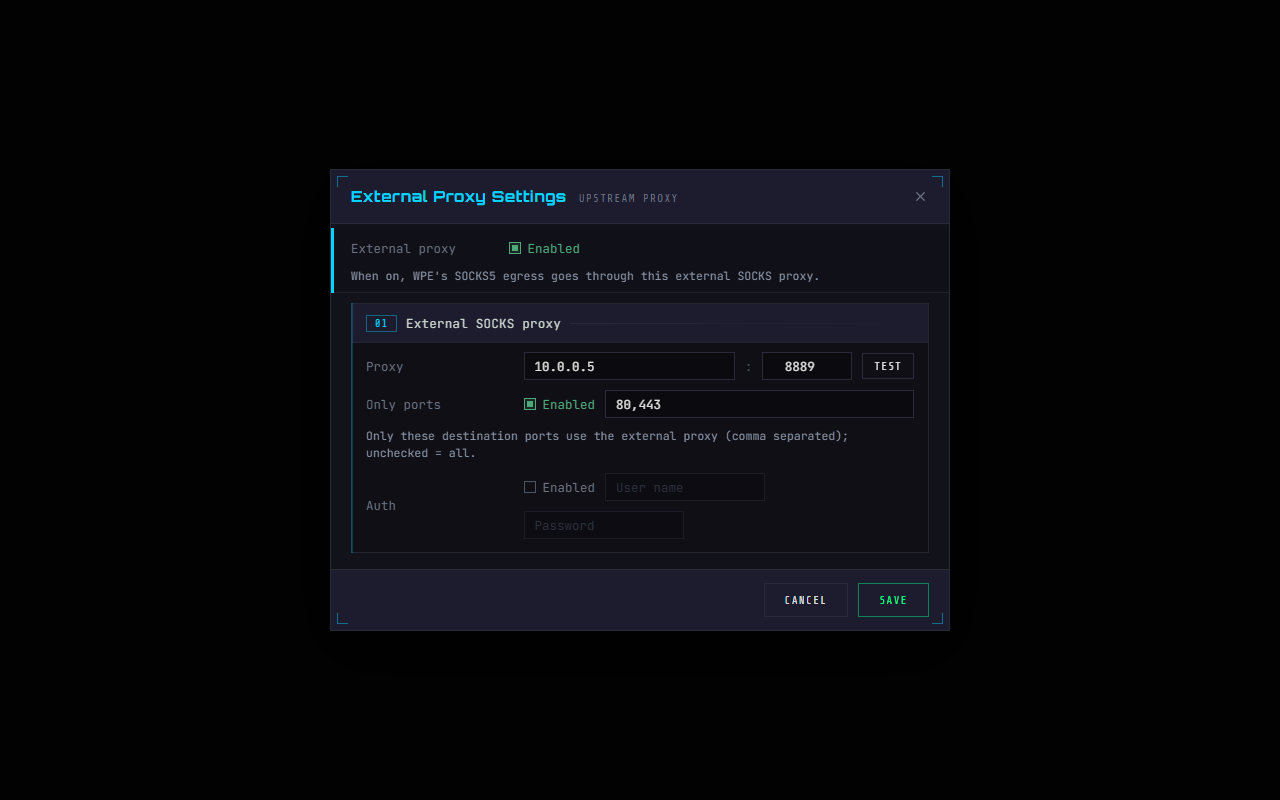
- EXTProxy: the master switch. With it on, WPE's SOCKS5 exit goes out through this upstream SOCKS proxy — capturing still happens inside WPE; only the last hop changes hands
- Proxy address and port, with Test proxy beside it — it really connects and completes the handshake, not just a ping
- Specified ports: only these destination ports go through the upstream proxy, comma separated; leave it unticked and everything does. Handy for "send the game ports out through another exit and let the rest go direct"
- Requires authentication: tick it when the upstream proxy wants credentials
- ⚠️ This and Process Settings are different things: that one governs how traffic gets into WPE, this one how it leaves
| Field | Default | Notes |
|---|---|---|
Enable EXTProxy | off | the master switch |
| IP or domain / port | 127.0.0.1 / 8889 | the upstream SOCKS server |
Specify port | off (prefilled 80,8080,443,8443) | only destinations on this list go upstream |
Requires auth | off | tick it when the upstream wants credentials |
Test proxy | — | error messages are listed in section 03 |
06 · Map Settings
Two independent features, each with its own switch. This is the right place to change HTTP content — filters cannot reach those packet types.
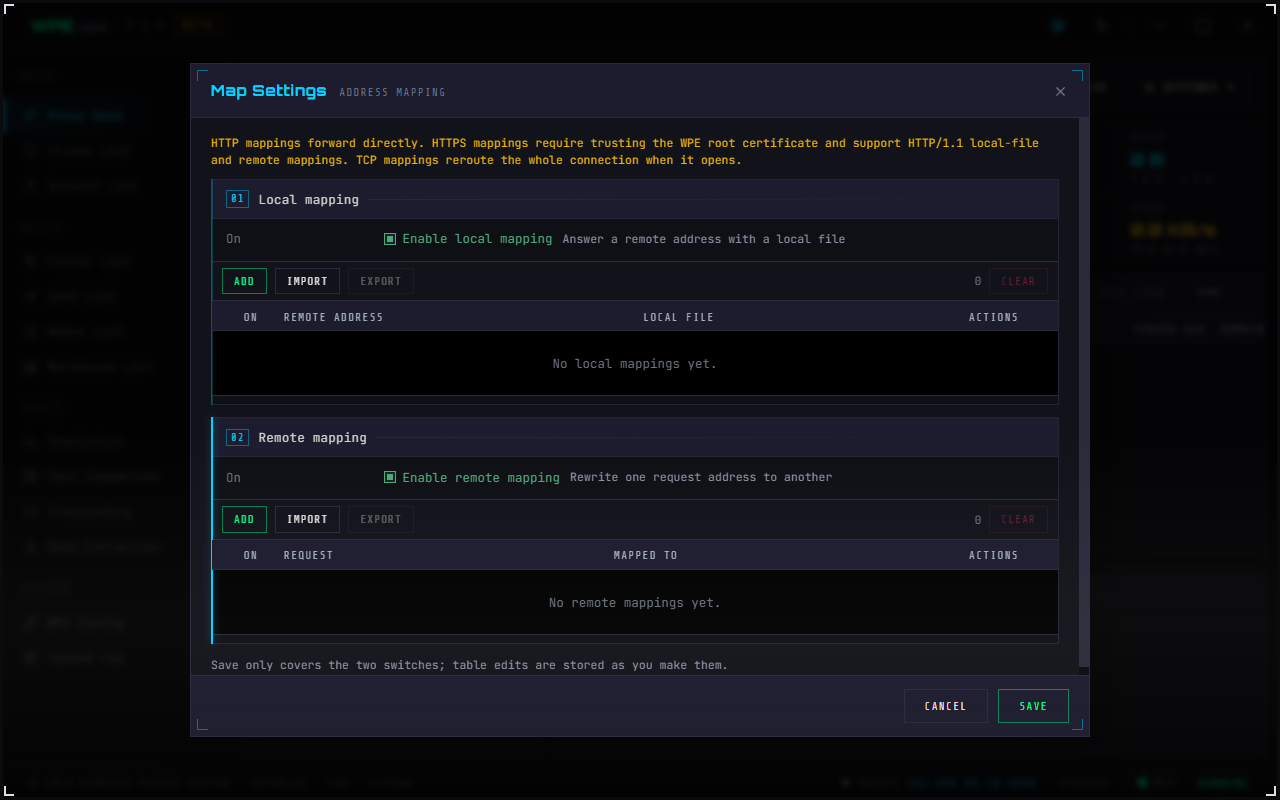
- Mapping supports HTTP and HTTPS. HTTP is matched after its complete request header arrives; HTTPS needs an enabled mapping and a trusted root certificate, and currently supports HTTP/1.1 only.
- 01 Local mapping: replaces the response from a remote address with a local file. A rule is "remote address → local file"; on a match the file contents are returned as the response
- 02 Remote mapping: rewrites a request address to another address. A rule is "request address → mapped address"
- Each group has its own add / import / export / clear and a count; disabled rows are dimmed as a whole
- ⚠️ Long addresses are truncated from the left (
…example.com:80/config.json) — cutting from the right would keep thehttp://every row shares and throw away the path tail you actually need to read - ⚠️ The line at the bottom says it: Save only covers the two master switches; adding, editing and deleting rules is already written to the database
- The protocol is fixed at
http://: mapping applies to HTTP requests only
Map Local · serve a local file instead
| Field | Notes |
|---|---|
| Protocol | fixed to http:// with no choice (mapping only applies to HTTP) |
| Host | e.g. cdn.example.com |
| Port | 80 by default |
| Remote path | e.g. /static/app.js |
| Local file | drag it in or browse for it; matching requests get this file as their response body |
Map Remote · redirect to another address
| Section | Fields |
|---|---|
| Request address (what to match) | host / port / path (protocol fixed to http://) |
| Mapped address (what to rewrite it to) | host / port / path (protocol fixed to http://) |
Both lists support right-click move to top / up / down / to bottom / export / duplicate / delete, and import and export as .pml for Map Local and .pmr for Map Remote.
07 · FireWall
With "auto-clear expired IPs" on, the program regularly removes rules that have expired, whether or not that IP connects again.
Implemented as a SuperSocket connection filter, so a client is allowed or refused while the TCP connection is still being established — which costs almost nothing.
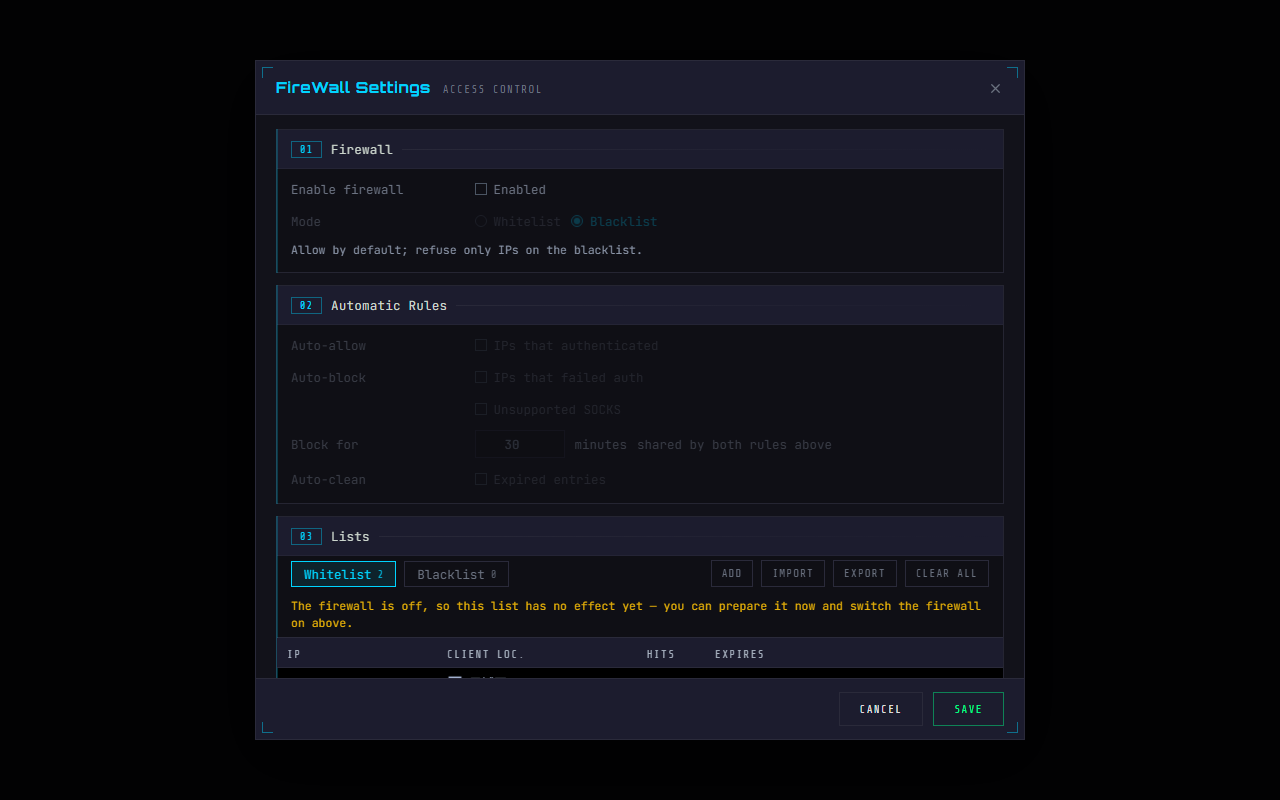
- Enable firewall: the master switch. While it is off, the mode and the automatic rules below are dimmed — they describe how the firewall behaves, which is meaningless when it is off
- Mode: allow-list = deny by default, permit only what is listed; block-list = permit by default, deny only what is listed. ⚠️ In allow-list mode an empty list means nobody can connect — that is by design
- Automatic rules: IPs that authenticate successfully are added to the allow list; failed authentications and non-SOCKS protocols go to the block list; both share one block duration; and "auto-clear expired IPs"
- The lists: allow and block tabs; each entry is a single IP or a range, with its location, hit count and expiry
- ⚠️ The lists stay editable while the firewall is off (prepare the addresses first, enable later), with an amber line saying they are not in effect yet
| Rule | Default | Notes |
|---|---|---|
| Auto-allow → IPs that authenticate successfully | off | an IP is allowed once a proxy account authenticates from it |
| Auto-block → unsupported SOCKS protocol, for N minutes | off / 30 | an IP sending a malformed handshake is banned for N minutes |
| Auto-block → IPs that fail authentication | off | a wrong username or password gets the IP blocked |
| Auto-clean → expired entries | off | removes expired entries periodically |
Right-click an auth record in the Client List → add to WhiteList or add to BlackList ▸ (1 hour / 1 day / 30 days / permanent).
Import and export: .wl for the allow list, .bl for the block list.
08 · Proxy accounts
With authentication enabled, clients must use the credentials defined here.
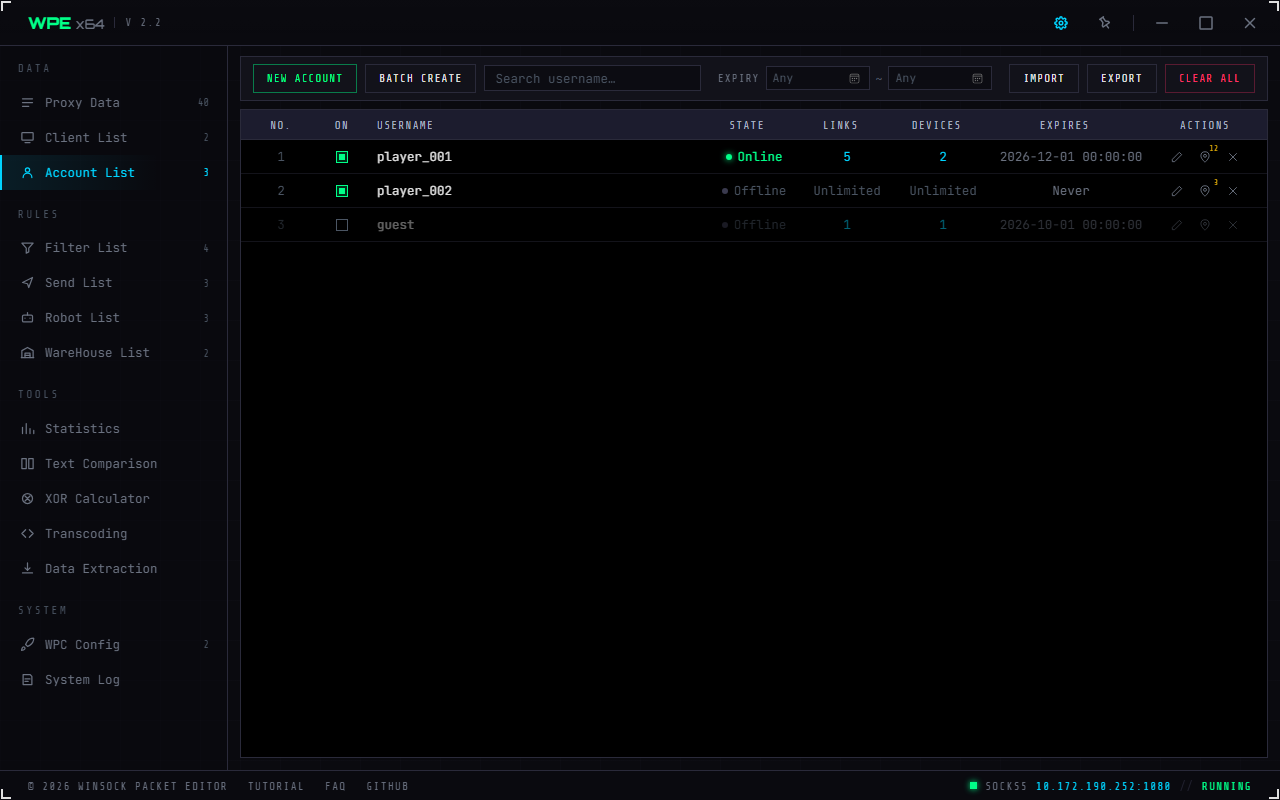
- Toolbar: new account / bulk create / expiry range (two date boxes) / search / import / export / clear. On a narrow window the toolbar wraps and the search box gives way first
- The "enabled" column is the only checkbox on screen and it is always green — clicking it toggles that account and saves immediately. Selection does not use checkboxes: click to select, Ctrl to add, Shift to extend, exactly like Explorer
- A disabled row is dimmed as a whole, except the checkbox cell — that is the control you need in order to light the row back up
- Sortable headers: ascending → descending → back to the original order. IPs and dates sort numerically; "unlimited" and "never expires" sort last
- Context menu: Bulk adjust ▸ (Expiry / Links / Devices) · Bulk export · Bulk delete · Select all / Deselect, the first three showing how many rows are selected. Enabling is done in the On column, and Login history is a button in the Actions column. ⚠️ Right-clicking opens the menu without changing the selection; with nothing selected the items are still clickable and tell you to select something first — dimming would say "you cannot" without saying why
- The table stays smooth to scroll and search even with tens of thousands of accounts
- ⚠️ Connection and device limits cannot be 0: the minimum is 1, and 0 is treated as 1 — whether set in the program, the remote console or through the CCProxy-compatible API
Editing an account
| Field | Notes |
|---|---|
Enabled | a disabled account cannot authenticate |
Username | must be unique; duplicates are rejected |
Password | case-sensitive at authentication |
Link limit | how many simultaneous connections one account may hold |
Device limit | how many distinct source IPs one account may use |
Expiry | unticked means never — stored internally as 8888/12/31 |
Batch create and batch adjust
Batch create (toolbar button): under Rules, choose how Username is generated — Time + No. or Prefix + No. (enter the prefix for the latter) — then set Count (10 by default) and Password length (6 by default). Under Limits, tick Links / Devices and Set expiry as needed (unticked means Unlimited / Never). Then under Preview press Generate: the table lists No. / Username / Password, usernames that already exist are flagged and skipped on save, and unwanted rows can be removed one by one. Export saves the preview to a file; when it looks right, press Save.
Bulk adjust: select several accounts, then right-click:
- Bulk adjust ▸ Expiry: under Add time enter N and pick
HoursorDays; under Starting from pick Current expiry or Now - Bulk adjust ▸ Links / Devices: set one value for all, or lift the limit entirely
- Bulk export / Bulk delete, the latter behind a confirmation showing how many accounts will go
The native format is .pa — XML, with optional password encryption. Import also accepts CCProxy .ini account files. Export asks whether to encrypt (Skip encryption or Encrypt), and only an encrypted file asks for its password on import.
09 · Client List
Two stacked tables: the authenticated clients on top, and the connections the selected client currently has open below.
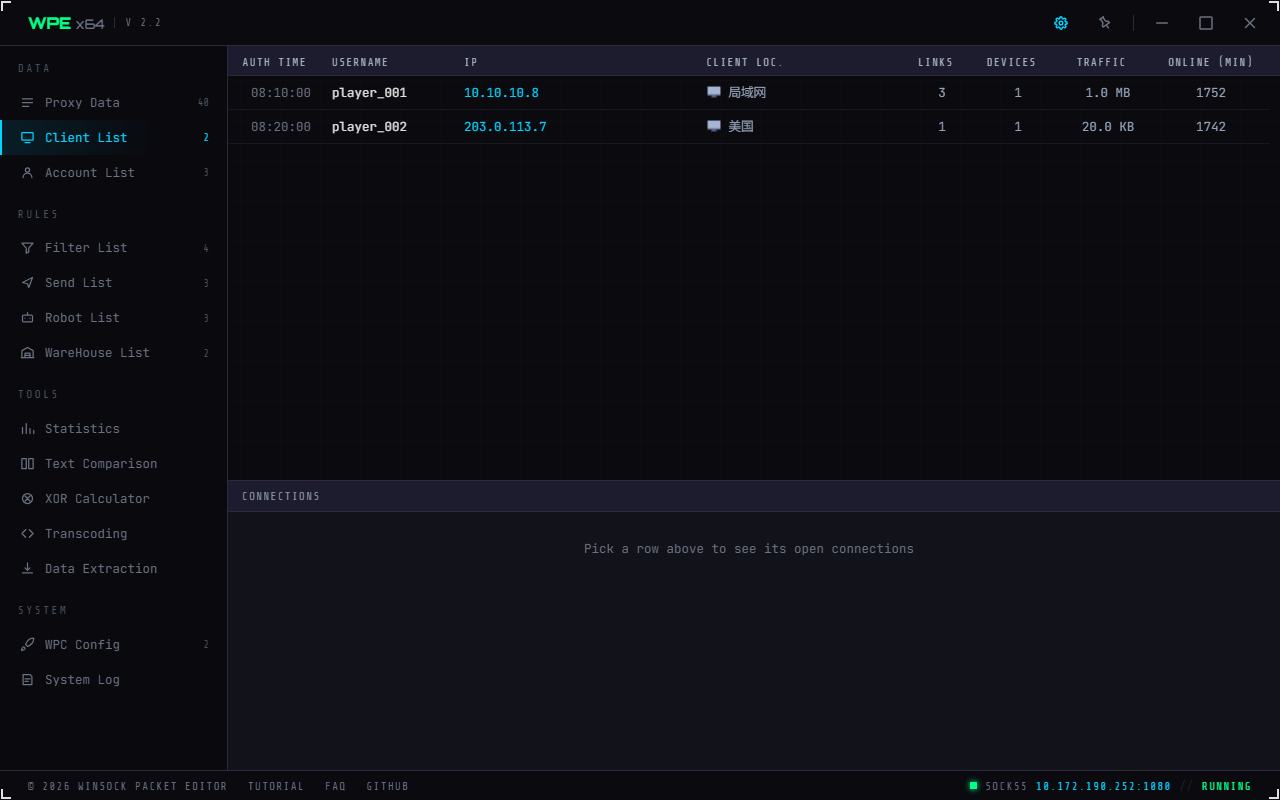
- Upper table:
auth time / username / IP / client location / links / devices / traffic / online (min) / device ID. The location carries a flag icon, resolved from the QQWry offline database - Device ID (the last column): only WPC connections have one — it shows a truncated device fingerprint in green, and hovering reveals the full value plus the client version (such as
WPC 1.2); a plain SOCKS5 client shows a dash. This is exactly what an account's device limit counts, so the cell is either a dash or WPC - Lower table, "connection detail": select a row above to fill it — it lists every connection that client has open right now
- WPC control connection: WPC's persistent control connection is labelled
WPC control connection · WPC · —in green (its target is empty). It never connects to a target by design, so it is not a broken connection - Headers are sortable (ascending → descending → back to the original order). IPs sort numerically, not as strings — otherwise
10.10.10.9would land after10.10.10.10 - The context menu can drop an IP straight into the firewall block list, see section 07
- ⚠️ There is no "result" column: an authentication that fails never reaches this table, so the column would read "passed" forever and carry no information at all
- Connections brought in through local process interception show a local client address; manage the process list in Process Settings.
10 · Bringing in phones, emulators and other PCs with WPC
Inject Mode reaches one local process and no further. To capture from an Android phone or another PC on the LAN or across the internet, install the proxy client WPE Proxy Cap (WPC) on the device. It takes over the device's traffic with a virtual adapter (Windows) or the system VPN (Android) and, following the node's forwarding rules, hands the traffic that should be proxied to WPE over SOCKS5 — no need to set a proxy program by program. WPC comes as WPC for Windows 1.2 and WPC for Android 1.1; the Android download link is pending and will be placed on the Downloads page.
① The SOCKS5 service is running: tick Auto detect and Enable SOCKS5 in Proxy Settings. Keep authentication on and create a proxy account — the Account / Password you enter in WPC is that account.
② Remote MGT is on: WPC pulls nodes, rules and notices from it. Pick the local IP the device can reach as the listening address; the port is 88 by default.
③ WPC Config has an enabled node: its server address is an IP:1080 the device can reach (the LAN IP on a LAN, the public IP across the internet), with forwarding rules set up.
④ Inbound traffic is allowed: Windows Firewall lets in the SOCKS5 port and the Remote MGT port; across the internet, the router or cloud server must forward / allow both ports as well.
- Start the service: Proxy Mode → Proxy Settings, tick
Auto detect,Enable SOCKS5andRequire authentication, save; add an account in the Account List; press Start proxy on the status bar. - Turn on Remote MGT: Settings ▾ → Remote MGT Settings, switch it on, choose the local IP the device can reach as the listening address (the one
ipconfigshows on the device's subnet), port 88, fill in the administrator credentials, and save — saving starts it. - Add a node: WPC Config → Server List, add a server with the address
<this PC's IP>:1080; click the paper plane to add rules — name a game by process, domain or IP withPROXYto take over just that game, or useMATCH,PROXYto send all of the device's traffic into WPE (see Common WPC rule setups). - Get a subscription ID: WPC can only find this WPE through a subscription ID, so request one pointing at
<this PC's IP>:88from the subscription server — see Where subscription IDs come from. When WPC for Windows runs on the same PC as WPE, you can use the shared debugging ID127.0.0.1:88instead (set Remote MGT to listen on127.0.0.1). - Connect on the device: install WPC, enter the ID and update the subscription, pick the node, enter the proxy account from step 1 as Account / Password, and click the reactor core. Details in the WPC for Windows tutorial and the WPC for Android tutorial.
- Verify: the account appears in WPE's Client List, and once the device does something on the network the Proxy List starts filling up. If in doubt, run verification in WPC — it tells you separately whether the server is reachable and whether the credentials are right.
How each kind of device connects
| Device | Connect with | Notes |
|---|---|---|
| Android phone / tablet | WPC for Android (download) | the system VPN takes over, no root needed. Per-app proxy decides which apps hand traffic to WPC, then the node rules decide proxy or direct (two gates); PROCESS-NAME / PROCESS-PATH rules are skipped on phones |
| Another Windows PC | WPC for Windows | runs as administrator and takes over the whole machine's traffic with a virtual adapter (TUN); rules can pick out a single program by process name |
| Android emulator | WPC for Android inside the emulator, or WPC for Windows on the PC running it | inside the emulator it works as on a phone: the system VPN takes over, and per-app proxy and the two gates apply; the published APK is ARM64, so the emulator must be able to run ARM64 apps. On the PC, write the rules against the emulator's process name. An emulator is a local process, so Inject Mode can also skip this whole setup |
| The PC running WPE | the mihomo core in Process Settings, or WPC for Windows with the debugging ID 127.0.0.1:88 | with WPC the node address can be 127.0.0.1:1080; only send the target program through the proxy by process name, and do not use MATCH,PROXY as the fallback — WPE's own outbound traffic would be taken over too and looped back into WPE |
| iPhone / iPad | a SOCKS5-capable proxy client from the App Store (such as Shadowrocket) | there is no WPC for iOS yet. Add a SOCKS5 server in the client at <PC IP>:1080 with a WPE proxy account as the username and password; the WPC nodes and rules configured in WPE are not delivered to such clients, so decide inside the client which traffic goes through the proxy. To read HTTPS in the clear, add an enabled HTTPS mapping rule for that host in WPE, then create, trust and export the root certificate from Proxy Settings → root certificate and install it on the iPhone (see "Installing the certificate per platform" below) |
When the SOCKS5 and Remote MGT ports are open to other devices, enable authentication so clients must supply credentials, put the firewall in WhiteList Mode with only the devices' IPs allowed, and check the auth records in the Client List.
HTTPS in the clear: HTTPS mapping plus certificate
Connections from WPC arrive over SOCKS5: their data lands in the TCP / UDP types of the Proxy List and Filters can edit it as usual; HTTP requests to destination port 80 / 8080 can also be changed with Map Settings. The SOCKS5 path does not decrypt HTTPS, though — on 443 / 8443 you see encrypted bytes.
Reading HTTPS in the clear takes three things: ① an enabled HTTPS mapping rule for the host you want, in Map Settings (with no rule, HTTPS passes straight through undecrypted); ② the root certificate created and trusted on this machine under Proxy Settings → root certificate; ③ the certificate exported in the format you need and installed, per the table below, on the device that makes the requests. The device's traffic just has to reach WPE over SOCKS5 (through WPC or a SOCKS5 client) — there is no separate proxy port to point it at.
| Target | Format | How to install |
|---|---|---|
| This Windows PC | — | press Create and then Trust under Proxy Settings → root certificate; that installs it as a trusted root for the current user. Alternatively export Cer certificate (binary), double-click it and install into Trusted Root Certification Authorities |
| Android 6 and below | Crt or Cer | copy the file to the phone, then Settings → Security → Install from storage. A user certificate is enough here |
| Android 7 and above | Android system certificate (9a7ae4b0.0) | apps no longer trust user certificates by default, so the device must be rooted: push 9a7ae4b0.0 into /system/etc/security/cacerts/ — under /apex on some builds — set permissions to 644 and reboot |
| iPhone / iPad | Cer certificate (binary) | open it via Safari or AirDrop → install it under Downloaded Profile in Settings → then enable full trust for it under General → About → Certificate Trust Settings, the step people forget |
| Firefox | Crt / Pem | Firefox does not use the system store: Settings → Privacy & Security → Certificates → View Certificates → Authorities → Import, and tick trust for identifying websites |
| Linux / Nginx / curl / SDKs | Crt · Pem | drop it into the distribution's CA directory and refresh, or point the tool at the file with something like --cacert |
Almost certainly SSL Pinning: the app trusts only the certificate baked into it, regardless of what the system trusts. No certificate will fix that. Either switch to Inject Mode and read the buffers on either side of encryption, or give up on decrypting and watch it as TCP traffic.
Connecting through WPC · troubleshooting
| Symptom | Check this first |
|---|---|
| After subscribing the node list is empty, or WPC says the ID does not exist / has expired | ① is the ID valid — see Where subscription IDs come from; ② is WPE's Remote MGT running, and does the ID point at its listening address and port; ③ does the firewall allow inbound traffic on the Remote MGT port; ④ is the node ticked as enabled in WPC Config |
The debugging ID 127.0.0.1:88 returns no nodes | it only works for WPC for Windows on the same PC as WPE, and Remote MGT must listen on 127.0.0.1 — when it listens on a LAN IP, the loopback address cannot reach it |
| Nodes are listed, but connecting fails / verification times out | ① is WPE's proxy service running; ② is the node's server address an IP the device can reach (not 127.0.0.1 when another device uses it); ③ does the firewall allow inbound traffic on the SOCKS5 port, and is the port forwarded across the internet; ④ are both really on the same subnet — is the phone on 4G or a guest network |
| Verification reports a wrong username or password / an expired account | Account / Password is a WPE proxy account, not the subscription ID; the account must be enabled, unexpired and under its link / device limits |
| Connects, then drops immediately | the firewall is in WhiteList Mode and the device is not on the list, or the IP was auto-blocked after failed authentication |
| Connected, but WPE's list stays empty | ① did the node's forwarding rules send that traffic direct (on phones PROCESS-NAME rules are skipped, and check whether the app is selected in per-app proxy); ② are the TCP / UDP boxes ticked in Hook Settings; ③ is Leach Setting hiding them (watch the Leach counter); ④ is Speed Mode on |
| WPE and WPC on the same PC, and the network misbehaves once connected | the rules fall back to MATCH,PROXY, so WPE's own outbound connections are sent back into WPE. Send only the target program through the proxy by process name and fall back to MATCH,DIRECT |
| HTTPS shows only encrypted bytes | HTTPS is not decrypted unless an enabled HTTPS mapping rule matches — that is expected; to read it in the clear see HTTPS mapping plus certificate above |
| HTTPS pages report an untrusted certificate | it was never installed, installed as a user certificate on Android 7+, or full trust was not enabled on iOS |
11 · Troubleshooting
The port is taken, or the bind IP you chose does not exist. Change the port, or tick Auto detect.
"Proxy type not set" → tick Enable SOCKS5 proxy.
① Are the TCP / UDP boxes ticked on the proxy tab of Hook Settings; ② is Leach Setting hiding them (watch the Leach counter); ③ is Speed Mode on.
Turn on the mihomo core in Process Settings, tick the target processes and press Save; only then does TUN route their traffic into WPE's SOCKS5. A ticked process with the core off produces no data at all.
HTTPS is decrypted only when an enabled HTTPS mapping rule matches and the device trusts the WPE root certificate; encrypted bytes in every other case are expected — see section 10. Check that the certificate is created and trusted under Proxy Settings → root certificate, and export it for other devices to install as a trusted root.
This is a leftover from older releases: a loaded driver still locks the choice, so it has to be uninstalled first — and uninstalling reboots the machine immediately, so save your work. From 2.4 process takeover is done by the built-in mihomo core and needs no driver.