Tools & Settings
Everything outside the main screen: five auxiliary tools, the WPC Config that publishes nodes to the accelerator, the System Log, five groups of global settings, the remote management console, and a performance checklist.
01 · Statistical Data
It answers one question: are the filters running, and how much. The page reads as a two-stage funnel: first how many packets the filters matched, then how often each action ran.
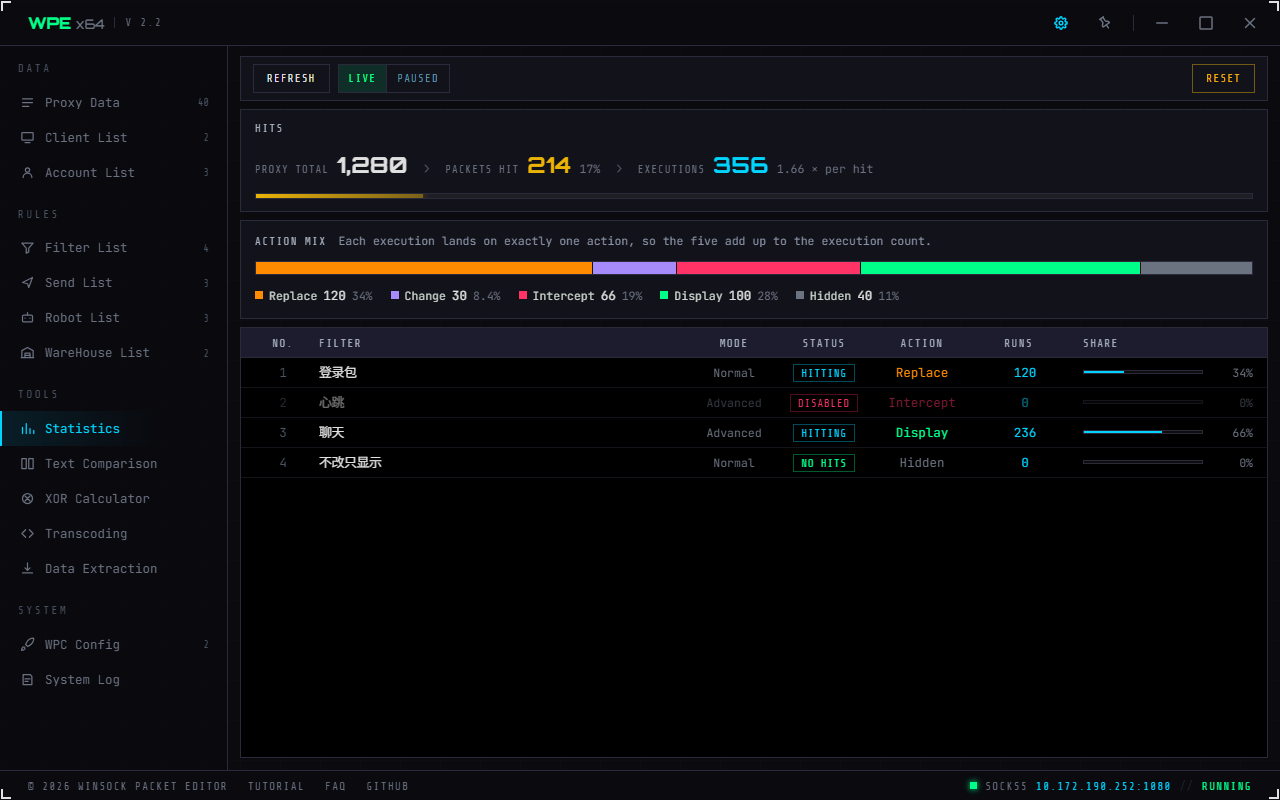
- Toolbar: Refresh and a Live / Pause segment. While the page is open it refreshes itself once a second; Pause exists because you cannot copy a number down accurately while it ticks every second
- Match (first stage):
proxy total → packets matched → executions. That middle figure counts packets a filter actually changed, which is not the same as the execution count (one packet may pass through several filters), and only both together tell you how wide the match is and how often each packet is processed (the1.66 × per matchon the right is that ratio) - Action breakdown (second stage): the five actions form one stacked bar, not five separate ones. Every execution hits exactly one action, so the five must add up to the execution count — a relationship only a stacked bar can show
- ⚠️ And it actually verifies that identity: if they do not add up, the page says by how much (things that would otherwise fail silently should speak up)
- Detail table:
no. / filter name / mode / status / action / executions / share. Status has three values — Hitting (enabled and matching), No hits (enabled, nothing yet), Disabled. It is the fastest way to tell whether a filter is really running - The executions column is sortable (ascending → descending → back to the original order). ⚠️ This does not contradict the filter list page deliberately not sorting: there the order is the data, while this page is a read-only view, and the no. column always shows the filter's original position
- Reset clears only the filter counters; the packet total and the traffic figures are untouched
The statistics on this page are accurate in both modes. Clearing the packet list also resets the matching counters, while Reset here clears only the filter group.
02 · Text Comparison
Two tabs, and the main tool for pinning down a field's offset. It aligns the two sides before comparing: when a byte was inserted in the middle — the most common case in packet work — only that byte is marked, instead of everything after it being reported as "modified".
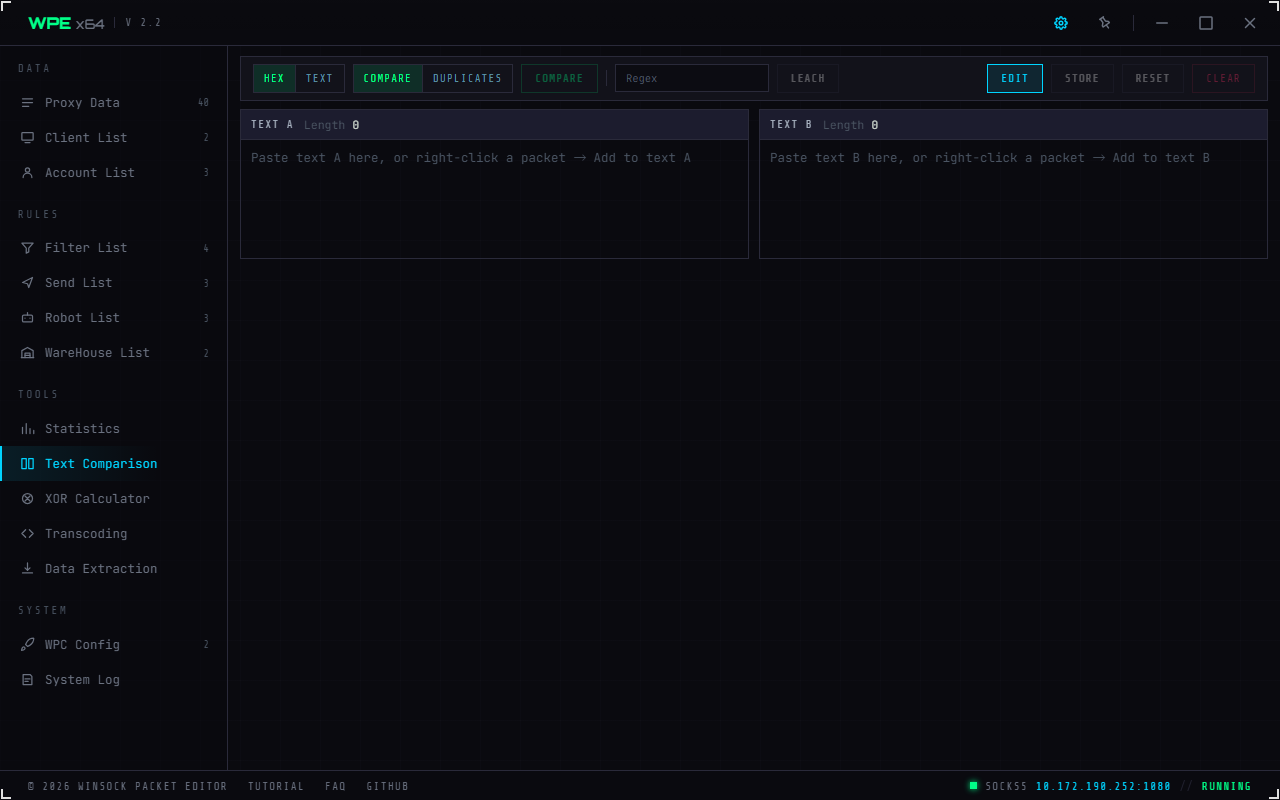
- Hex / Text (the leftmost segment): align by byte or by line. "Add to text A / B" from the packet list feeds in hex, so most of the time you want the left one; when the content does not look like hex the toolbar says so, but it never switches for you (switching silently leaves you with no idea what happened)
- Compare / Duplicates: the first finds "which bytes differ", the second finds "what the two have in common". Two different jobs
- Regex highlight + Filter: the regex applies to the editors only; the comparison view is read-only
- Edit / Stash / Restore / Clear: "Edit" is a toggle — the editors are open while both sides are empty and collapse after a comparison to give the result the space; click it to go back
- Text A / Text B: paste by hand, or use the packet list's "add to text A / add to text B" (a full replacement, not an append). The headers show the length live
- After comparing, the screen turns into a side-by-side aligned view: A and B live in one scroll container, with
··filler cells holding the other side open across an insertion or deletion — so scanning across always lines up, and no "synchronised scrolling" switch is needed
Results come as blocks of difference: the example above is 1 difference. The unit follows the segment you picked (bytes in hex, lines in text).
- The
‹ n / N ›control on the toolbar steps through the differences (F3 / Shift+F3), and a 22px difference map along the bottom answers "are the differences at the head or the tail, and how dense are they" - ⚠️ The edit distance is capped: two entirely unrelated long texts degrade to "one big change in the middle", and the toolbar then shows an amber note plus a toast. The interface has to say this out loud, or you see one huge "change" and assume the algorithm compared them properly
The Duplicate Finder
Finds fragments the two sides share, with a minimum length of 4 bytes. The longest fragments are listed first, and each sequence appears only once.
- The table gained a share column (length × occurrences ÷ total bytes): shows which fragment accounts for the most of the data
- A coverage bar for each of A and B, cyan where a shared fragment covers it; click the bar to jump to that fragment
- ⚠️ The minimum length defaults to 4: set it too low (say 2) and you get lots of meaningless fragments that match by coincidence
03 · Encode/decode workbench
The standalone XOR calculator now lives in the Encode/decode workbench, and 2.4 adds reusable decoders. Test a transformation in the workbench, then save it as a recipe for packet lists, details and Smart Decode.
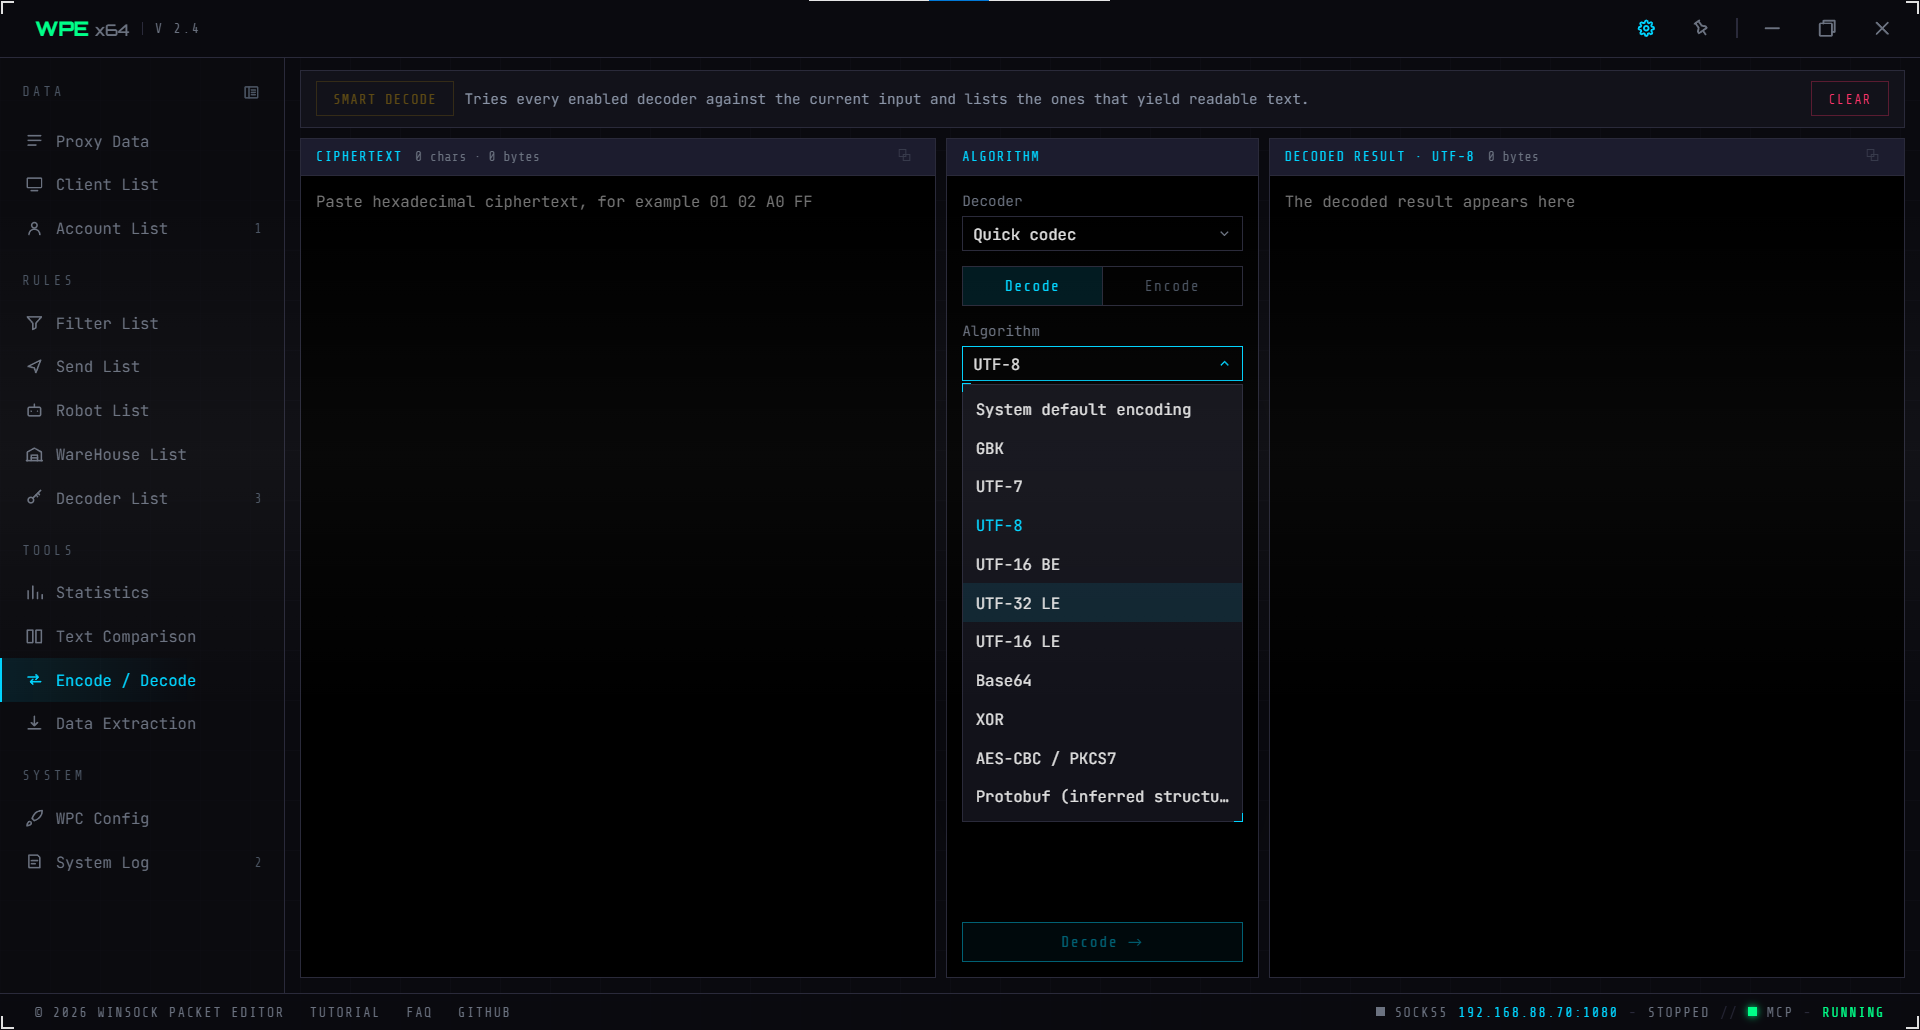
- Use the selector for Quick encode/decode or a saved decoder. A decoder is not a password-cracking tool: it is a saved recipe — for example, “for this TCP response, skip the four-byte header and decode with this XOR or AES key”. Quick mode is for testing XOR, AES-CBC, Protobuf inference and text/byte encodings; a saved decoder carries the complete recipe.
- Direction defines the left and right panes: encoding is “source → result”, decoding is “result → source”. Decoding accepts hex or Base64 source data; errors are shown instead of presenting garbage as a result.
- XOR is useful for repeating keys; AES/DES require the correct key, IV, mode and padding. Protobuf, MessagePack, BSON, AMF and FlatBuffers inspect structure — they cannot reconstruct application fields from arbitrary bytes.
- Input is capped at 4 MB. Verify a small known sample here first; only save it as a decoder once the text, headers and lengths make sense.
04 · Creating and managing decoders
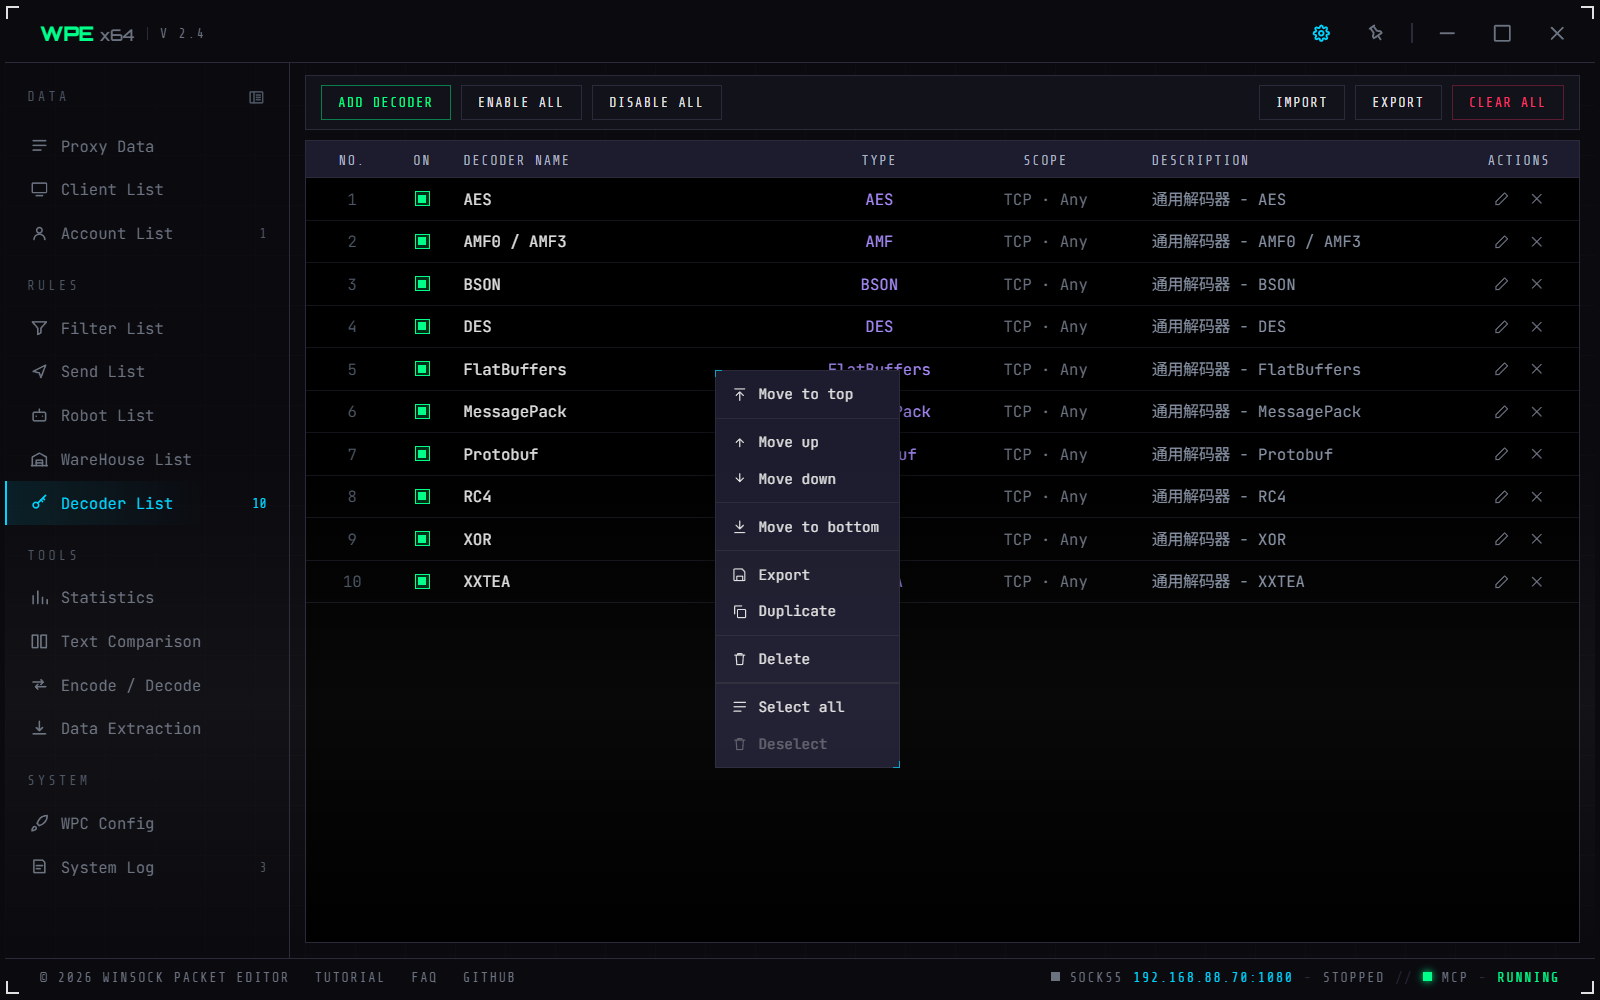
Open Rules → Decoders in the side bar and choose Add Decoder. Name it by protocol, direction and version — for example Login TCP Response XOR v1 — rather than “test”. List order matters: Smart Decode and the context menu try enabled decoders in this order.
- Choose the algorithm and enter its key. Keys may be hex, Base64 or text; AES/DES also need the protocol's IV, cipher mode and padding. An empty AES key is not a valid decoder.
- For a length-prefixed or fixed-header protocol, configure a frame. Length fields support 1, 2 or 4 bytes, byte order, whether the length includes itself/fixed header, a fixed-header check and a data offset. A wrong frame gives the algorithm truncated data.
- Set the scope: TCP/UDP/HTTP/WebSocket and request/response direction. Scope filters only real packets in lists and details; the workbench deliberately ignores it for testing.
- After saving, enable/disable, copy, reorder, import or export
.decfiles. Export is for backup or another WPE instance; do not blindly enable a decoder file containing keys you do not trust.
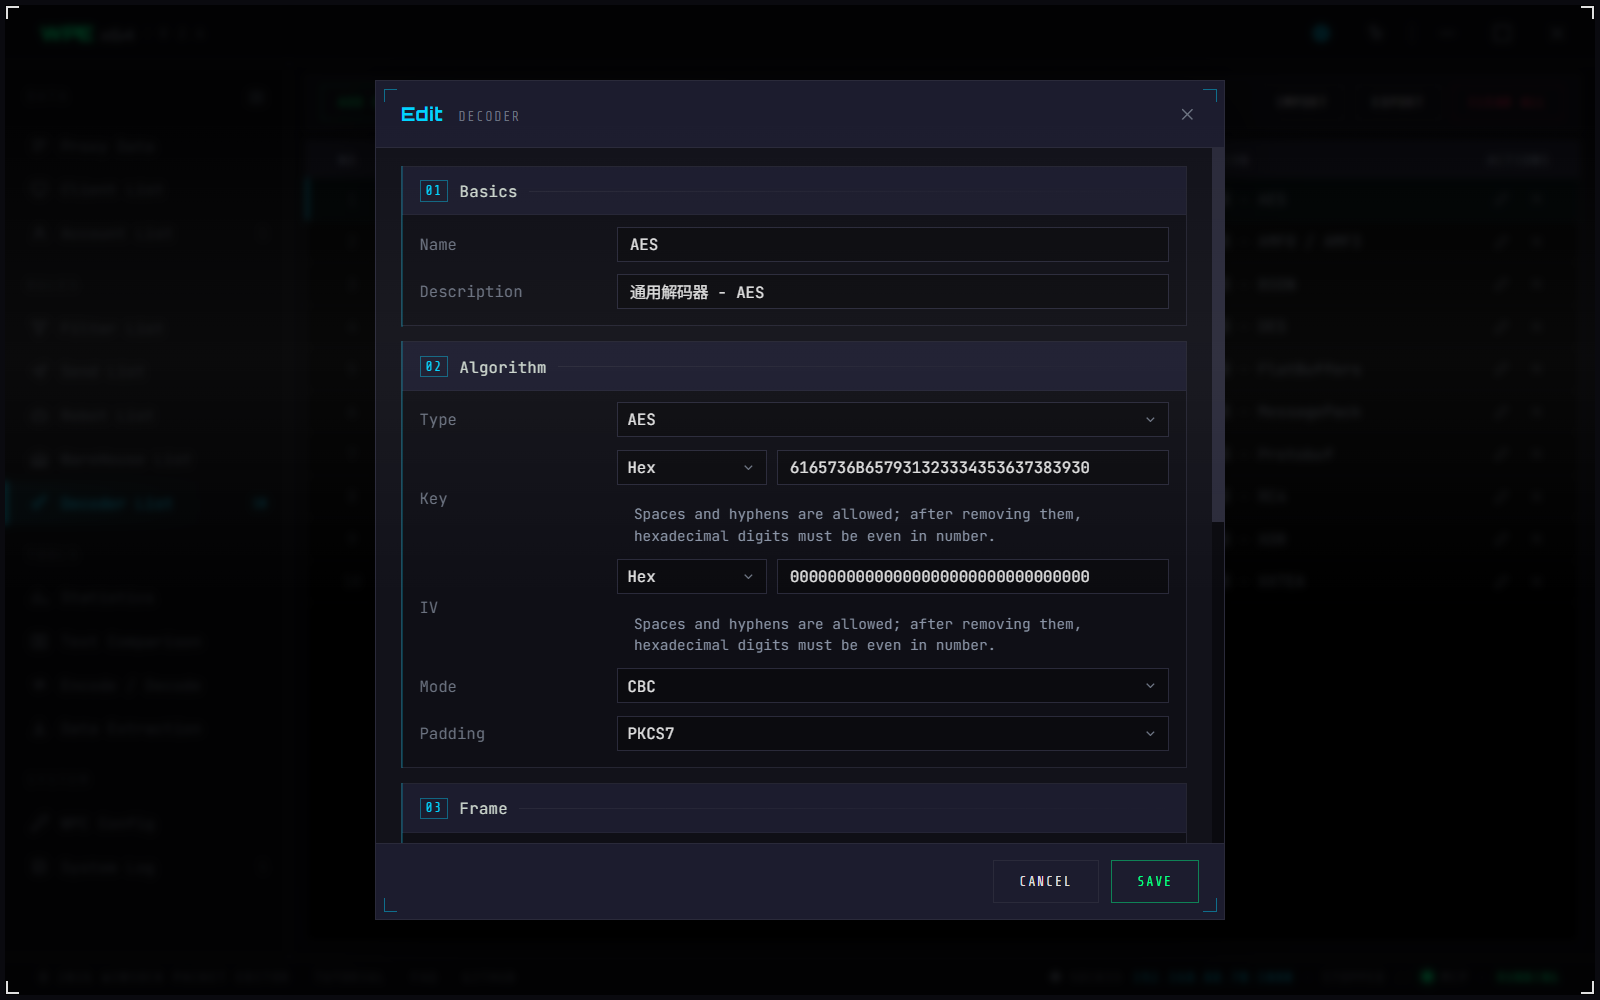
05 · Decoding packets and Smart Decode
Select a packet in either packet list. Right-click Decoder to choose an enabled recipe; for multiple packets WPE processes each item with progress and cancellation, and never displays a partial result after cancellation. Right-click Smart Decode to try every enabled decoder whose scope matches, retaining only plausible readable output.
It does not guess keys, bypass TLS or prove that an output is the protocol truth. It only automates the saved decoders you created and enabled. Validate the decoder on known samples, then cross-check headers, lengths, field patterns and repeated output across packets.
- A single result has text, hex and the decoder used. Batch results are grouped by original packet for comparison across a session.
- The detail panel can decode too. Decoding runs only when requested by the user, never on capture, filter or forwarding hot paths, and never alters the original packet or network traffic.
- A practical workflow: capture a few packets of one kind → compare them to locate variable fields → test algorithm/key/frame in the workbench → save and scope the decoder → batch-check with Smart Decode → only then consider a filter.
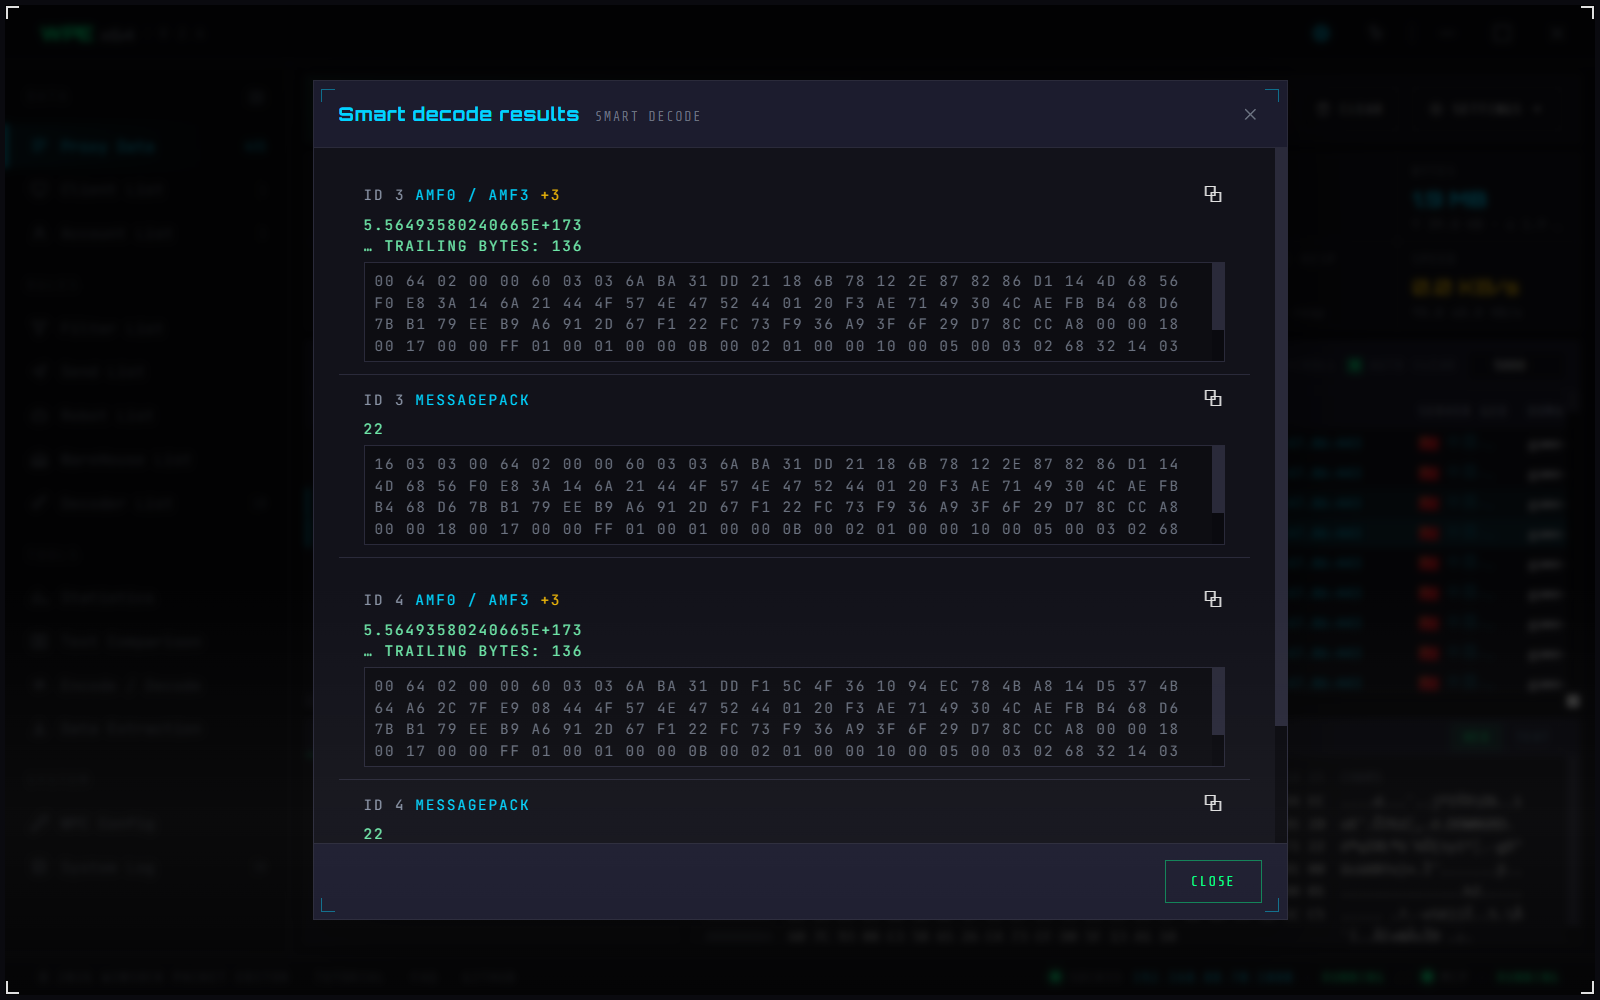
06 · Extraction
The three extraction types are three cards, each saying what file goes in, what comes out and what it is for, so you can see the difference before choosing.
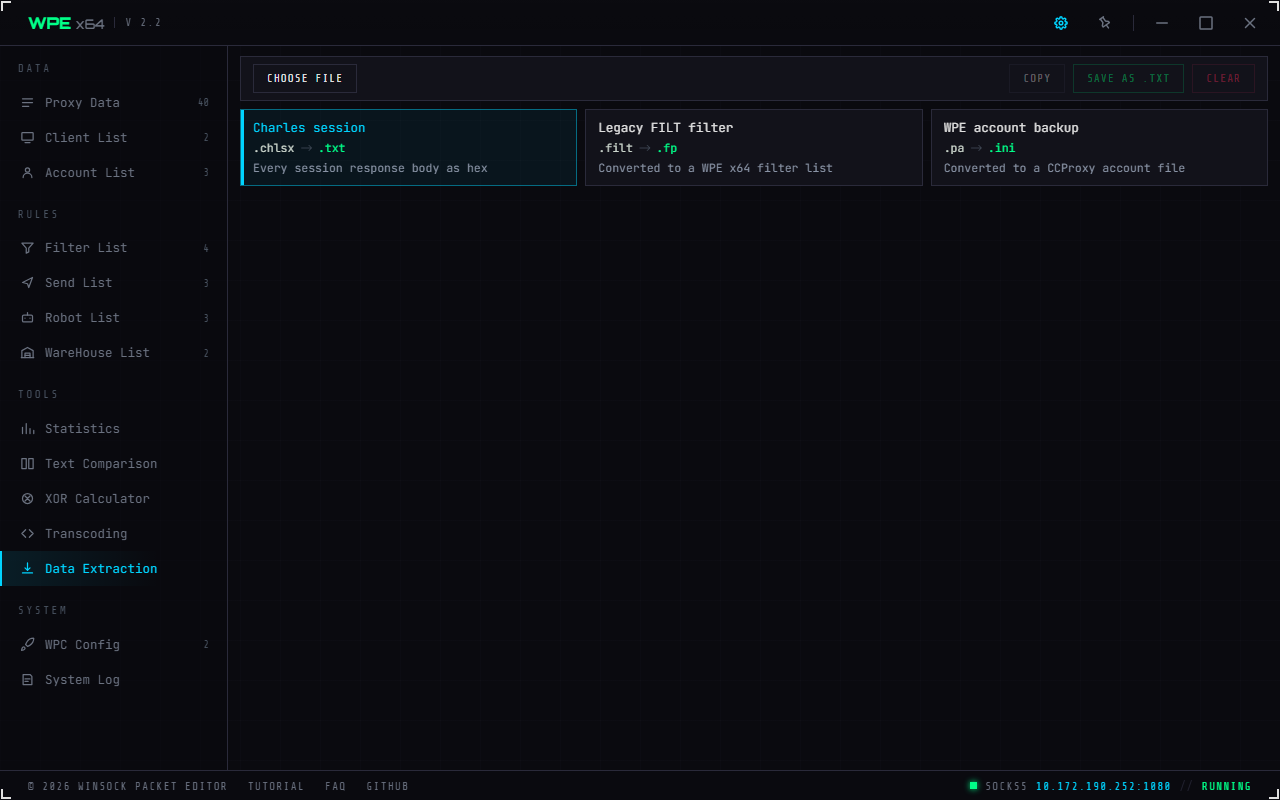
- Choose file opens the native file dialog (the browser cannot supply a full path — the same reason as everywhere else). You can also drag a file straight onto the page: the dashed overlay only appears while something is being dragged, so it takes no room the rest of the time
- Charles session
.chlsx → .txt: extracts every session response body as hex, blocks separated by a blank line - Legacy FILT filter
.filt → .fp: converts an old WPE filter file into a WPE x64 filter list (35¥-separated fields mapped onto name, header / socket / length conditions, normal or advanced mode, action, search and modify content, progression) - WPE account backup
.pa → .ini: converted into a CCProxy account file - The result header says Extracted N items, so you can confirm the count before pressing Save
- Copy: extracted hex usually goes straight into a filter or the XOR tool, and saving a file just to reopen it is a detour. The result is also editable — edit, then Save as
- ⚠️ Changing the type clears the result: otherwise the screen reads "type: account backup" above hex from the previous extraction, while Save uses the new type
| Extraction | Input | Output |
|---|---|---|
| Charles XML session → hex | .chlsx | decodes the Base64 inside <response><body> and shows it as hex |
| FILT filter file → WPE64 filter | .filt from the old WPE | converted to WPE x64 filter XML |
| WPE account file → CCProxy account file | .pa | a CCProxy-format .ini |
On-screen hint: once extraction succeeds the contents appear below, and the generate button exports them in the matching format.
07 · WPC Config (feeding the accelerator)
Proxy Mode only. What you set here is published through WPE's built-in web service to the WPEProxyCap accelerator client. For the full path from subscribing to a device connected into WPE, see Proxy Mode · bringing in devices with WPC.
Clients reach what you configure here by way of a subscription ID: WPC exchanges the ID with the subscription server for this machine's address before it requests either endpoint below. Only the subscription server issues IDs, and you have to apply for one — see Proxy Cap · where a subscription ID comes from.
GET http://{this machine's IP}:{remote MGT port}/ProxyCap/GetServerListGET http://{this machine's IP}:{remote MGT port}/ProxyCap/GetNoticeList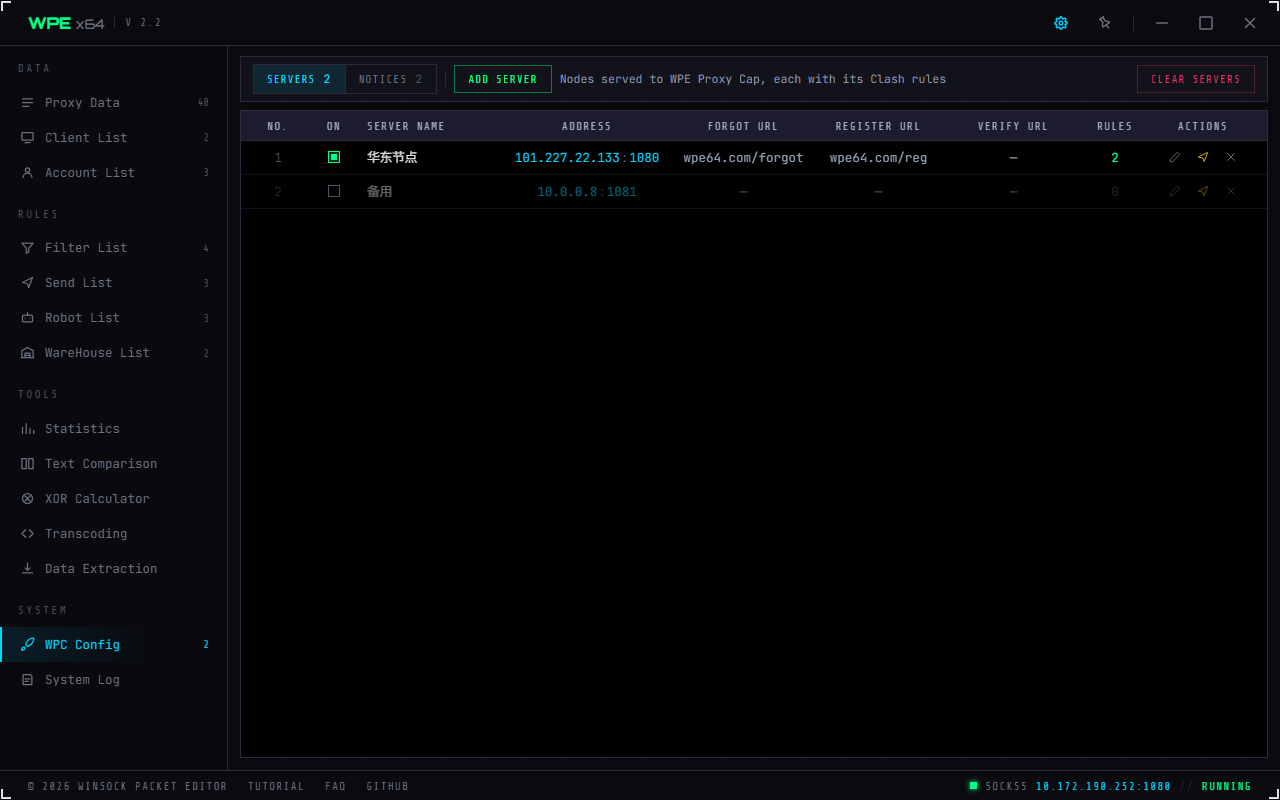
- Server list / Notice list (segments, each with a count): these back the two endpoints the client reads
/ProxyCap/GetServerListand/ProxyCap/GetNoticeList - Add server on the left and clear all servers on the right; the grey line between them says what the table is for
- Columns:
no. / enabled / server name / server address / password-recovery URL / registration URL / verification URL / rules / actions. Everything except the server name is centred — short, uniform values are easiest to scan down a column when centred, and only a variable-length identifier needs left alignment - The rules column is a count; the paper-plane icon in the actions column opens the rule set: one server carries one set of Clash rules, which the client writes into its mihomo configuration
- Enabled is a green checkbox that takes effect and is saved the moment you click it. A disabled row is dimmed as a whole, except the checkbox cell — that is the control that lights it back up
- Three icons in the actions column: ✎ edit · paper plane rule set · ✕ delete
The server list
| Field | Default | Notes |
|---|---|---|
Enable | ticked | only enabled servers are published |
Server name | — | the node name the client displays |
Address | — : 1080 | the node's SOCKS5 address: IP and port in one field, shown as IP:Port in the list |
Password-recovery URL | — | where the client's recover-password button goes |
Registration URL | — | where the client's register button goes |
Verification URL | — | the endpoint the client verifies accounts against |
Rules (one set per server)
Click the paper plane in the middle of a server row's action area to open its rule set. These rules are delivered to the proxy client, which writes them into the rules: section of the acceleration core's (mihomo) configuration when it connects — one line per rule, in the form TYPE,PARAMETER,ACTION.
| Field | Notes |
|---|---|
Enabled | only enabled rules are delivered; untick a rule you do not need for now instead of deleting it |
Type | what a connection is matched on — see Rule types and parameters below |
Parameter | the value to match; the format depends on the type. When adding, you can enter several at once separated by ; — a.com;b.com creates two rules. Leave it empty for MATCH |
Action | what happens on a match: PROXY / DIRECT / REJECT, see the table below |
| Action | Effect | Typical use |
|---|---|---|
PROXY | goes through the connected node (out via WPE x64's SOCKS5 proxy) | games to accelerate, programs you want to capture with WPE |
DIRECT | connects directly from this machine, bypassing the proxy | the local network, local sites, software that does not need acceleration |
REJECT | refuses the connection outright | blocking ads, telemetry or anything else you do not want to let through |
How rules take effect
- When the client connects, it writes the current node's enabled rules into the configuration in table order. Right-click the table to move a rule to the top, up, down or to the bottom.
- Every new connection is checked from the top down, and the first rule that matches decides what happens — the rest are not looked at. So put exceptions first and broad rules later.
- A connection that matches nothing goes direct. It is good practice to always end with a
MATCHrule so the fallback is explicit; if a server has no rules at all, the client addsMATCH,DIRECTon its own.
Written into the configuration, a rule set looks like this (the first line keeps the local network direct, the next two accelerate the game, and the last one sends everything else direct):
rules: - GEOIP,LAN,DIRECT - PROCESS-NAME,game.exe,PROXY - DOMAIN-SUFFIX,game-example.com,PROXY - MATCH,DIRECTRules are written into the configuration when the client connects. After changing them, have the client fetch the nodes again (reopen the client or update the subscription), then connect again.
Rule types and parameters
Of the types in the drop-down, the ones below are supported by the acceleration core and safe to use:
| Type | Matches | Parameter | Example |
|---|---|---|---|
DOMAIN | an exact domain name | domain | www.example.com |
DOMAIN-SUFFIX | a domain and all of its subdomains | domain suffix | example.com (matches both example.com and a.example.com) |
DOMAIN-KEYWORD | domains containing a keyword | keyword | game |
DOMAIN-REGEX | domains matching a regular expression | regular expression | ^login[0-9]*[.]example[.]com$ |
IP-CIDR | destination IPv4 addresses in a range | IPv4 range; use /32 for a single IP | 203.0.113.0/24, 203.0.113.8/32 |
IP-CIDR6 | destination IPv6 addresses in a range | IPv6 range | 2001:db8::/32 |
SRC-IP-CIDR | the source IP of the device that opened the connection | IPv4 range | 192.168.1.0/24 |
DST-PORT | destination port | a port or a range; separate several with / | 443, 27015-27030, 80/443 |
SRC-PORT | source port | as above | 7777 |
PROCESS-NAME | the program that opened the connection | the executable name, including .exe | game.exe |
PROCESS-PATH | the program, told apart from same-named ones by full path | full path to the program | C:\Games\Demo\game.exe |
NETWORK | transport protocol | tcp or udp | udp |
GEOIP | the region of the destination IP | region code; LAN means local and reserved addresses | LAN |
GEOSITE | the category a domain belongs to | category name | cn |
AND | all conditions in the brackets are met | ((condition1),(condition2)) | ((PROCESS-NAME,game.exe),(NETWORK,udp)) |
OR | any condition in the brackets is met | as above | ((DST-PORT,80),(DST-PORT,443)) |
NOT | the condition in the brackets is not met | ((condition)) | ((DOMAIN-SUFFIX,example.com)) |
IN-PORT | the local port the connection entered the acceleration core on | port | rarely needed |
MATCH | every connection (the fallback) | leave empty | always the last rule |
When the client writes a node's rules into the acceleration core's configuration, a rule the core does not understand is skipped — the connection is unaffected, but that one rule does nothing, and the client leaves an amber 已跳过一条规则:类型,参数(原因) line in its System Log. These are the ones that get skipped:
① Do not use these types: RULE-SET and SUB-RULE (they need extra rule-set / sub-rule configuration that the client does not generate), and UI-EX / COMMAND / DEVICE-NAME (not supported by the acceleration core);
② apart from MATCH, the parameter must not be empty — and for MATCH it must be empty;
③ the parameter must not contain a comma: separate several ports with / (80/443 works, 80,443 does not); bracketed AND / OR / NOT expressions are the exception and are kept as they are;
④ enter only the value itself — do not append options such as no-resolve (no-resolve on IP-CIDR / IP-CIDR6 / GEOIP is the exception: the client moves it after the action for you).
If a rule seems to do nothing, search the System Log for 已跳过 ("skipped").
On top of the ones above, PROCESS-NAME and PROCESS-PATH rules are skipped on WPC for Android as well — splitting traffic by app on a phone is done by per-app proxy at the system VPN layer, so process names in the rules are of no use. To send one game through the proxy on a phone, use per-app proxy; see the WPC Android tutorial · rules and DNS.
GEOIP,LAN works straight away. Any other region code, and any GEOSITE category, makes the acceleration core download a geolocation database the first time it is needed, and on a poor connection that can keep the connection waiting a long time. For game acceleration, IP-CIDR and DOMAIN-SUFFIX with concrete addresses and domains are the better choice.
Common rule setups
Each setup below is a few rules added to the rule set in order. In the interface one row is one rule: pick the type, enter the parameter, pick the action, click Insert.
① Accelerate only the game, everything else direct (the most common)
PROCESS-NAME,game.exe,PROXYPROCESS-NAME,launcher.exe,PROXYMATCH,DIRECTChoose type PROCESS-NAME, enter game.exe;launcher.exe, choose PROXY, and the first two rules are created in one go; then add type MATCH with an empty parameter and action DIRECT. If the game has a launcher or an updater, list those programs too.
② Accelerate by the game server's domain or IP
DOMAIN-SUFFIX,game-example.com,PROXYIP-CIDR,203.0.113.0/24,PROXYMATCH,DIRECTFor when you know where the game servers are (capture once with WPE x64 and look at the server address column). A domain rule covers all of its subdomains; an IP rule suits games that connect to an IP directly.
③ Accelerate everything, but keep the local network and chosen sites direct
GEOIP,LAN,DIRECTDOMAIN-SUFFIX,qq.com,DIRECTDOMAIN-SUFFIX,weixin.qq.com,DIRECTMATCH,PROXYThe fallback becomes MATCH,PROXY, so all traffic is accelerated by default and the exceptions listed first go direct. Keep the local-network rule so printers, NAS boxes and other local devices are not sent through the proxy.
④ Accelerate only the game's UDP traffic (voice, matches)
AND,((PROCESS-NAME,game.exe),(NETWORK,udp)),PROXYMATCH,DIRECTAND requires both conditions: the program is game.exe and the protocol is UDP. Enter the whole ((PROCESS-NAME,game.exe),(NETWORK,udp)) as the parameter.
⑤ Accelerate by port
DST-PORT,27015-27030,PROXYMATCH,DIRECTThe simplest option when a game uses a fixed port range. Use - for a range and / to join several ports or ranges, for example 27015-27030/3478.
⑥ Block certain addresses
DOMAIN-SUFFIX,ads.example.com,REJECTPROCESS-NAME,game.exe,PROXYMATCH,DIRECTREJECT rules belong at the top: rules are checked in order, and further down the connection may already have been let through by an earlier rule.
① exceptions first, broad rules after, MATCH last;
② keep one game's program names, domains and IPs together, so they are easy to move as a group;
③ untick Enabled on a rule you do not need for now rather than deleting it;
④ every server has its own rule set, so different nodes can carry rules for different games.
The notice list
| Field | Notes |
|---|---|
Notice type | 1 event news (blue) · 2 maintenance (yellow) · 3 esports (green) · 4 limited-time shop (purple) · 5 community (blue) |
Title / Body | the body may span several lines |
More URL | where the More link goes |
08 · The System Log
| Tab | Columns | Export headings |
|---|---|---|
| System Log | no. / time (HH:mm:ss) / module / message | time · module · message |
| Filter Log | no. / time (HH:mm:ss:fffffff) / filter name / action / matches / type / length | time · filter name · action · matches · type · length |
| Proxy Log | no. / time / account / IP address / message | time · account · IP address · message |
| MCP Log | no. / time (HH:mm:ss) / module / message | time · module · message |
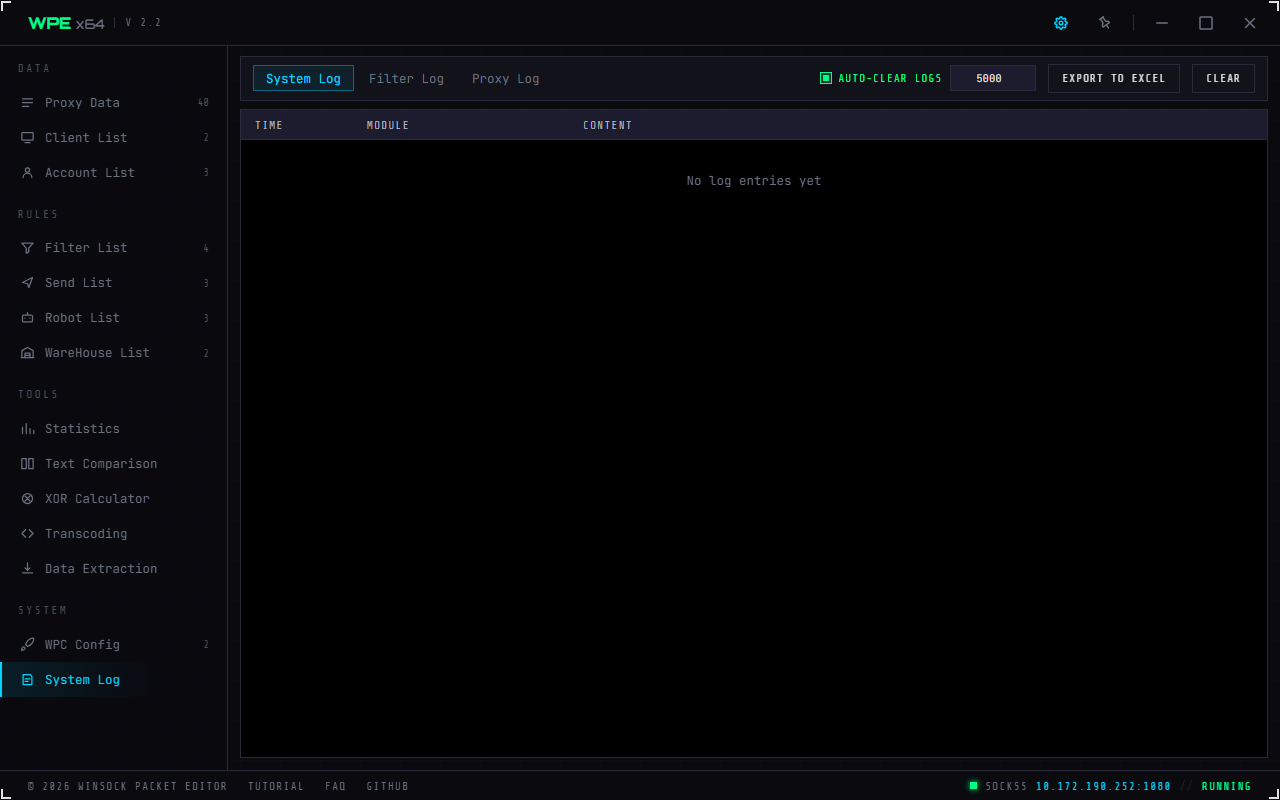
- Four tabs: system / filter / proxy / MCP. Their columns are entirely different — four datasets, four sets of columns. The MCP log records every tool call. Proxy logs come from the SOCKS5 service and the Proxy Mode runtime path, so Inject Mode does not produce that class of entry.
- Log auto clear plus a row count (default 5000, range 100–500000). ⚠️ This is a separate setting from the packet list's "auto clear": this one governs the four log streams, that one the packet and proxy lists, and they do not affect each other. The labels are deliberately different too (this one reads "log auto clear")
- ⚠️ The semantics are circular: past the limit only the oldest rows go and the most recent N are kept. A log is precisely the thing you scroll back through, and emptying the whole table wipes the screen just as you are reading it
- Auto-scroll kept its behaviour and lost its switch: stay at the bottom and it follows, scroll up once and it stops, scroll back down and it resumes (the
tail -fconvention) - Export to EXCEL exports the whole table (selection is irrelevant); Clear also discards the backlog that has not been displayed yet
- You can select a stretch of the log and copy it directly
⚠️ The log is kept in memory only and never written to disk; unexpected errors in the program are recorded here too. Use Export to EXCEL to keep a copy.
When the process really does crash the in-memory log goes with it, leaving only the Event Viewer (.NET Runtime / Application Error) and WER. ⚠️ The EdgeWebView Id=256 event there is not a crash signal — it is an extension GC entry logged on every start, dozens a day. Do not follow it.
Failed injections, a proxy that will not start, certificate installation, filter errors, bad robot instructions, remote management starting and stopping — all of it is recorded here. Come here before the FAQ.
09 · System Settings
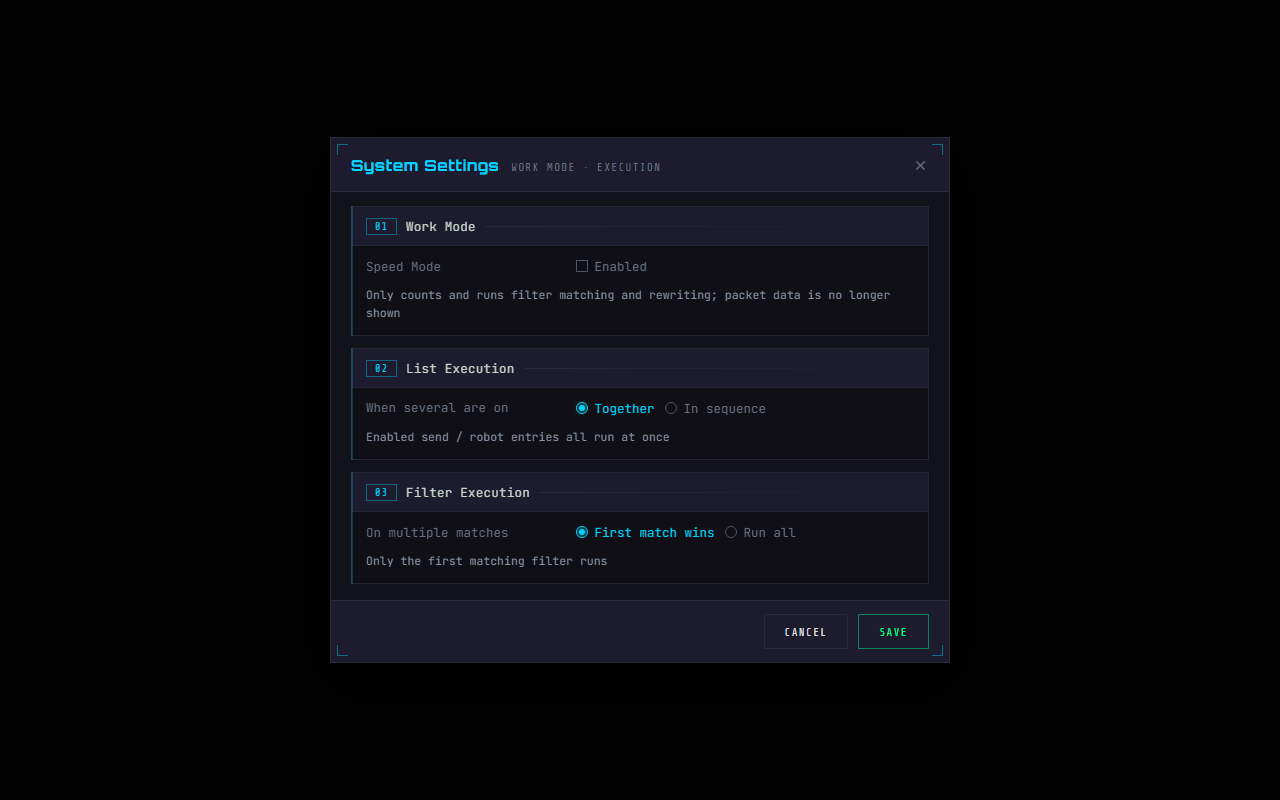
- 01 Working mode · Speed Mode (off by default): with it on WPE only counts, matches and rewrites — packet data is no longer displayed. For very high-rate editing: the interface is the most expensive stretch of the whole chain, and turning it off moves the capture rate up an order of magnitude
- 02 List execution mode (default in order): one entry finishes before the next starts, or every enabled entry runs at once. Governs batch runs of the Send List and the Robot List — one switch for both
- 03 Filter execution mode (default in order): when several filters match, run them all top to bottom (Replace keeps matching downwards, so later filters work on already-modified data), or execute only the first match. See section 07 of the Filters chapter
- Each group carries a one-line explanation underneath, so you do not have to come back to the documentation
- ⚠️ Filter action colours moved out too: they are now the four colour chips on the data page toolbar — click a chip to change that action's colours, with the setting sitting next to the thing it governs
Yes. It only keeps packets out of the list; counting, traffic, filter matching and rewriting all continue, in both modes.
10 · HotKey Settings
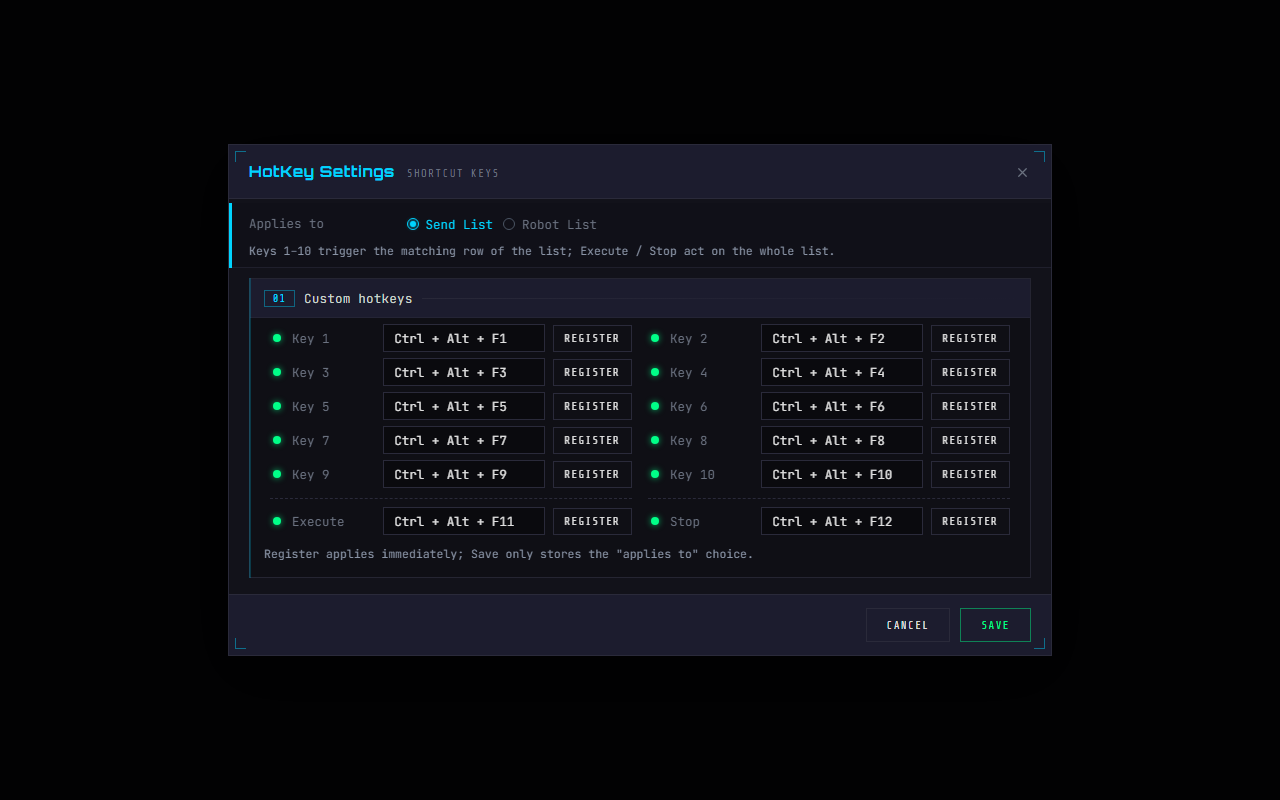
- Applies to: one of two — the
Send Listor theRobot List. This switch decides where every hotkey lands; the grey line under it spells out the split between 1–10 and Execute / Stop - Hotkeys 1 to 10 fire entries 1 to 10 of that list (by position, not by name)
- Execute / Stop (the 11th and 12th) run and stop the whole list
- The boxes are key recorders — just press the combination. Ctrl / Alt / Shift plus F1–F24, 0–9 and NumPad0–9 are supported
- The lamp at the start of each row is that entry's status; hover for the wording: green active · amber changed but not registered · red registration failed (usually another program holds it) · grey (hollow) not set. The lamps line up in one column, so a glance tells you which ones are not live
- ⚠️ Register talks to the system at that moment; it does not wait for Save. Save only covers the "applies to" choice — which is what the grey line at the bottom says
① Is that row's lamp green (red = another program holds the combination, amber = changed but not registered)? ② Is "applies to" pointing at the right list — the cyan keyboard icon beside the quick-panel tab shows this without opening the dialog. ③ Does the numbered entry exist — hotkey 1 needs a first entry in the list. ④ If it starts a send and nothing goes out, work through the checklist in the Send section.
11 · Backup Settings
Exports and imports the entire configuration as a single .sb file (optionally encrypted), including warehouses, auto-store rules, the WPC nodes and rules, and the WPC notices.
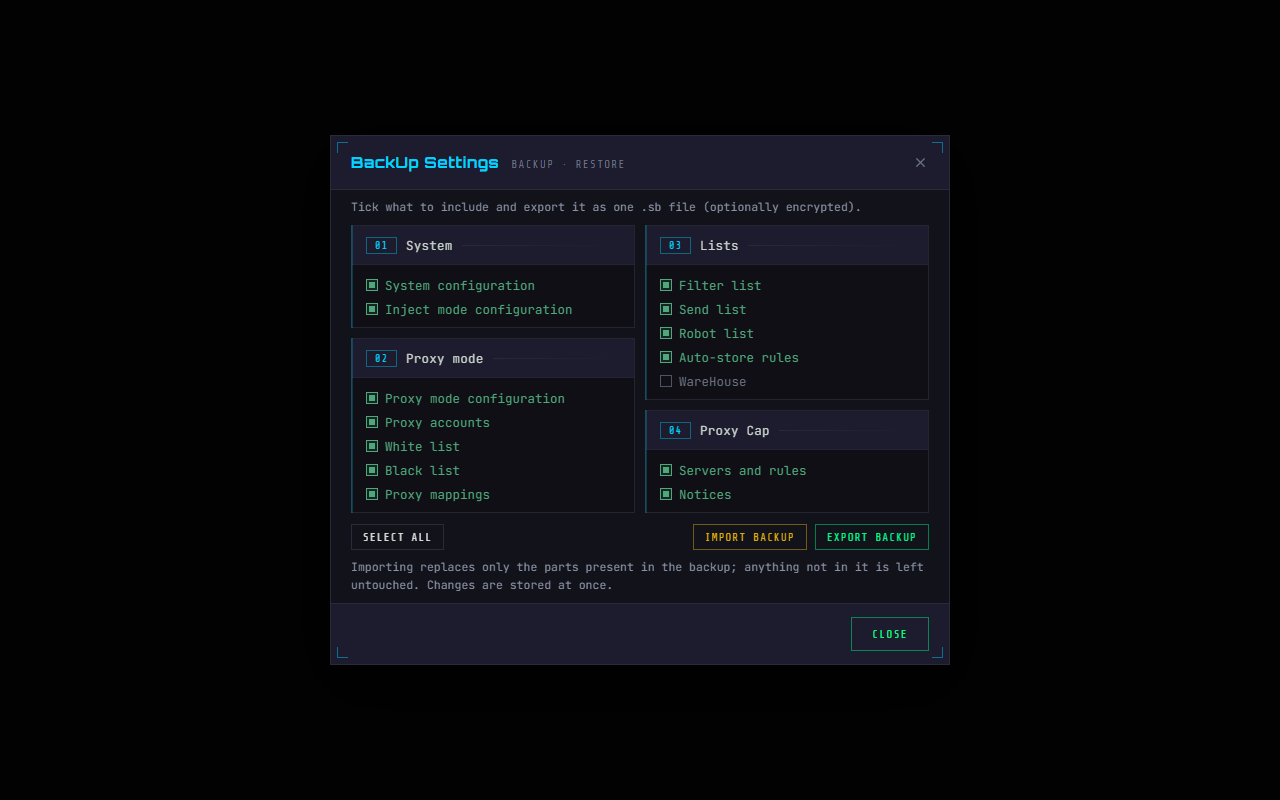
- 01 System: system runtime configuration · inject-mode configuration
- 02 Proxy Mode: proxy configuration · accounts · allow list · block list · mappings
- 03 List data: Filter List · Send List · Robot List · auto-store rules · warehouses (unticked by default — they carry packet bytes and can be large; hover for the note)
- 04 WPC Config: nodes and rules · notices
- Select all sits at the lower left, with Import backup and Export backup on the right
- ⚠️ Read the line at the bottom carefully: importing replaces only what the backup contains; anything not in it is left alone, and the result is saved immediately. Note that a list that was empty at export time is not written to the backup, so the same list on the target stays as it is
- ⚠️ Ticking nothing is now rejected
Export asks first: press Skip encryption to export as plain text (anyone can open it), or enter a password twice and press Encrypt. An empty password shows "Enter a password" in the dialog, and two different entries show "The two entries do not match".
To import an encrypted file, enter the password set at export and press Unlock; a wrong one shows "Wrong password — try again" in the dialog. Unencrypted files import directly, with no password box.
Whatever a backup contains is cleared first and then loaded on import, with filters, sends and robots keeping the backup's order; anything the backup does not contain is left alone. If a section fails during export, the whole export reports failure and the system log names the section.
12 · Appearance (language · theme · display · file icons)
Opened from the gear on the right of the title bar. It governs "what this program looks like", so it is reachable from every screen, unlike the 12 settings dialogs that only mean anything once you are inside a mode (the two entries on the home screen — Database Setting and MCP Settings — are the exception).
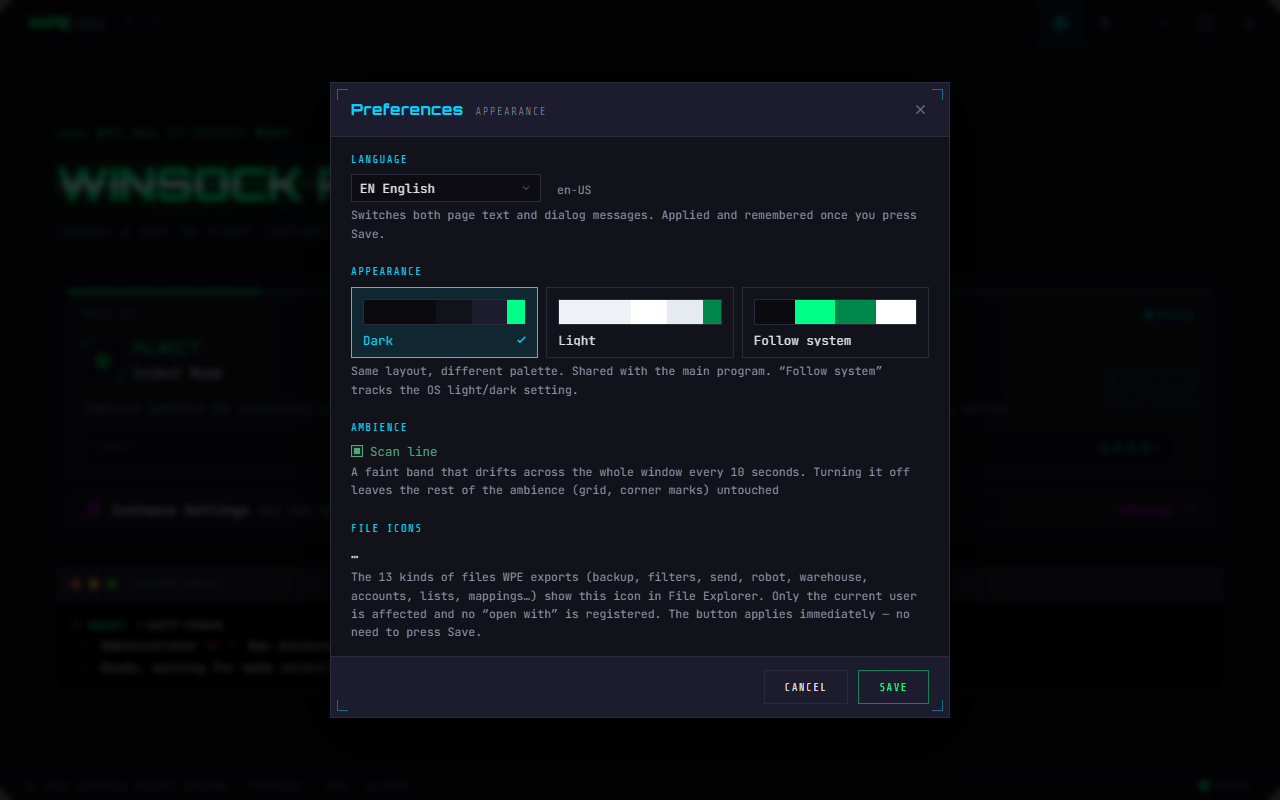
- Interface language: seven — Simplified Chinese / Traditional Chinese / English / Japanese / Korean / Vietnamese / Russian. Each row is "a two-letter prefix plus the language's own name for itself", with the culture name (
zh-CN) beside it. Endonyms are deliberate: once you have switched into a language you cannot read, the endonym is the only thing on screen you still recognise; the prefix exists so type-ahead works (you cannot jump to a CJK name by first letter) - ⚠️ Page text and dialog wording switch together — one language setting drives both, so you never get "English interface, Chinese dialogs"
- Theme: Dark / Light / Follow system, three cards each with a four-colour preview strip (background / card / panel / accent). The "follow system" card shows half of each
- ⚠️ It is not an inversion, it is the same design with a different palette: layout, spacing, borders, corner marks, the grid backdrop and the travelling beam all stay. The neon colours are each dimmed enough to be readable on light, with their hue unchanged
- Under "follow system" the explanatory line also states which one it currently resolves to — showing just "follow system" leaves you unable to confirm that it read the system correctly
- Display: Font size (90%–150% in 5% steps) scales every font in the interface; Main text color can be overridden (unchecked = the current theme's native greys), with Restore defaults beside it. Both apply on Save and ride along with display preferences and backups
- Scan line (formerly its own "ambience" group): the beam that travels slowly across the whole screen (one pass every 10 seconds). Turning it off leaves the rest of the ambience (grid backdrop, corner marks) untouched. ⚠️ It is orthogonal to the theme — light mode has it too — which is why it now sits in the Display card rather than Appearance
- File icons: gives the 16 file types WPE exports (
.sb .fp .dec .pex .sp .sc .rp .whp .whs .pas .pa .wl .bl .pml .pmr .upr) their own icon in Explorer. It writes the current user's settings only, does not register an open action (several versions may be unpacked on one machine, so which one a double-click should open is undecidable), and never takes an extension somebody else already owns. The button takes effect immediately — no Save needed - This screen is a draft: your choices only change the draft, and Save applies and remembers them (the file-icon button aside)
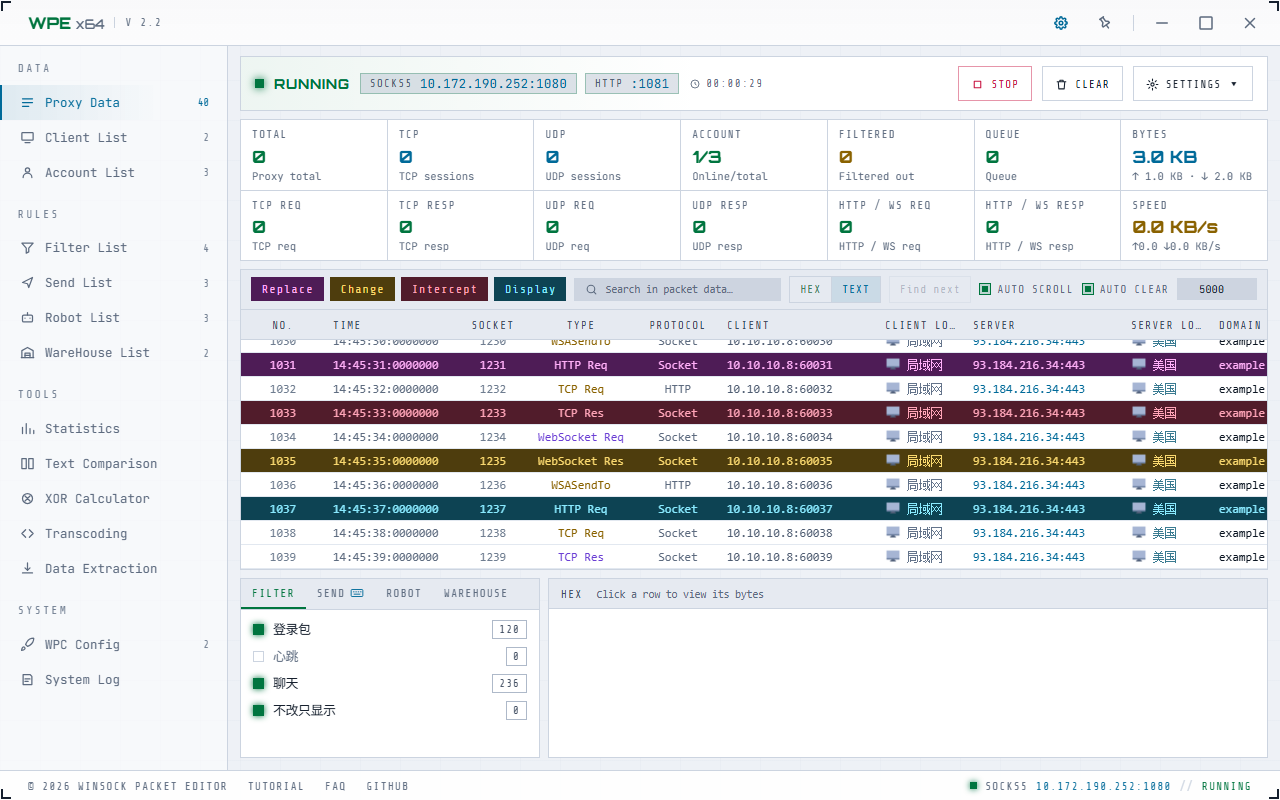
- The dozen columns of the packet list keep their colour-by-information-layer scheme, each dimmed enough to read on light — the cool grey / cyan / amber / violet / matrix-green split is unchanged
- ⚠️ Rows matched by a filter use the four configurable "filter action" colours (edited from the four chips on the data-page toolbar); those do not follow the theme — they are data, not theming
- Text stays clearly readable in both the dark and the light theme
13 · Remote MGT and the web console
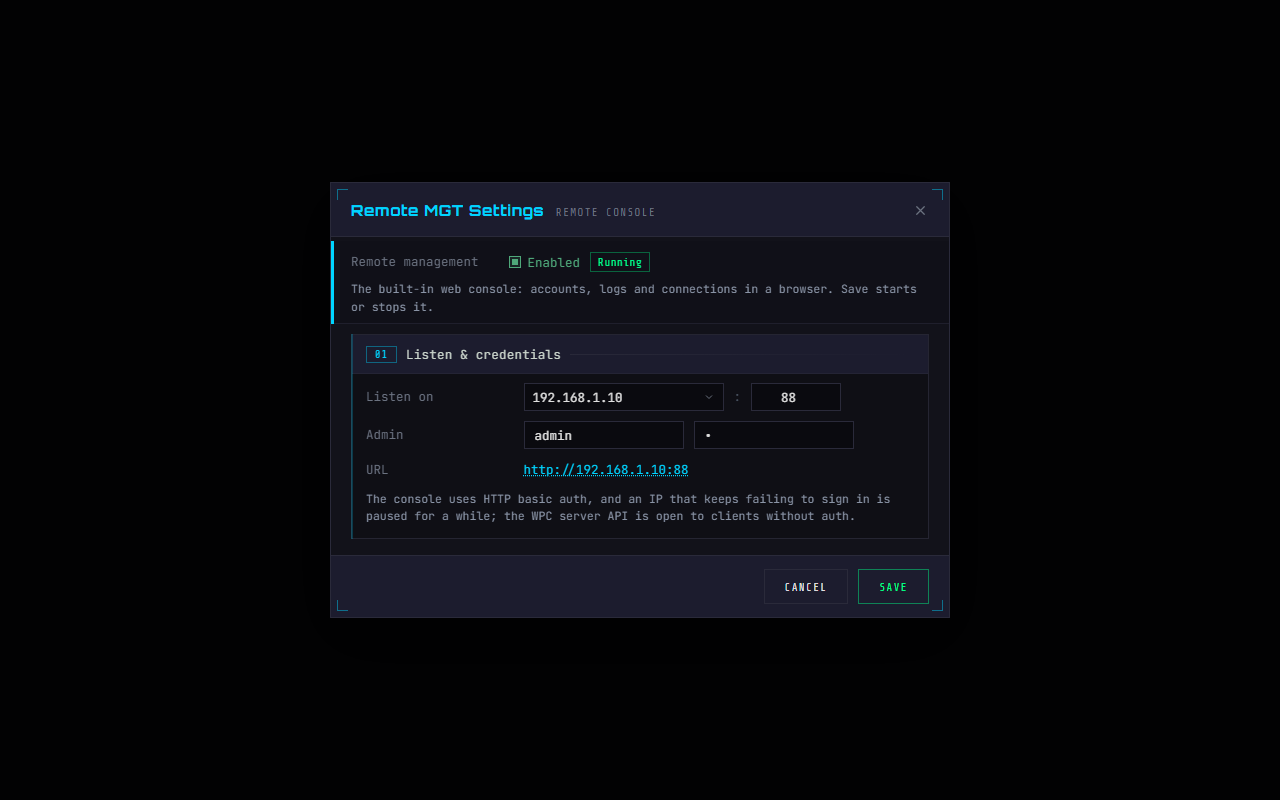
- Remote MGT: the master switch plus a running state badge on its right. ⚠️ Saving starts or stops it — there is no second place to click
- Listening address: the dropdown lists this machine's addresses, with port
88by default. ⚠️ If the saved address is not one of this machine's, you get an amber note, prompting you to pick again - Administrator: the account and password for signing in to the console — pick a strong one
- Access URL: the complete, clickable address — no assembling it yourself
- ⚠️ A failed start shows the actual reason and keeps the dialog open (port in use, address not on this machine…) so you can fix it right there
Once it starts, the log carries a line: Remote MGT enabled: http://ip:88.
All three pages (overview / accounts / log) match the main program's look and are built for phones: on a narrow screen tables turn into cards, buttons are easier to tap, refreshing pauses when the page goes to the background, and you never get a stale page after an upgrade.
Pages and endpoints
| Path | Page or purpose | Authenticated |
|---|---|---|
/ | overview | yes |
/ProxyAccount | proxy account management | yes |
/SystemLog | system log | yes |
/account | a CCProxy-compatible account endpoint — GET returns an HTML list, POST adds, edits and deletes | yes |
/SystemInfo/* | GetCPUAndMemory · GetStartTime · GetSelectMode | yes |
/SocketInfo/* | GetSocketInfo · GetSocketLogList · GetProxyLogList | yes |
/ProxyInfo/* | GetProxyInfo · GetProxyAuthList · GetProxyLogList | yes |
/ProxyCap/* | GetServerList · GetNoticeList | no — allow-listed |
Keep the remote management port on your local network where you can; when outside proxy clients need to reach it, use a firewall to allow only the source addresses you need, and give the administrator a strong password.
The console has login protection built in: repeated failed logins lock it for a while, longer each time, and requests that change data check where they come from, so another website cannot act on your logged-in session.
14 · Performance tuning
When capture volume makes things stutter and the buffer count climbs, work down this list — best return first:
- Turn off both location columns in List Settings, which skips the IP lookup and the flag rendering.
- Turn on Auto clear and lower the threshold from its default of 5000.
- Turn off Auto scroll.
- Make the window smaller or stop it filling the screen — rendering cost scales with visible area; and turn off the scan line in Appearance (it is a full-screen animation running a pass every 10 seconds).
- Use Leach Setting to display only the packets you care about.
- The last resort: Speed Mode — nothing is displayed at all, but the filters keep working.