Send · Robot · WareHouse
Three features make up WPE's automation: the Send List replays packets in bulk, the Robot sequences steps and simulates keyboard and mouse input, and the WareHouse archives samples. They can call one another, and filters and hotkeys can trigger all three.
00 · Which of the three you want
All three sound like automation, but what triggers them and what they can do differ sharply. Check this table first:
| Send List | Robot | WareHouse | |
|---|---|---|---|
| What it is | a set of packets plus a loop count and an interval | a sequence of instructions — send, wait, key and mouse input, call another list | a library of packet samples; it stores, it never sends |
| What triggers it | Execute by hand, a hotkey, a Robot instruction, or a filter's chained execution | Execute by hand, a hotkey, a filter's chained execution, or another Robot | right-click to store, or an auto-store rule |
| Branching and waiting | no — it sends the set N times in order | yes — the instructions include delays, loops and conditions | — |
| Keyboard and mouse simulation | no | yes, via InputSimulator | — |
| Typical use | replaying a captured run untouched; load testing | reproducing a login flow, timed heartbeats, multi-step scripts | collecting samples, comparing packets across versions, feeding filters and sends |
| You want it when | "I just want to send these packets again" | "send, wait a bit, then send the next one depending on what happened" | "I will need this packet later — keep it" |
A filter matches the packet you care about → chained execution starts a Robot → the Robot waits, then calls a Send List to fire off a burst → and the original sample goes into the WareHouse for the record. Worked examples in section 04.
- Create a send first: Send List toolbar → Add Send. The right-click "Add to send" only lists existing sends, and is greyed out while there are none.
- Back in the packet list, select the rows you want to replay (multiple rows work) and right-click → Add to send ▸ the send you just made.
- Open the Send List, double-click the entry to reach Send Edit, and set the Loop count and interval.
- Decide on the socket: keep each packet's own, or tick Use system socket — which requires having set a system socket from the packet list's context menu first (without one the checkbox cannot be ticked).
- Save, turn On back in the list and press Start (or press Execute inside Send Edit to run just this one).
- Watch the Success column climb. Stuck at 0 usually means a dead socket — the System Log says why.
01 · The Send List
One send is a set of packets plus a loop count and an interval, replayed in bulk with one click.
The list screen
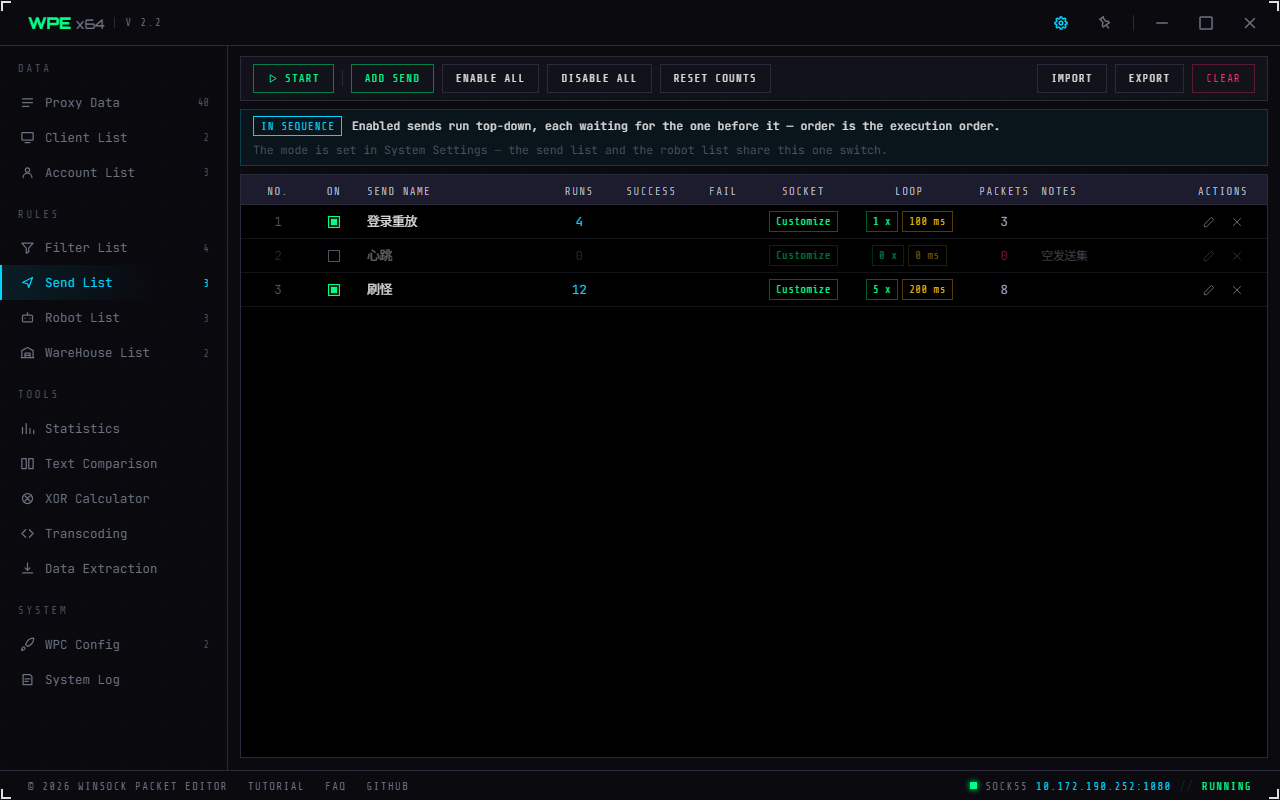
- Toolbar: Start · Add Send · Enable all · Disable all · Reset counts; Import / Export / Clear at the right end. While it runs only the buttons are locked, not the table — you still want to scroll it and watch the counters climb
- The execution-order note: the badge shows the current list execution mode (In sequence / Together, switched under System Settings, and shared with the Robot List). ⚠️ Under "Together" it turns amber — order decides nothing there
- Columns:
No. / On / Send Name / Runs / Success / Fail / Socket / Loop / Packets / Notes / Actions - The "Packets" column is the size of the send collection, and 0 is flagged red with a tooltip — an empty collection sends nothing at all
- The "Socket" cell shows the number of the system socket for sends that tick "use system socket", and "Customize" otherwise (meaning each packet's own socket is used)
- The "Loop" cell puts the count and the interval side by side (
1 x/100 ms) - Enabled and executions each have a column, so you can see at a glance which entries are on and how often they ran
- The note column does not wrap and truncates with an ellipsis; hover to read it in full
Toolbar, left to right: Start (it becomes Stop while running, and is separated from the rest by a vertical rule) · Add Send Enable all Disable all Reset counts; at the right end Import (reads a .sp), Export (writes a .sp) and Clear.
The context menu has seven items acting on the selected rows: Move to top / Move up / Move down / Move to bottom / Export / Duplicate / Delete, plus Select all and Deselect.
| List execution mode | What Start does |
|---|---|
| In sequence (default) | each send finishes before the next one starts |
| Together | every enabled send runs at once |
The mode lives in System Settings → List Execution → "When several are on" and applies to the Robot List as well.
Send Edit
Double-click a row in the Send List (or click the pencil at its end) to open it. What you edit is a working copy: reordering, deleting, importing and clearing only touch that copy, so Cancel really does leave everything as it was.
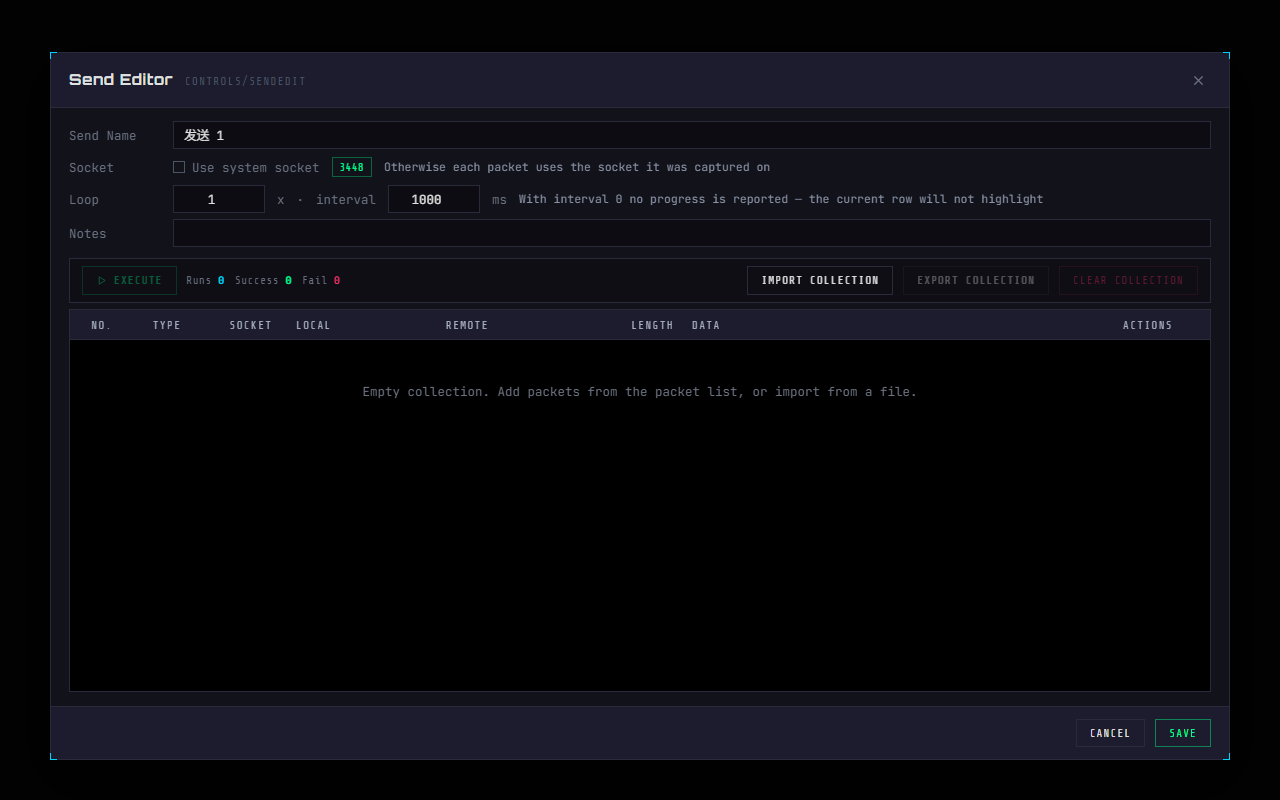
- Send name: defaults to
Send N - Socket: ticking "use system socket" ignores the socket recorded on each packet and uses the global one instead; the outlined tag beside it shows its current value (a green number once set, a red "not set" before that). With no system socket set, the checkbox cannot be ticked at all — that would be a choice guaranteed to fail — so set one first from the packet list's right-click menu. ⚠️ The system socket is runtime-only and goes back to unset on every restart, so this checkbox is not remembered either: it always opens unticked
- Loop: how many times the whole packet set repeats · Interval: milliseconds between packets. The grey line beside it says that with an interval of 0 no progress is reported and the current row is not highlighted
- Note: free text; the list page shows it in its own column
- Execution bar: Execute (it becomes Stop while running) plus three live counters (Runs / Success / Fail). Executing saves first and runs the saved copy; the three buttons at the right end are Import collection / Export collection / Clear collection
- Send collection:
No. / Type / Socket / Local / Remote / Length / Data / Actions. The pencil at the end of a row opens the packet editor (so does double-clicking the row) and × removes that entry; the context menu adds move to top / up / down / bottom - There is no hex panel on this screen: it is about which packets and in what order. To read or change bytes, open the packet editor
Three ways to add packets to a send collection
- Right-click in the packet list or the proxy list →
Add to send ▸ pick a send. Multiple rows at once are supported. - Right-click in the hex panel →
Add to send ▸ …. If you have bytes selected, only that slice is added. - Right-click the hex area of the Packet Edit window →
Add to send ▸ ….
⚠️ All three behave the same way: with no send defined the item is greyed out — add one in the Send List first.
A loop count of 0 is treated as 1. An interval of 0 is fine — it means "no pause, send back to back".
Import and export
| Format | Contents | Where |
|---|---|---|
.sp | the whole send list | Import / Export at the right end of the Send List toolbar |
.sc | the send collection of one send | Import collection / Export collection on the Send Edit execution bar |
① The target connection is closed or its socket is unavailable; ② you chose "use system socket" without setting one, so Send Edit, Send List, Robots and the global hotkey show a message; or ③ the current traffic cannot be sent back on its original connection. Check the system log for the reason.
02 · The Robot
A Robot is a set of instructions run in order. It can loop, wait, simulate keyboard and mouse input, fire off a send, and switch other lists on and off while it runs.
The list screen
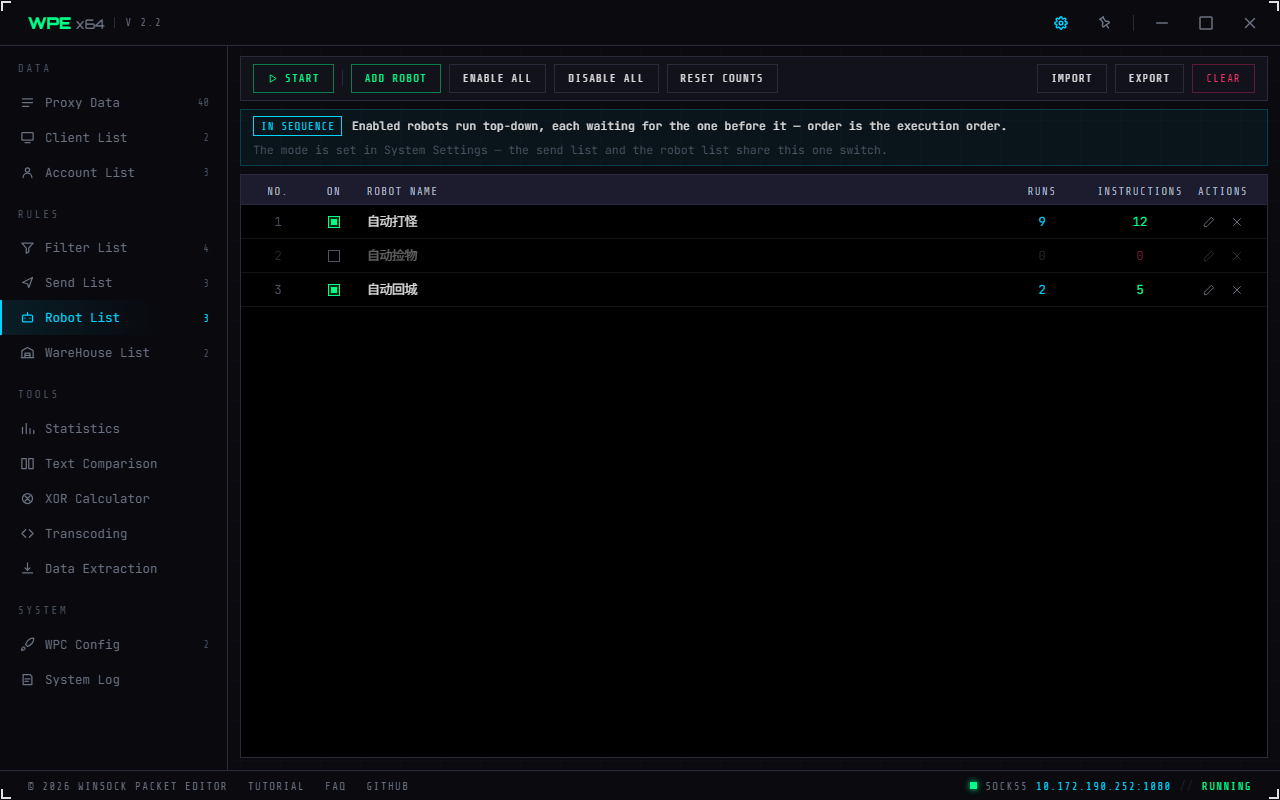
- The toolbar matches the Send List, with Start first
- Columns:
No. / On / Robot Name / Runs / Instructions / Actions - An instruction count of 0 is flagged red with a tooltip — an empty instruction set does nothing at all
- The execution-order note is driven by the same switch as the Send List ("list execution mode" under System Settings)
- Double-click a row to open the robot editor (below)
The toolbar matches the Send List button for button — only the first one reads Start and the add button reads Add Robot; the right end is still Import (a .rp), Export and Clear. The context menu is the same too.
Robot Edit
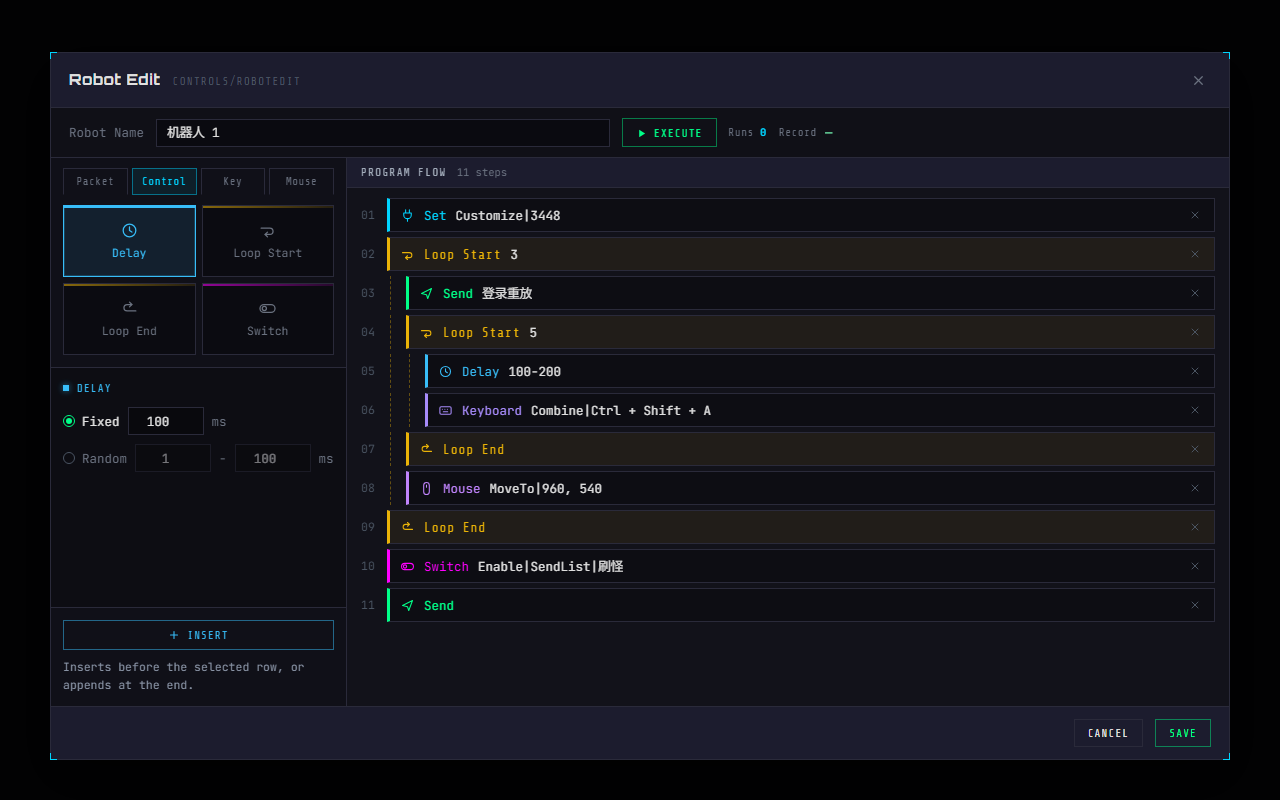
- Work bar (spanning both columns): robot name · Execute · run count · trace. It governs the robot as a whole, which is why it is not part of the program flow
- Instruction blocks (top left): four group tabs — Packet / Control / Keyboard / Mouse — over 13 tiles (icon plus name). Whichever tile you pick, the single parameter area below draws that form — there is never more than one form on screen
- Parameter area (bottom left): the parameters of the selected tile. Here it is Delay, so you get the fixed/random radio pair and the millisecond boxes
- Insert: inserts before the selected row, or appends to the end when nothing is selected (that is what the grey line under the button says)
- Program flow (right): blocks with a type colour rail, not a flat table. Send = green · Set = cyan · Delay = sky blue · Loop = amber · Toggle = magenta · Keyboard and Mouse = two shades of violet
- Loops are drawn with indentation and a vertical rail, computed from the execution stack — so nesting on screen equals nesting at run time. Anything unpaired (an extra Loop End, or a Loop Start that never closes) is flagged red on the spot, instead of waiting for Save to report "loop instructions are incorrect"
- The × at the end of each block deletes it; the context menu adds Move to top / Move up / Move down / Move to bottom / Delete / Clear all instructions, plus Select all and Deselect
- While it runs, the block being executed lights up as a whole and its step number turns cyan, with the whole instruction panel locked
Instruction reference
| Group | Instruction | Parameters and notes |
|---|---|---|
| Packet | Send - Send List | pick a send. The Robot waits for it to finish before moving on |
| Send - Packet List | sends whichever packet is selected in the list. ⚠️ It reads the selected row of the Inject-mode packet list and sends nothing in Proxy Mode (the parameter area says exactly that) | |
| Set - System Socket | one of three: Socket of the selected packet / Socket for calling filter / Custom plus a number (which must be > 0, otherwise Insert stays disabled) | |
| Control | Delay | Fixed milliseconds, 100 by default, or Random within a range, 1 to 100 by default |
| Loop Start / Loop End | two separate tiles: Loop Start carries the count (≥ 1), Loop End takes no parameters. They must come in pairs; the program flow draws the nesting from the execution stack and flags the odd one out immediately, and saving or executing validates it again | |
| Switch | Enable or Disable, a type (Send List, Robot List or Filter List), and the entry itself | |
| Keyboard | Key | Press, Down or Up; the input box records the key you actually press |
| Key combination | recorded the same way — press Ctrl+Shift+A and it is captured | |
| Text | a string that is typed out on the keyboard at run time | |
| Mouse | Key | eight in all: left and right, each with click, double-click, down and up |
| Wheel | a Scroll dropdown (Move up / Move down) plus a Distance that defaults to 10 | |
| Move | Move To an absolute X, Y, or Move By an X, Y offset |
It runs on InputSimulator and acts on whatever window is in the foreground. Do not click elsewhere while a Robot is running.
① Key combinations (such as Ctrl + Shift + A) are pressed exactly as written.
② Delays follow real time, and Stop responds immediately.
③ Random delays pick a fresh value from the range every time.
④ A run ends with a separate finished / stopped / error report, and the reason for an error goes to the system log.
A loop count of 0 runs once; a reversed random range (100-1) is put the right way round automatically.
Four ways to start a Robot
- Press Start in the Robot List — a batch run, governed by the list execution mode.
- Press Execute inside Robot Edit, for debugging one robot.
- A filter match: tick "Run on match" on the filter and set the type to Robot List.
- A global hotkey: point the hotkey settings' "Applies to" at the Robot List; hotkeys 1 to 10 fire entries 1 to 10, while the two extra rows, Execute and Stop, act on the whole list. A cyan keyboard icon beside the quick-panel tab marks the list the hotkeys currently act on, so you know which one a hotkey will touch before pressing it.
Check the System Log. A line reading 机器人指令 N 错误! [robot name] ("robot instruction N is invalid") means validation failed — usually an unpaired Loop Start and End, or a send the robot references having been deleted. A Robot that fails validation refuses to start.
A healthy run logs 启动机器人 [name] ("robot started") and then 机器人 [name] 执行完毕 ("finished"), 已停止 ("stopped") or 发生错误: … ("error: …").
The robot and send executors write their log lines through keys that have no entry in the English string table, so they fall back to the Chinese originals whatever the interface language is. Everything else on screen switches normally; only these few executor messages do not.
03 · The WareHouse and auto-store
The WareHouse archives packet samples so you can compare, replay and analyse them later.
The WareHouse list
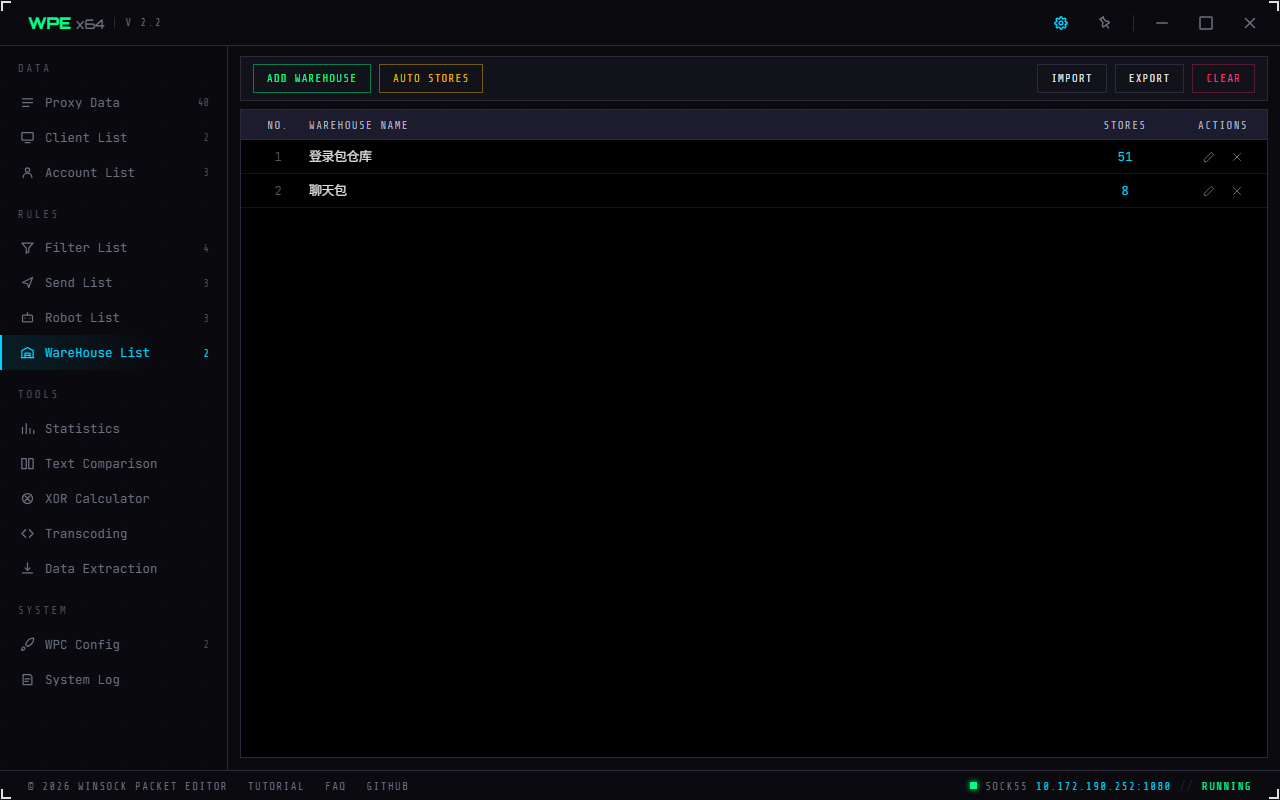
- Toolbar: Add WareHouse · Auto Stores (that screen is covered under Auto Store below); Import / Export / Clear at the right end
- Columns:
No. / WareHouse Name / Stores / Actions - The empty-state line spells out all three ways in: add one, then use "Add to warehouse" on the packet list, or let Auto Stores collect by header
- Double-click a row to open the warehouse editor and see which packets it holds
- ⚠️ Auto store is not one of the 12 entries under "Settings ▾" — it lives on this toolbar, because it is the other way of putting things into a warehouse, which makes it a sibling of "add warehouse"
Toolbar: Add WareHouse Auto Stores (amber); at the right end Import (a .whp), Export and Clear.
WareHouse Edit
Double-click a row to open it. The top line is the WareHouse Name; below it, full width, is the Stores table — No. / Length / Data, with an × at the end of each row. Its toolbar carries Copy hex (acting on the selected rows), Import data, Export all and Clear all; the context menu adds move to top / up / down / bottom, Copy hex, Export selected, Duplicate and Delete, plus Select all and Deselect.
Changes to the stored data (reordering, deleting, importing, clearing) take effect at once and Cancel does not undo them; only the WareHouse Name waits for Save. The grey line at the bottom of the dialog says exactly that.
There is no hex panel on this screen: to read the bytes, use "Copy hex" from the context menu.
Three ways to store a packet
- Right-click in the packet or proxy list →
Add to warehouse ▸ pick one. - From a filter: tick "Run on match", set the type to
WareHouse List, and choose the warehouse. - Auto-store, described below.
Auto Store
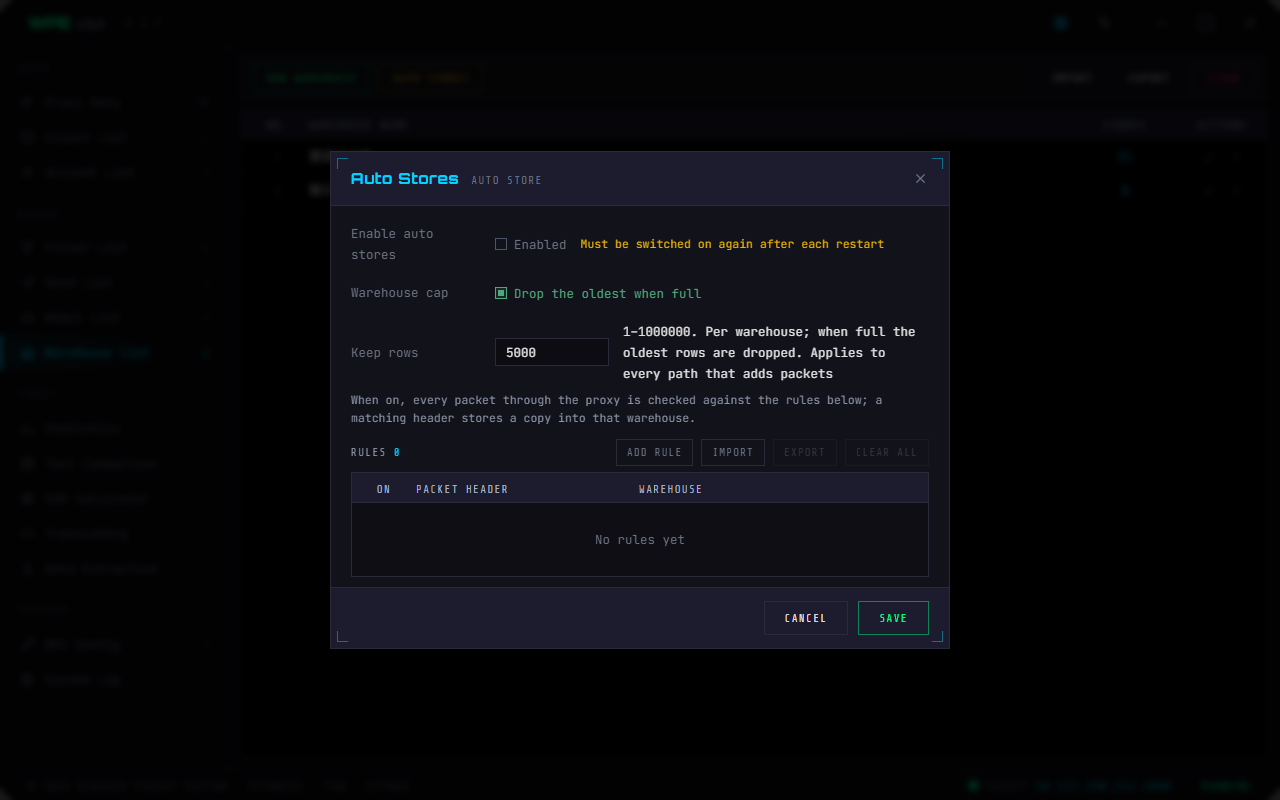
- Enable auto store: the master switch. The amber line beside it reads must be switched on again after each restart — it is not persisted, because leaving it on means every passing packet is checked against every rule, so defaulting to off is deliberate
- Warehouse cap: "drop the oldest when full" plus a row limit (1–1000000, default 5000). ⚠️ It governs every path that adds packets, not just auto-store: right-click "Add to warehouse", a filter's "Run on match → WareHouse List", and "Import data" in the warehouse editor are all subject to it. The semantics are circular — when full the oldest rows go, the warehouse is never emptied. ⚠️ Loading from the database does not trim, so tens of thousands of rows already in an old database are not deleted the moment you upgrade; the cap only bites when you actually add something. This setting is persisted, unlike the master switch
- Rule table:
On / Packet header / WareHouse, with the rule count and Add rule / Import / Export / Clear all on its toolbar. A rule is one hex header (e.g.16 03 01) plus a target warehouse; it matches when the packet starts with exactly those bytes - While the master switch is off the rule table is dimmed but not locked: you get to prepare the rules first and enable later (the same rule as the firewall lists)
- Saving checks that the header is valid hex bytes and does not repeat an existing rule
- Save in this dialog only covers the master switch and the cap; adding, editing, enabling and reordering rules have already been written to the database by their own actions
Each captured packet is checked against the enabled rules, and a matching header stores a copy in that warehouse — in Proxy Mode and Inject Mode alike.
The check happens before the leach test: packets kept out of the list by leach settings can still be picked up by auto-store.
Import and export
| Format | Contents |
|---|---|
.whp | the warehouse list |
.whs | stored items |
.pas | auto-store rules |
04 · Combinations worth stealing
A filter matches a notification from the server with the action set to Display → Run on match → a Send List that replies with an acknowledgement. To the target it looks like its own reply.
A filter matches the combat-start packet → Run on match → a Robot that does Set - System Socket = "Socket for calling filter", then Loop Start 5, Send - Send List, Delay, Loop End.
An auto-store rule on head 01 00 0A collects every login packet into one warehouse, which you later export as .whs for offline analysis.
The Robot's last instruction is Switch → Disable → Filter List → that filter, so the filter that started it fires exactly once.